As the museum and archives prepare to move the collections to the new Collections and Research Building in Colwood, BC, more items are arriving in the Conservation labs for treatment to ensure they are stable enough to endure the journey. This past year, one portrait made its way to the paper conservation lab in need of pre-move stabilization. In this case, a large hole and obvious moisture damage were cause for concern.
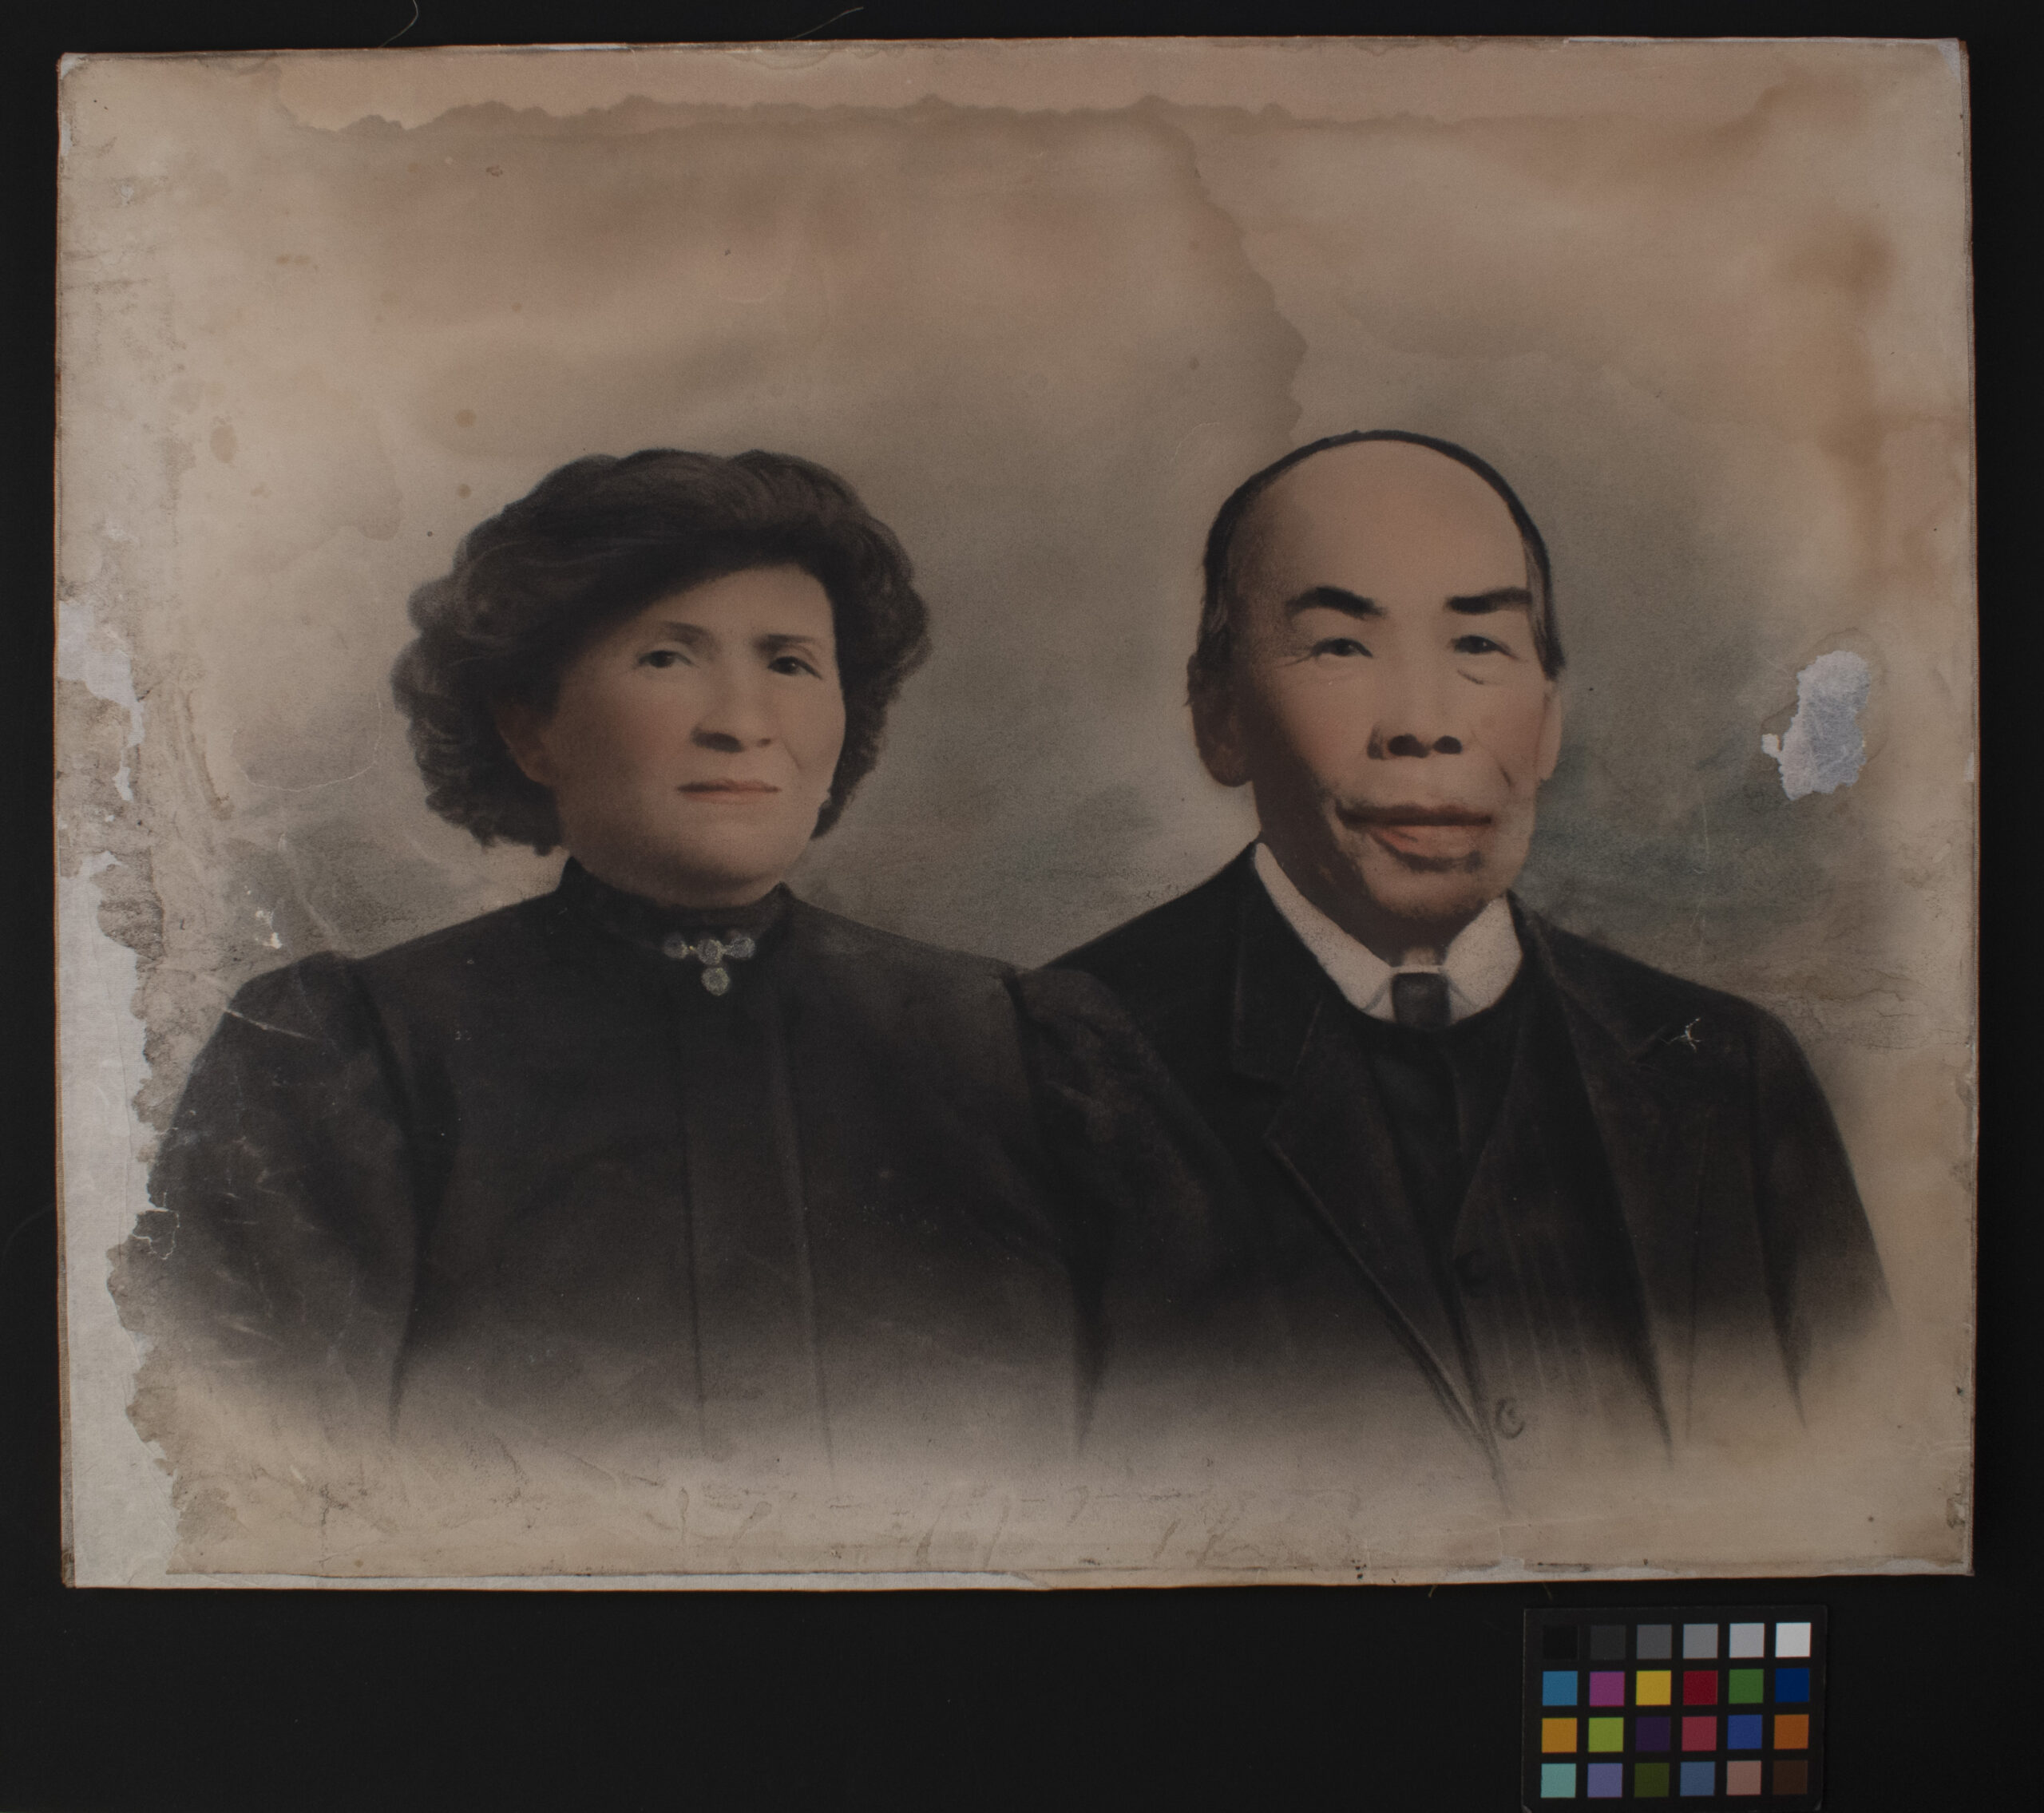
This portrait of Mr. and Mrs. Lum (BC Archives, J-01350) is one in a collection of four (BC Archives, MS-3411). Mr. Chin Lum Kee, also known as Ah Lum, was born in Guangdong (previously known as Canton), China in 1835. He arrived in the new colony of British Columbia during the Fraser River Gold Rush. While in Sto:lo territory, he met his wife, Squeetlewood, also known as Lucy, who was born in 1854.
Figure 1. Recto of [Mr. & Mrs. Lum] (BC Archives, J-01350) before treatment
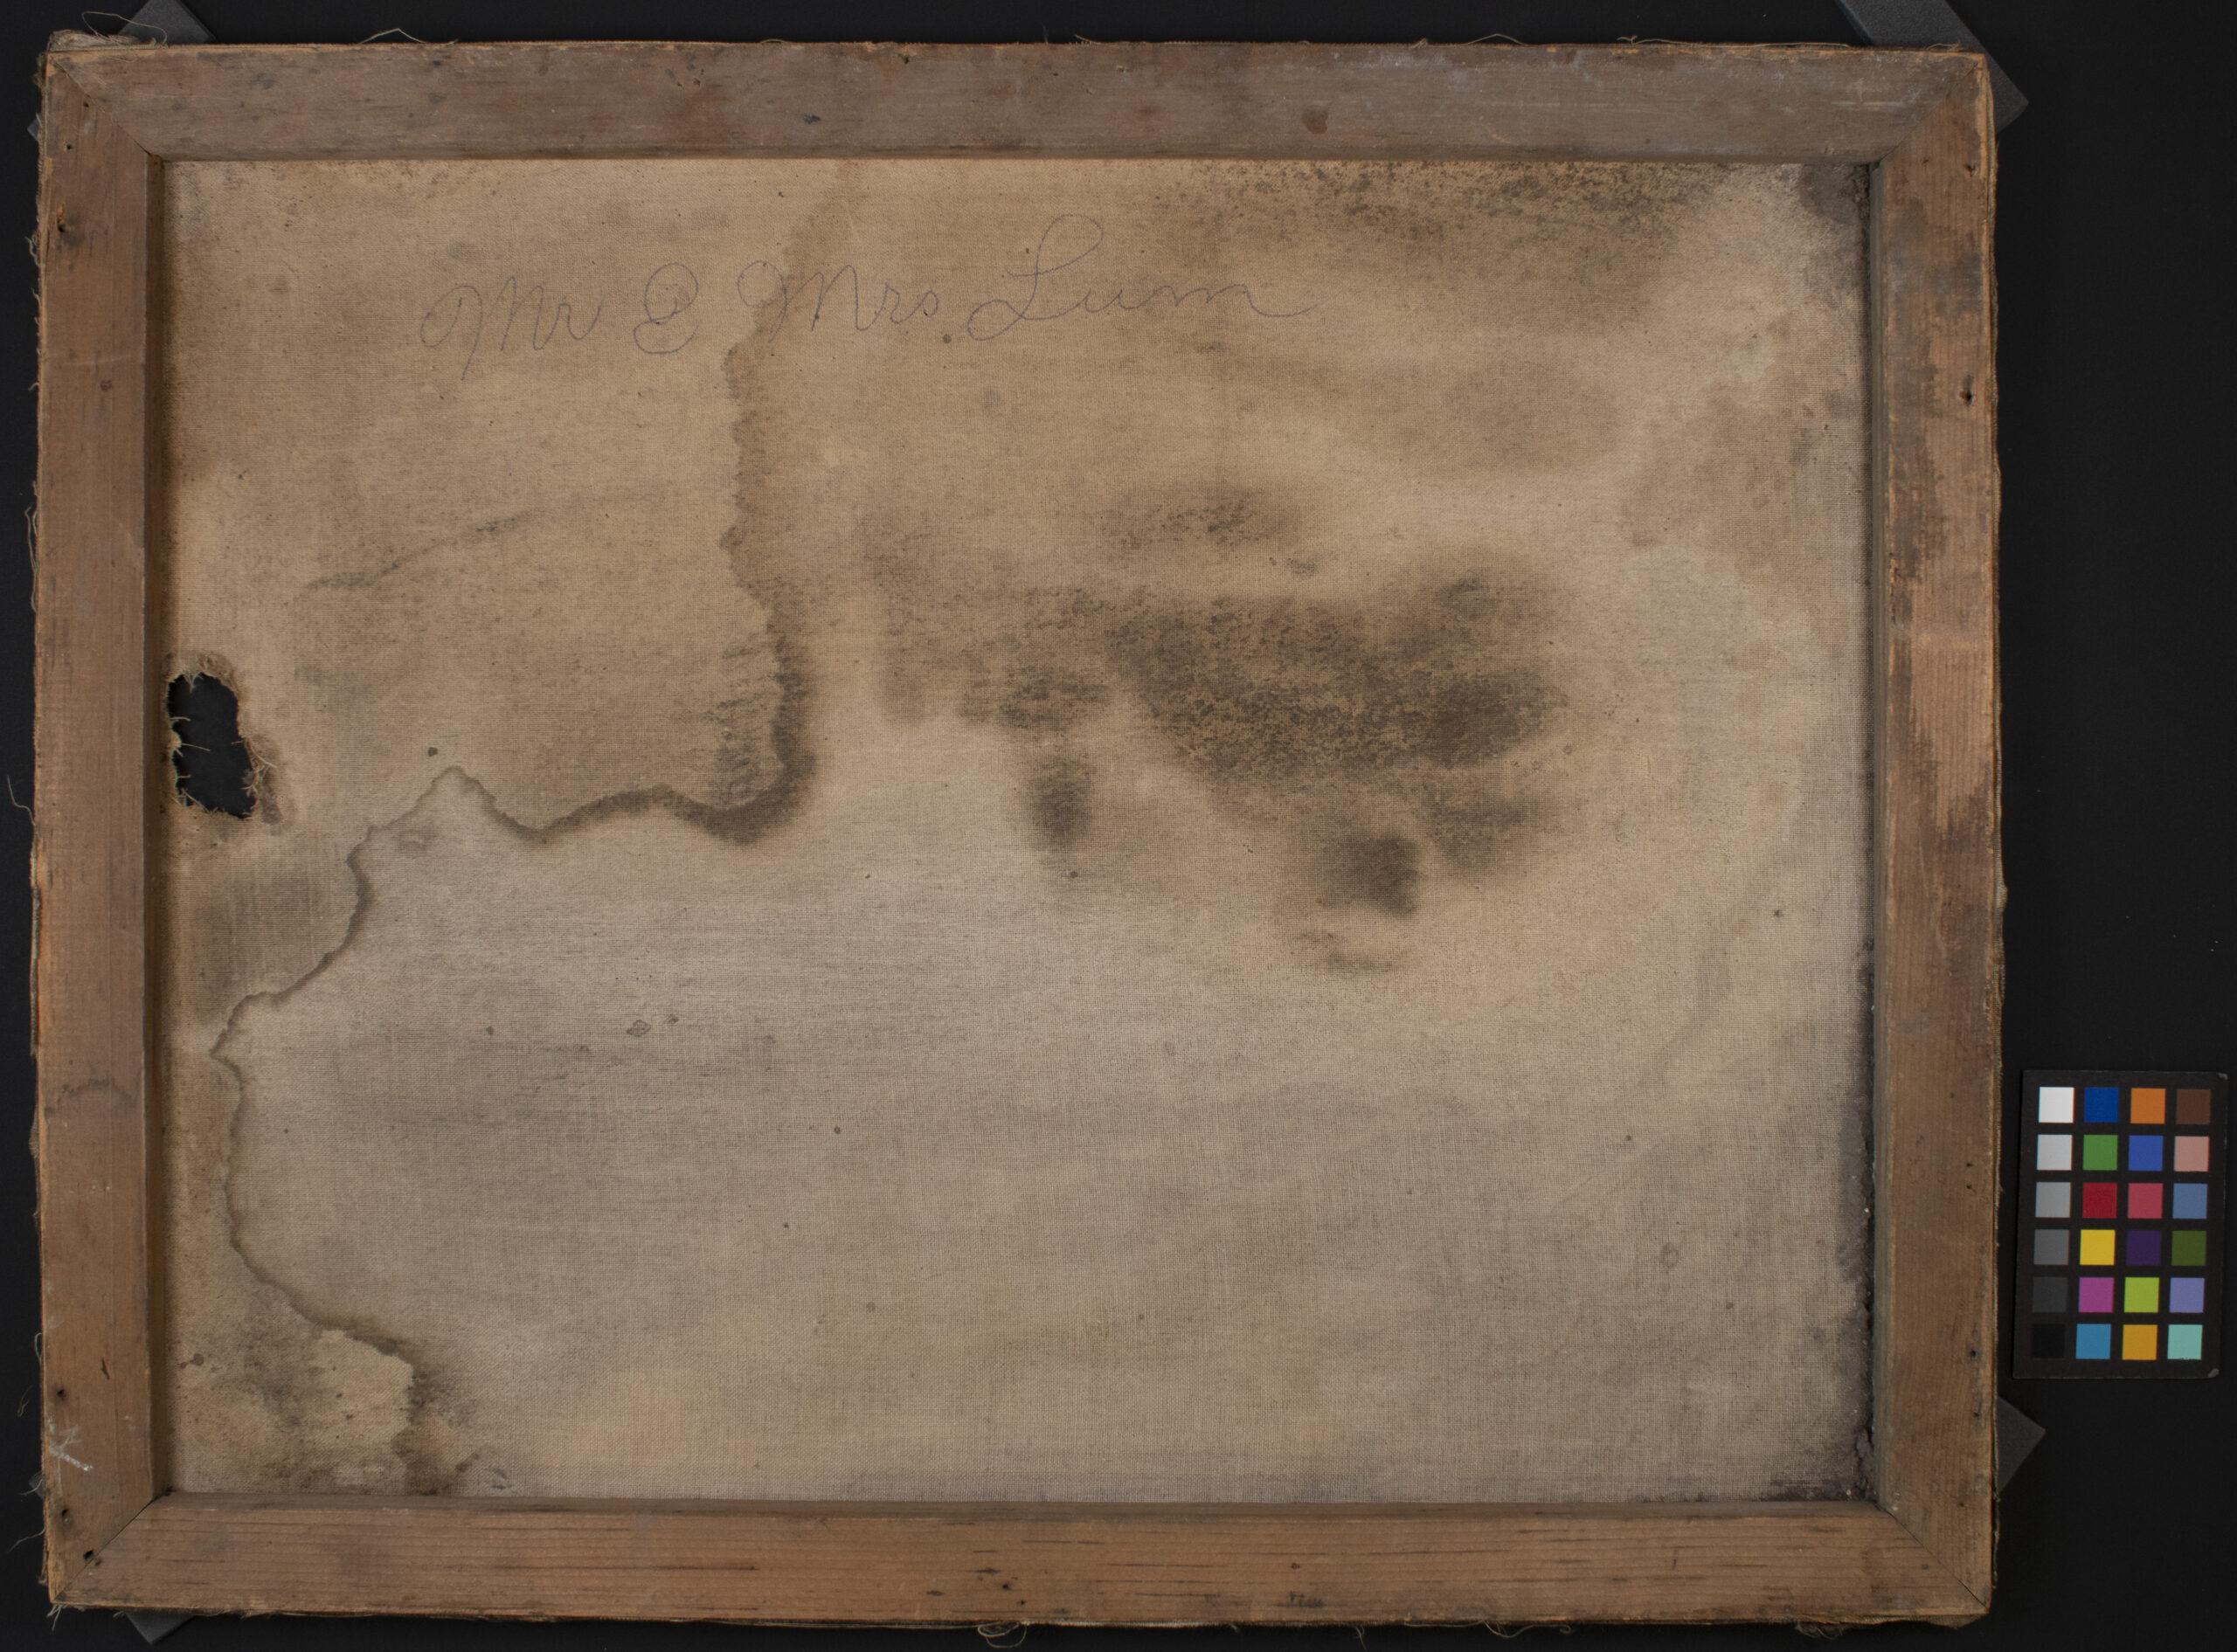
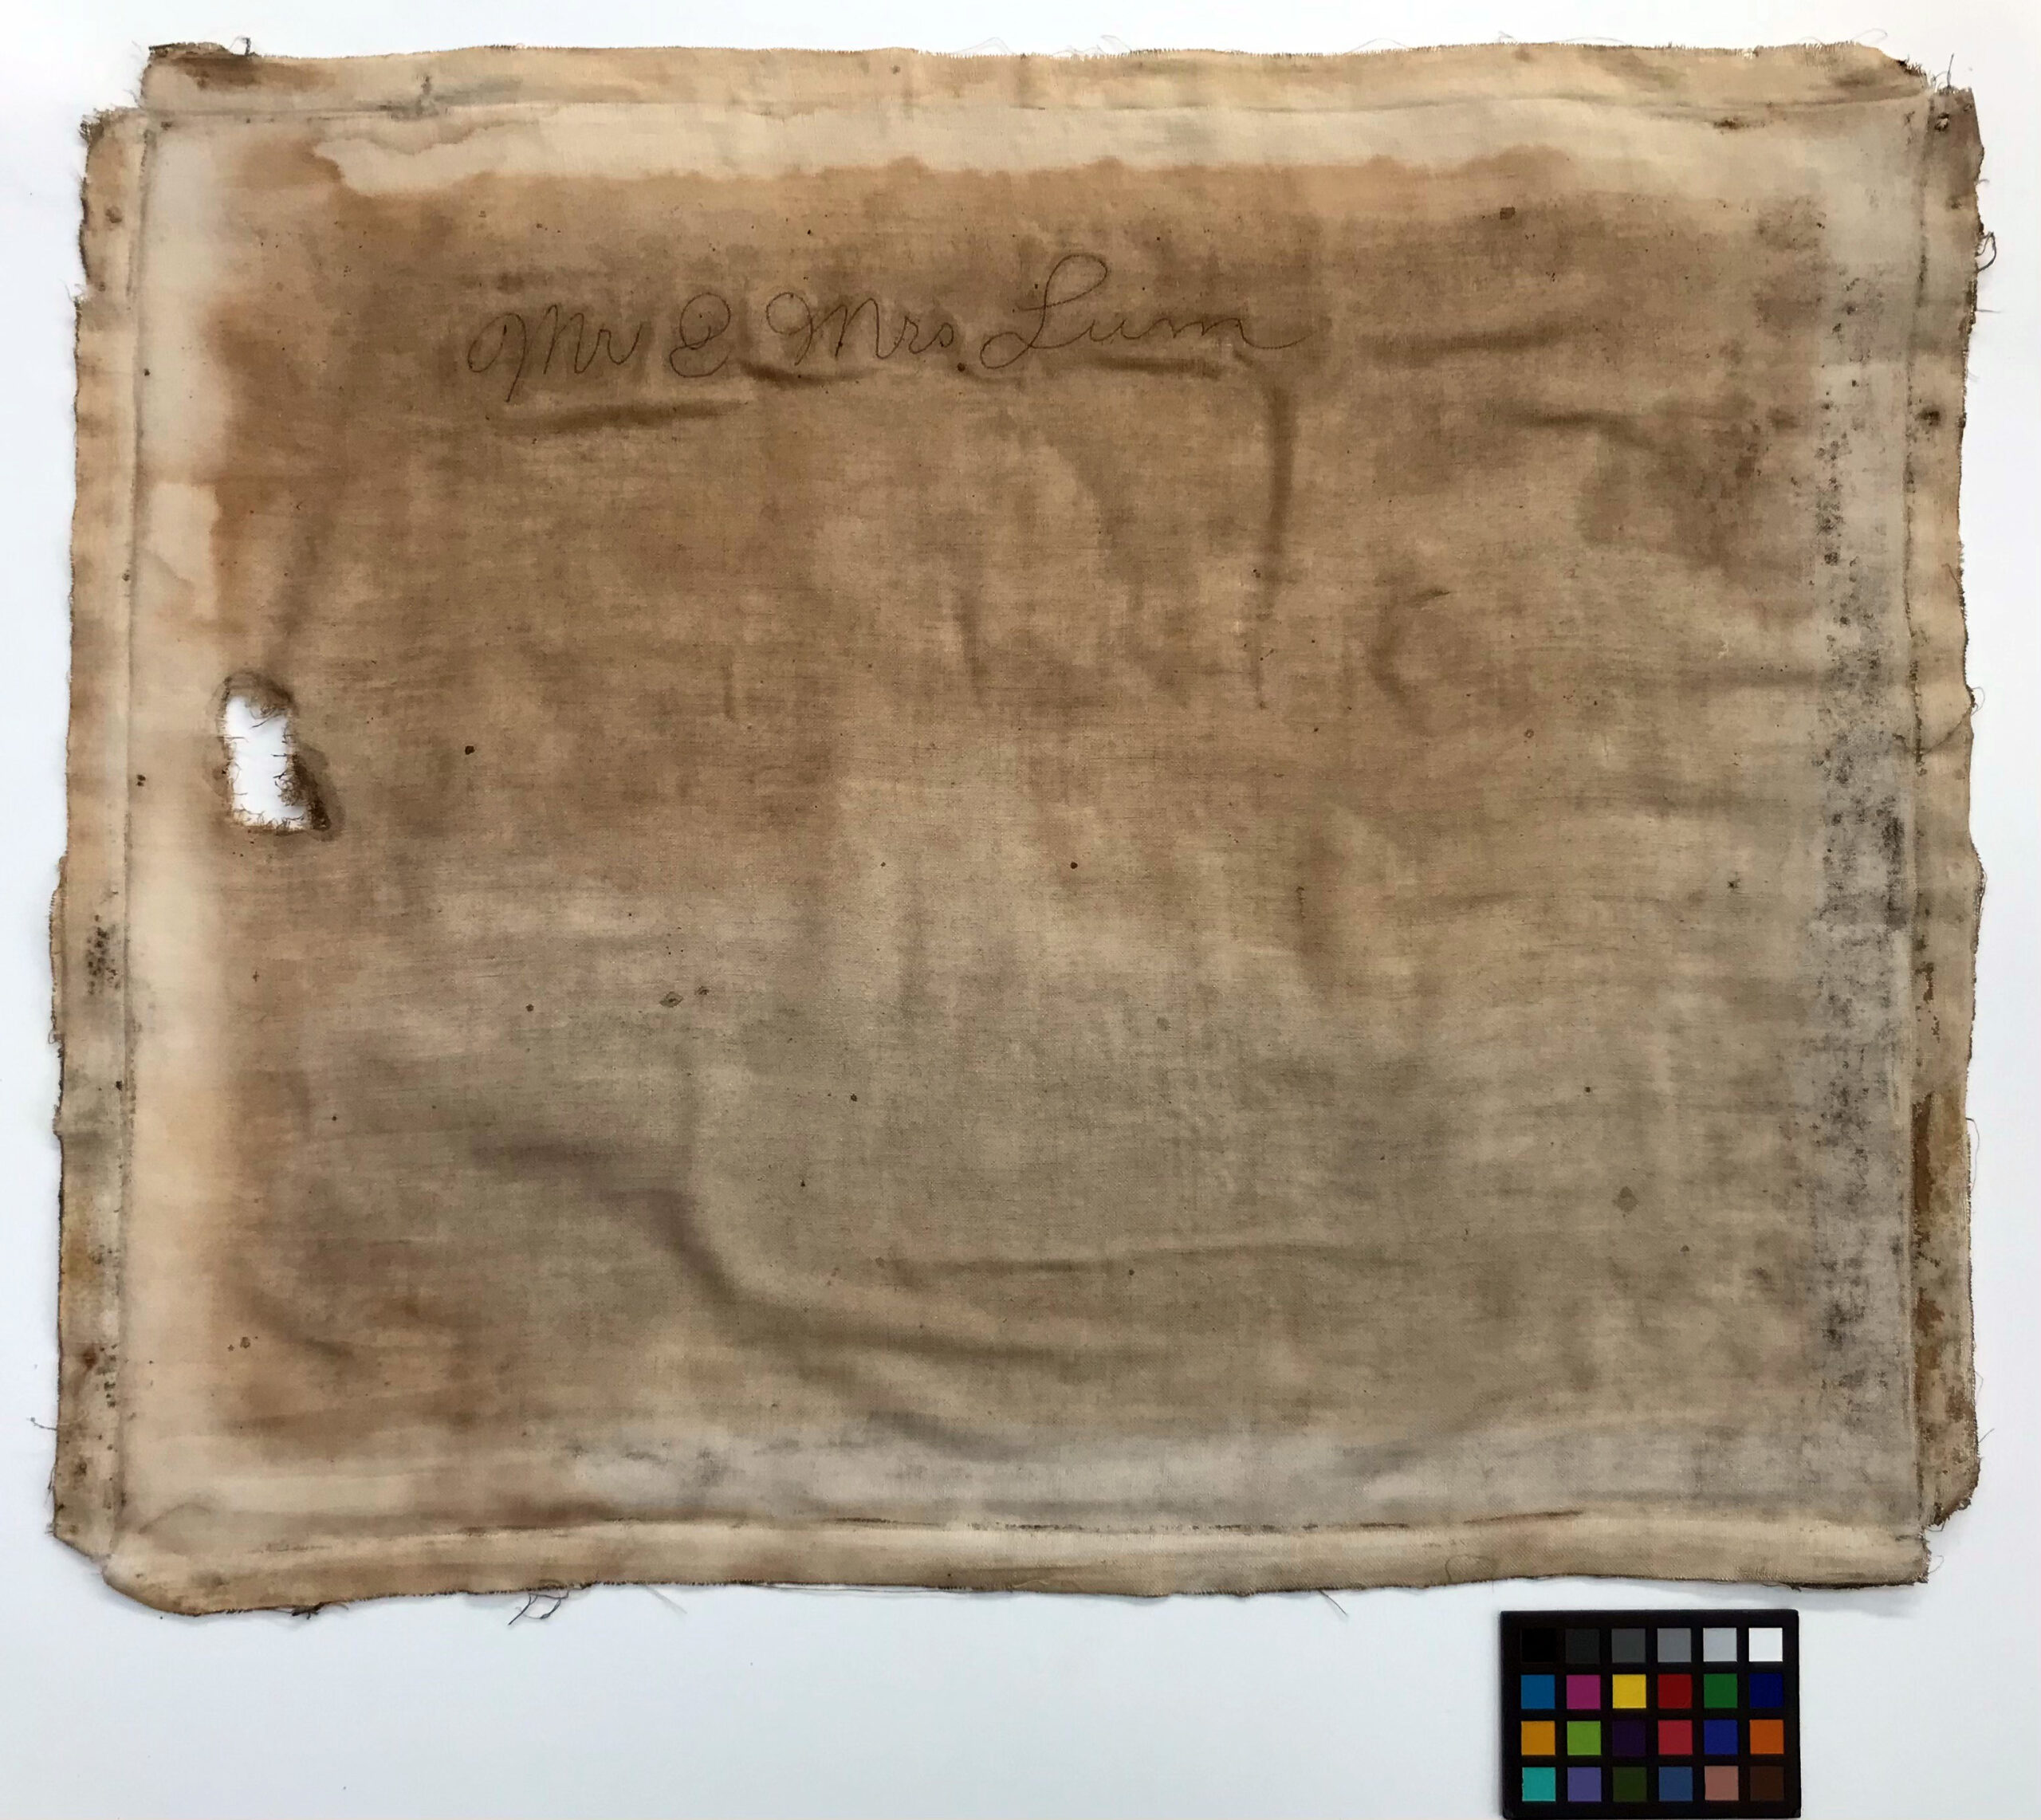
Figure 2. Verso of [Mr. & Mrs. Lum] (BC Archives, J-01350) before treatment
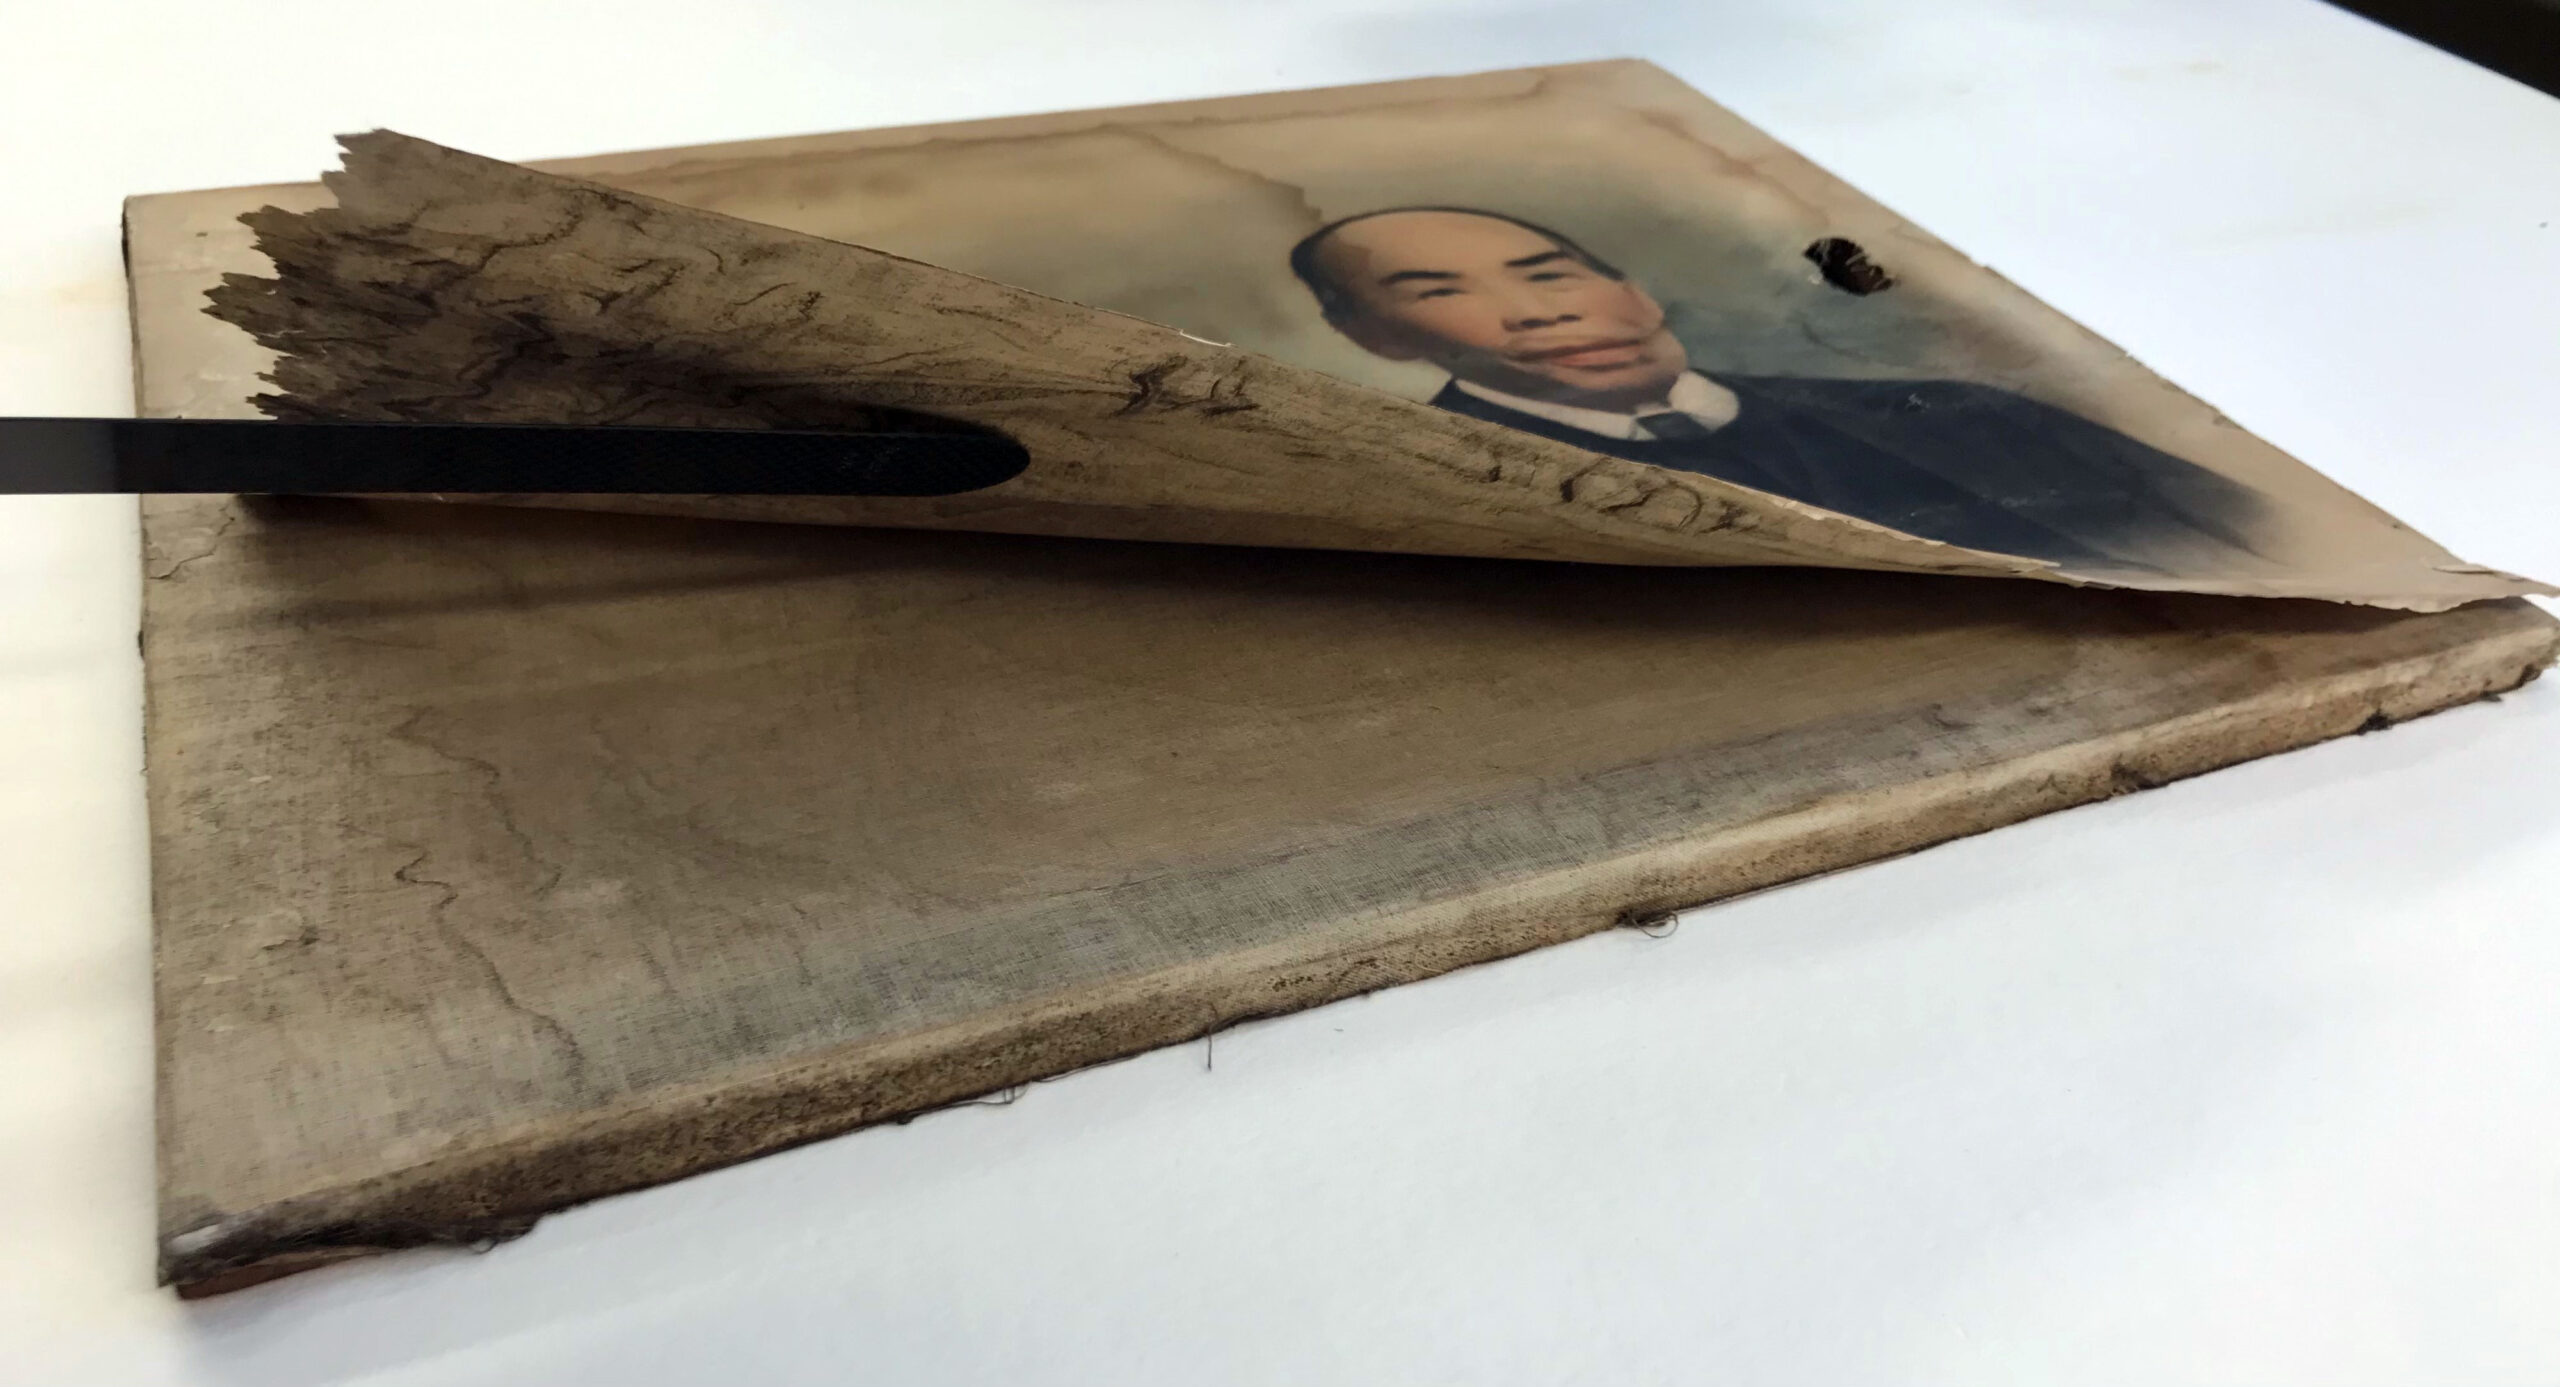
The portrait is a solar enlargement, based on a salted paper print (more information on this type of photography below). Black and white crayon have been used to work up the figures’ clothing and watercolour has been used to add soft colouring to the faces and background. In keeping with photographic portraiture of the time, the figures are captured from the chest upward with their bodies fading softly into the bottom of the picture plane. This solar enlargement on paper has been mounted to canvas and stretched over a wooden strainer.
A Brief History of Solar Enlargements
Solar enlargements, also known as crayon portraits, were produced between the 1860s and the early 20th century. During the 19th century, photographic prints were made by placing photo-sensitised paper in direct contact with a photographic negative. Making a photographic print larger than the original negative began to be possible in the late 1850s with the invention of “solar cameras”. These enlarged prints required lengthy exposures and were faint and soft-focused. Furthermore, any imperfections in the photographic negative would be amplified in the enlargement.
As a result, these faint photographs were used as a sort of under-drawing upon which charcoal and coloured paints and crayons were used to retouch and enhance the image. It was common for artists to be employed alongside photographers for this purpose.
The most popular process for these enlarged photographic “under-drawings” was the salted paper print, however albumen prints could be used as well. Bromide enlarging paper was introduced in the 1880s which employed a gelatin emulsion layer available in many different surface textures. For more information on historical photographic processes, visit the Image Permanence Institute’s Graphic Atlas.
Condition Issues
The portrait of Mr. and Mrs. Lum came to the conservation lab because it was not in a condition where it could be safely handled. There was a large hole in both the paper photograph and the canvas behind it. The paper had been worn away along the left edge, resulting in a loss of some of the image. This is likely, at least in part, the result of some previous moisture damage. There were also tideline stains across the image from previous moisture damage. The adhesive holding the paper photograph to the canvas was disintegrating (or previously dissolved?) which meant most of the photograph was not actually attached to the stretched canvas support and was therefore more vulnerable to creases, rips and tears. Finally, the whole structure was heavily soiled with dirt, dust and debris.
Figure 3. Bottom edge of [Mr. & Mrs. Lum], before treatment. Photograph lifted to show underside of primary support (paper) and the secondary support (canvas).
Treatment
Treating a composite object is always difficult. Since this portrait was so heavily soiled and already stained by moisture damage, an aqueous wash (water bath) was deemed necessary. The decision was made to disassemble the object, which meant removing the partially attached photograph (or “primary support”) from the stretched canvas and then removing the canvas from the strainer. Each piece was then cleaned separately and reassembled once dry.
Cleaning the Primary Support
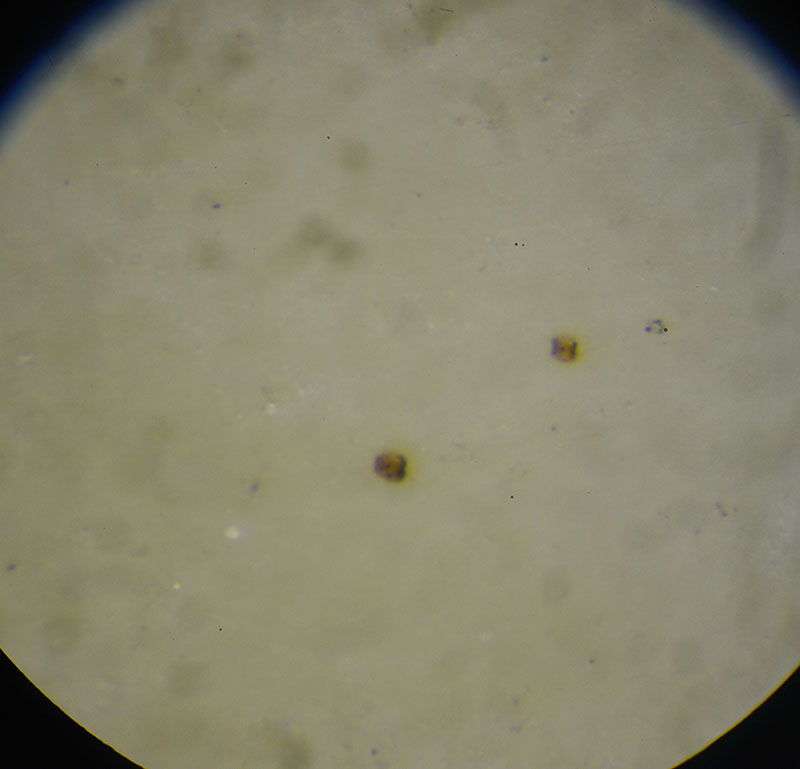
To be sure none of the media would be affected by washing, solubility testing of all the different media types as well as the staining was carried out under the microscope. The media was already thought to be quite stable—after all, it had survived moisture damage in the past—and the solubility tests proved this to be the case. The tidelines had mixed results with some appearing quite soluble and others less so. These results were enough to suggest that the primary support would benefit from a wash: the media would not be affected and the stains would likely disappear or at the very least, be reduced. Washing out these stains and other products created as a result of deterioration in the paper would also raise the pH, making the paper more chemically stable.
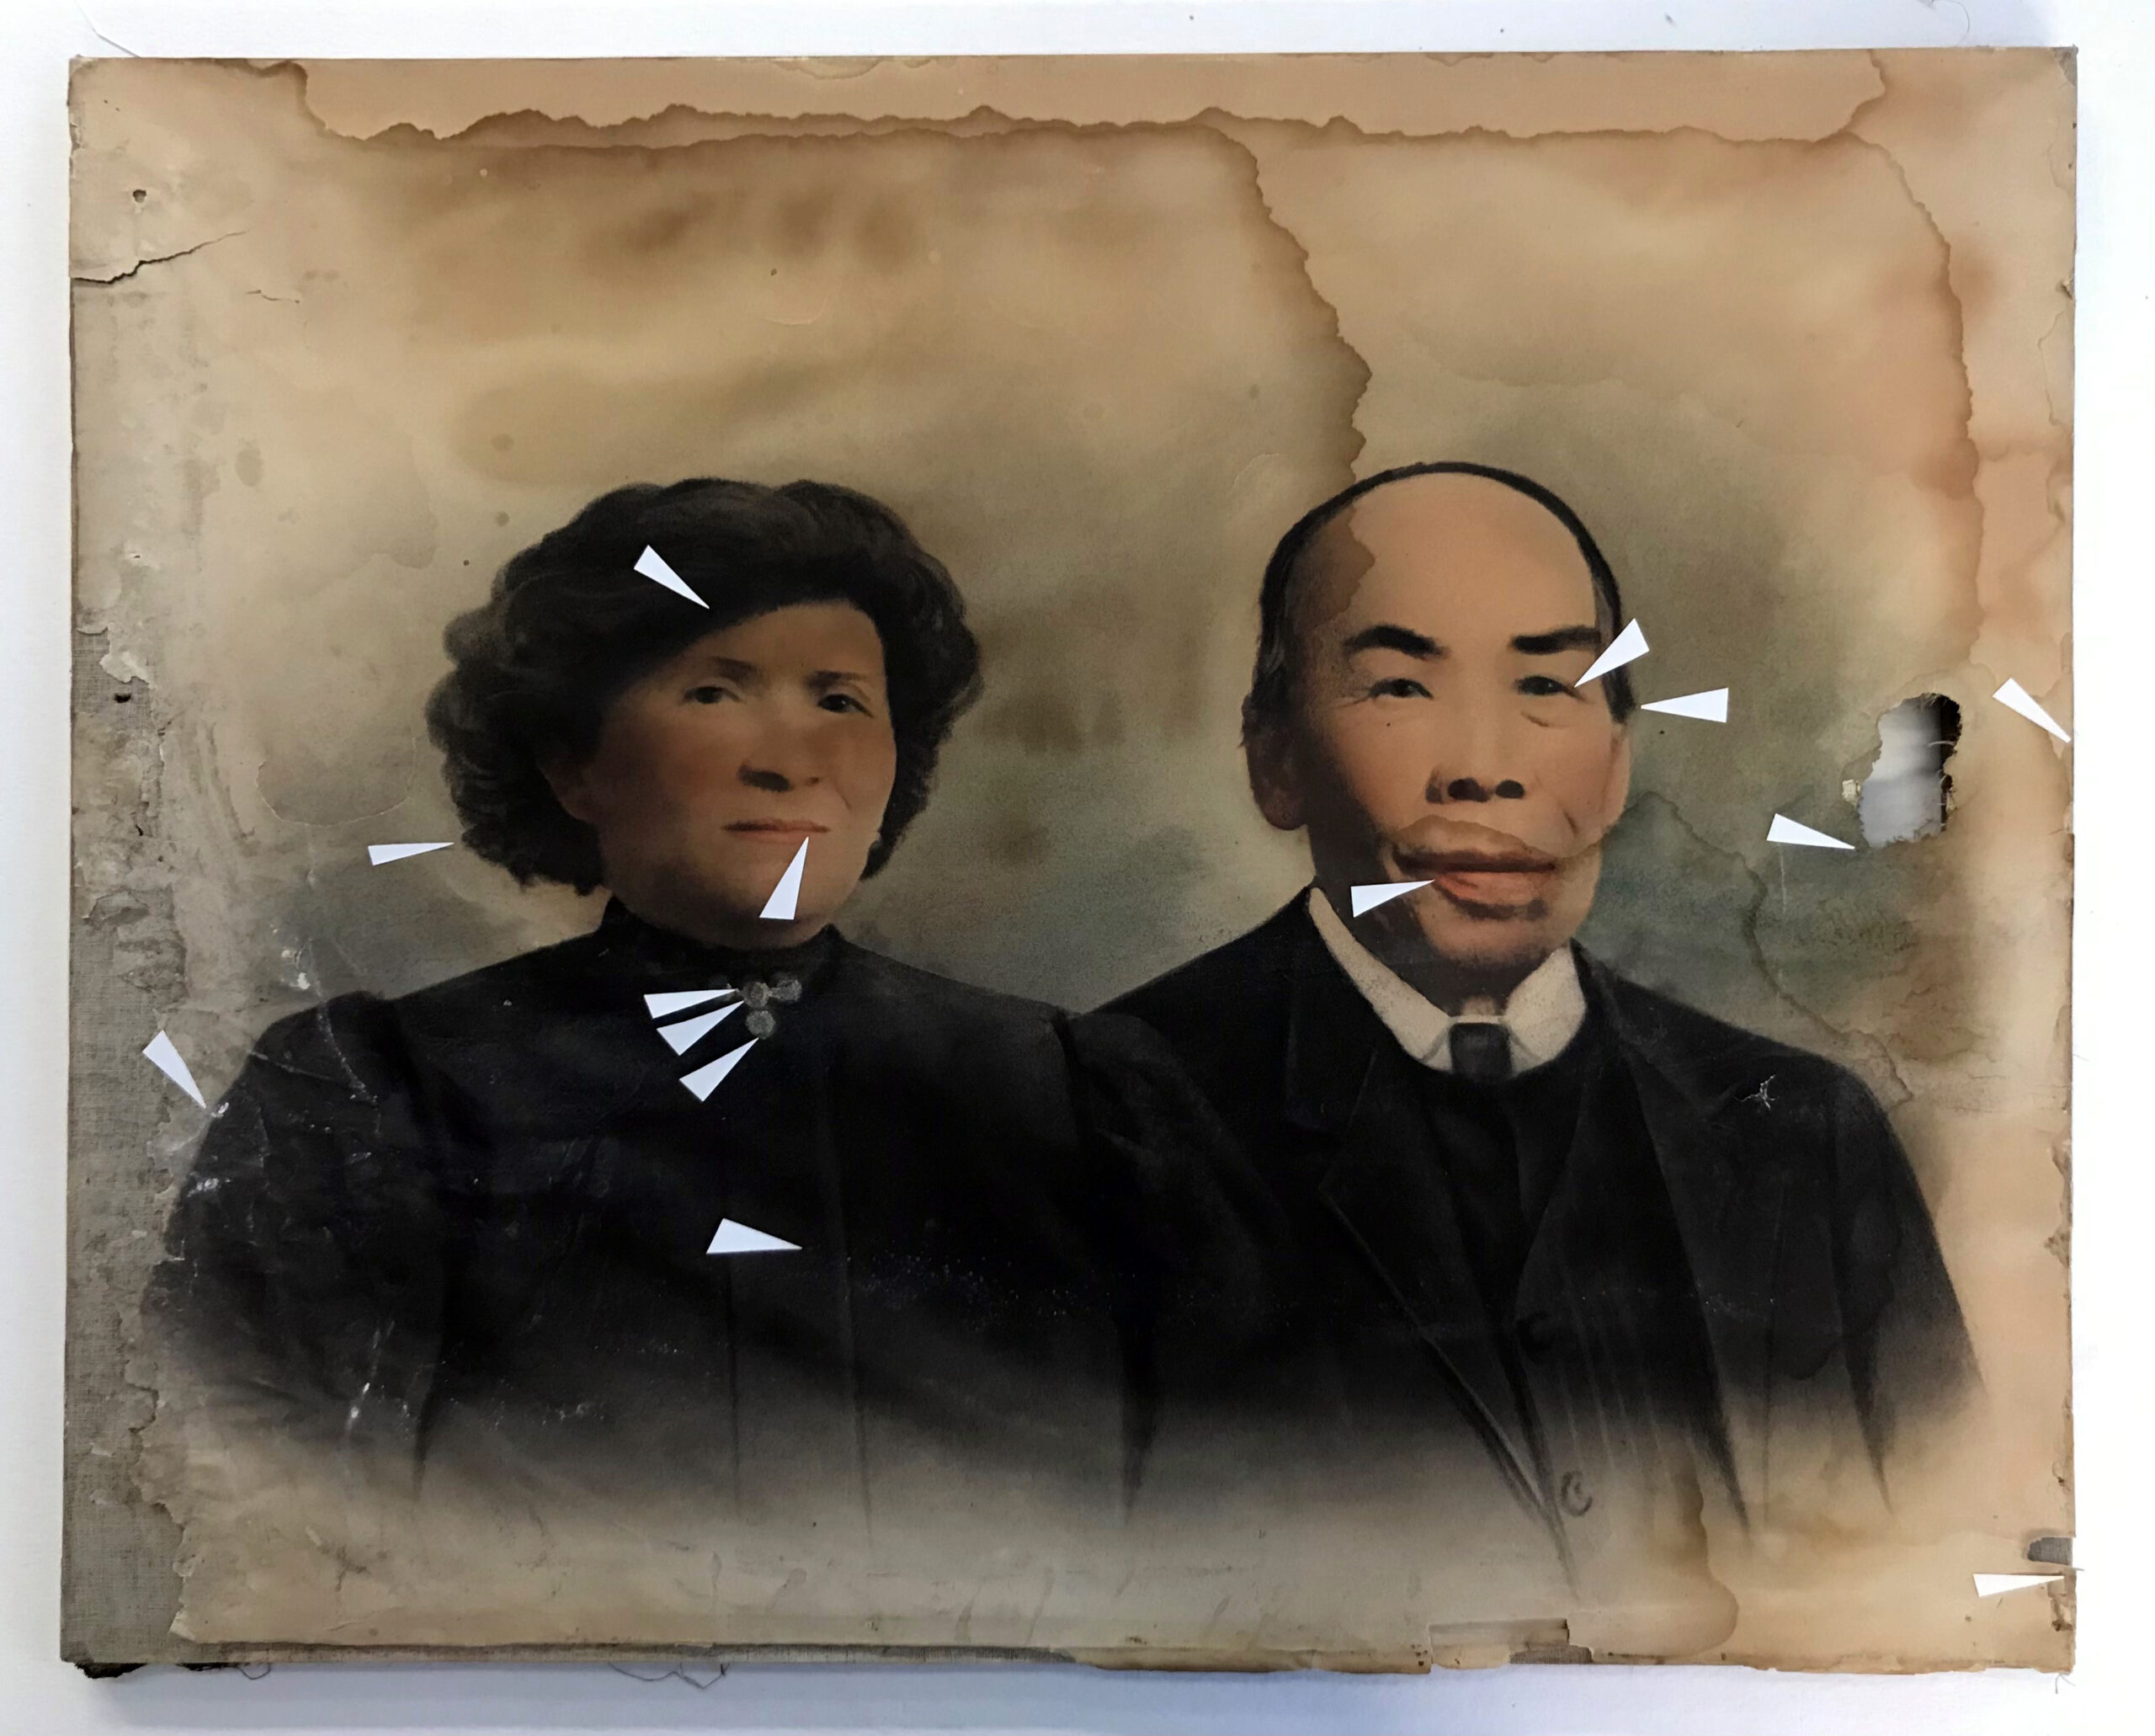
Figure 4. Recto of [Mr. & Mrs. Lum], before treatment. Paper triangles point to areas where solubility testing was carried out under the microscope.
The primary support was dusted lightly with a brush to remove loose dirt and debris from the surface. The paper was then lifted from the canvas to separate it fully. Similar surface cleaning was carried out on the backside of the paper once it was detached.
Then, the solar enlargement was washed in an aqueous bath. There were some small fragments that had come detached from the left side of the photograph. These fragments were also washed but using a different, more delicate method. These fragments were gently placed on wet Tekwipe®, a non-woven fabric made from cellulose and polyester. This fabric has capillaries that draw clean water from one basin through the fabric, wetting out the paper resting on its surface and removing dirt and other products of deterioration in the paper and then move the dirty water along the rest of the fabric to the empty basin on the other side.
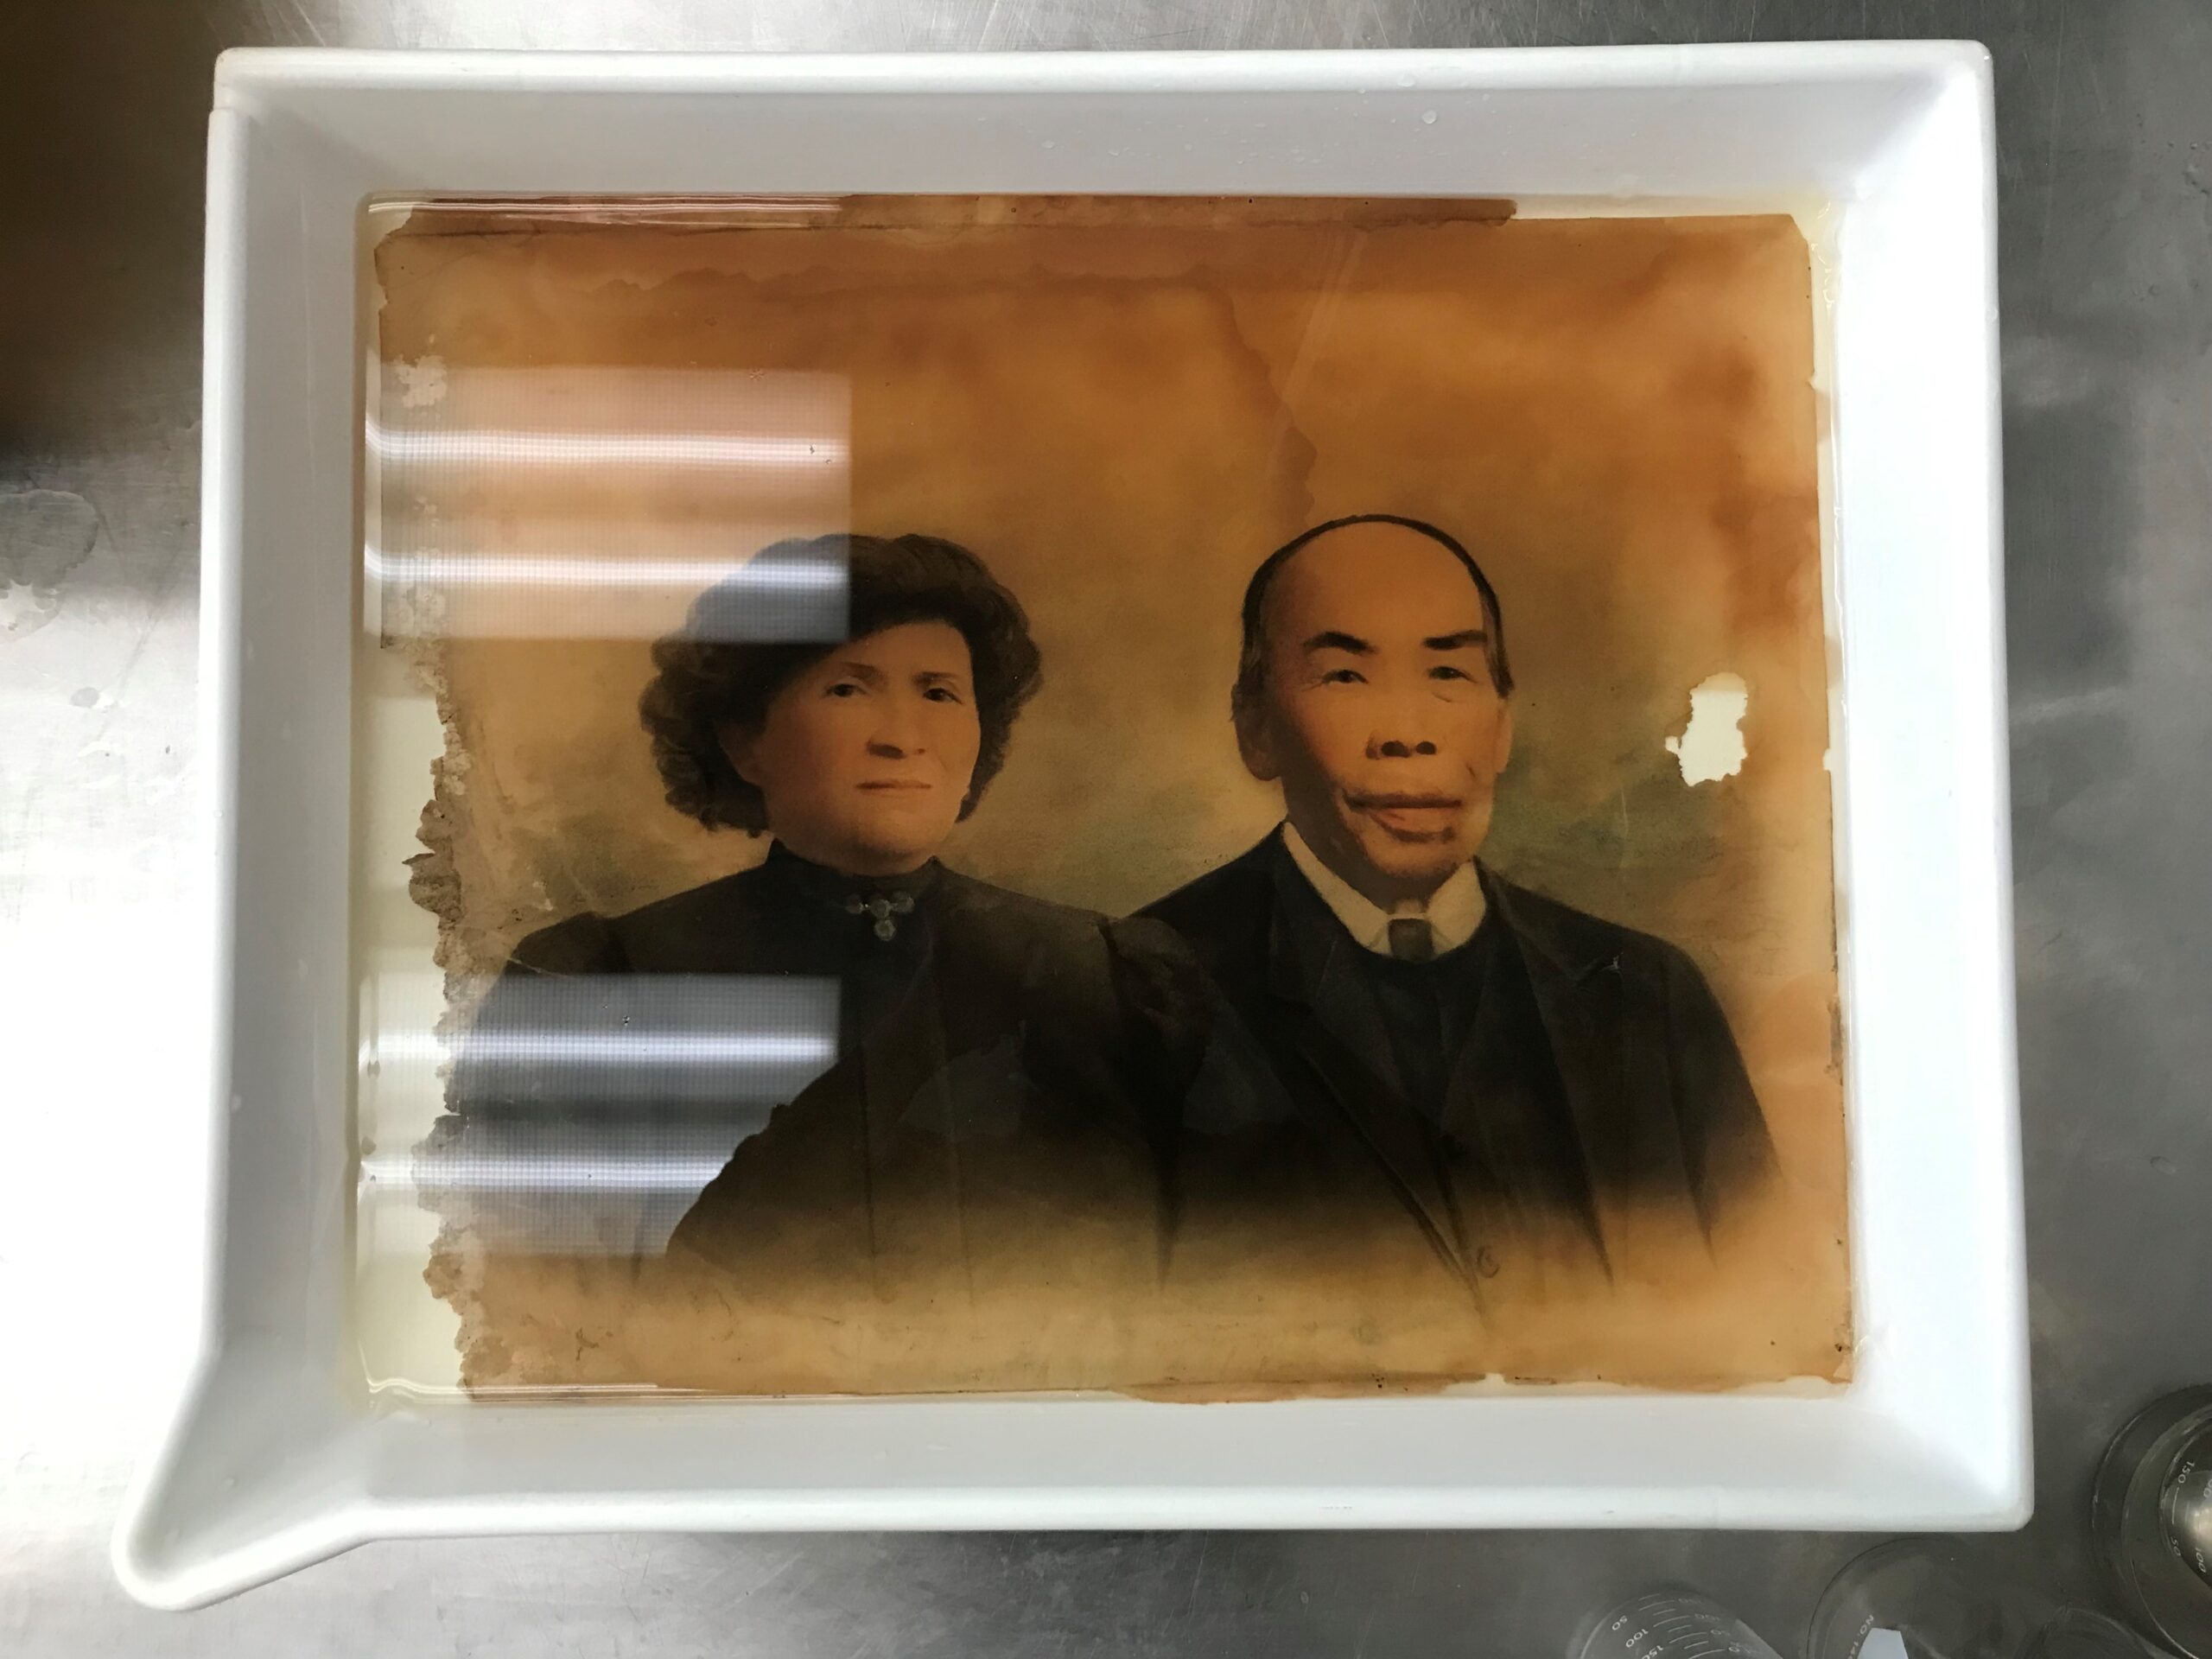
Figure 5. Primary support in an aqueous bath.
Figure 6. Primary support being removed from aqueous bath. Note the colour of the wash water has turned yellow with dirt and the water-soluble products that are formed as paper deteriorates.
Figure 7. Small fragments from the left side of the primary support being washed on Tekwipe® using capillary action.
Once washed, all pieces for the primary support were placed under weight to dry flat. After a few days of drying, the photograph was humidified and a thin piece of Japanese tissue paper was applied to the back. This lining provides a consistent support layer and prevents any further losses or tears around the areas that have already suffered losses.
Figure 8. Recto of solar enlargement after aqueous wash and lining with Japanese tissue. Note that some tidelines remain but they are reduced. The staining across Mrs. Lum’s face has been washed away.
Cleaning the Canvas
The canvas was gently removed from the wooden strainer and vacuumed on very low suction to remove loose clumps of dust and dirt that were deposited on the surface, particularly along the perimeter where the strainer had been.
The canvas was also heavily soiled and need a wash, however there is an inscription in blue ink on the back of the canvas that was discovered to be water-soluble during the solubility testing mentioned previously. To protect that ink from being solubilized during the wash, cyclododecane was applied as a temporary seal. Cyclododecane is a waxy substance that becomes liquid when warmed. It was applied over the ink as a warm liquid and solidified in place upon returning to room temperature. One of the unique properties of this wax is that it sublimes (passes directly from a solid state to a gas state) at room temperature over relatively short periods of time.
With the ink inscription temporarily sealed with cyclododecane, the canvas was washed with the help of textiles conservator Colleen Wilson. After the wash, it was allowed to dry and the cyclododecane was allowed to sublime, leaving the ink behind, unaltered.
Figure 9. Paper conservator, Lauren Buttle, applying cyclododecane to canvas to temporarily seal the water-soluble inscription in preparation for an aqueous wash.
Figure 10. Verso of canvas after being removed from strainer, with cyclododecane applied to inscription, before aqueous wash.
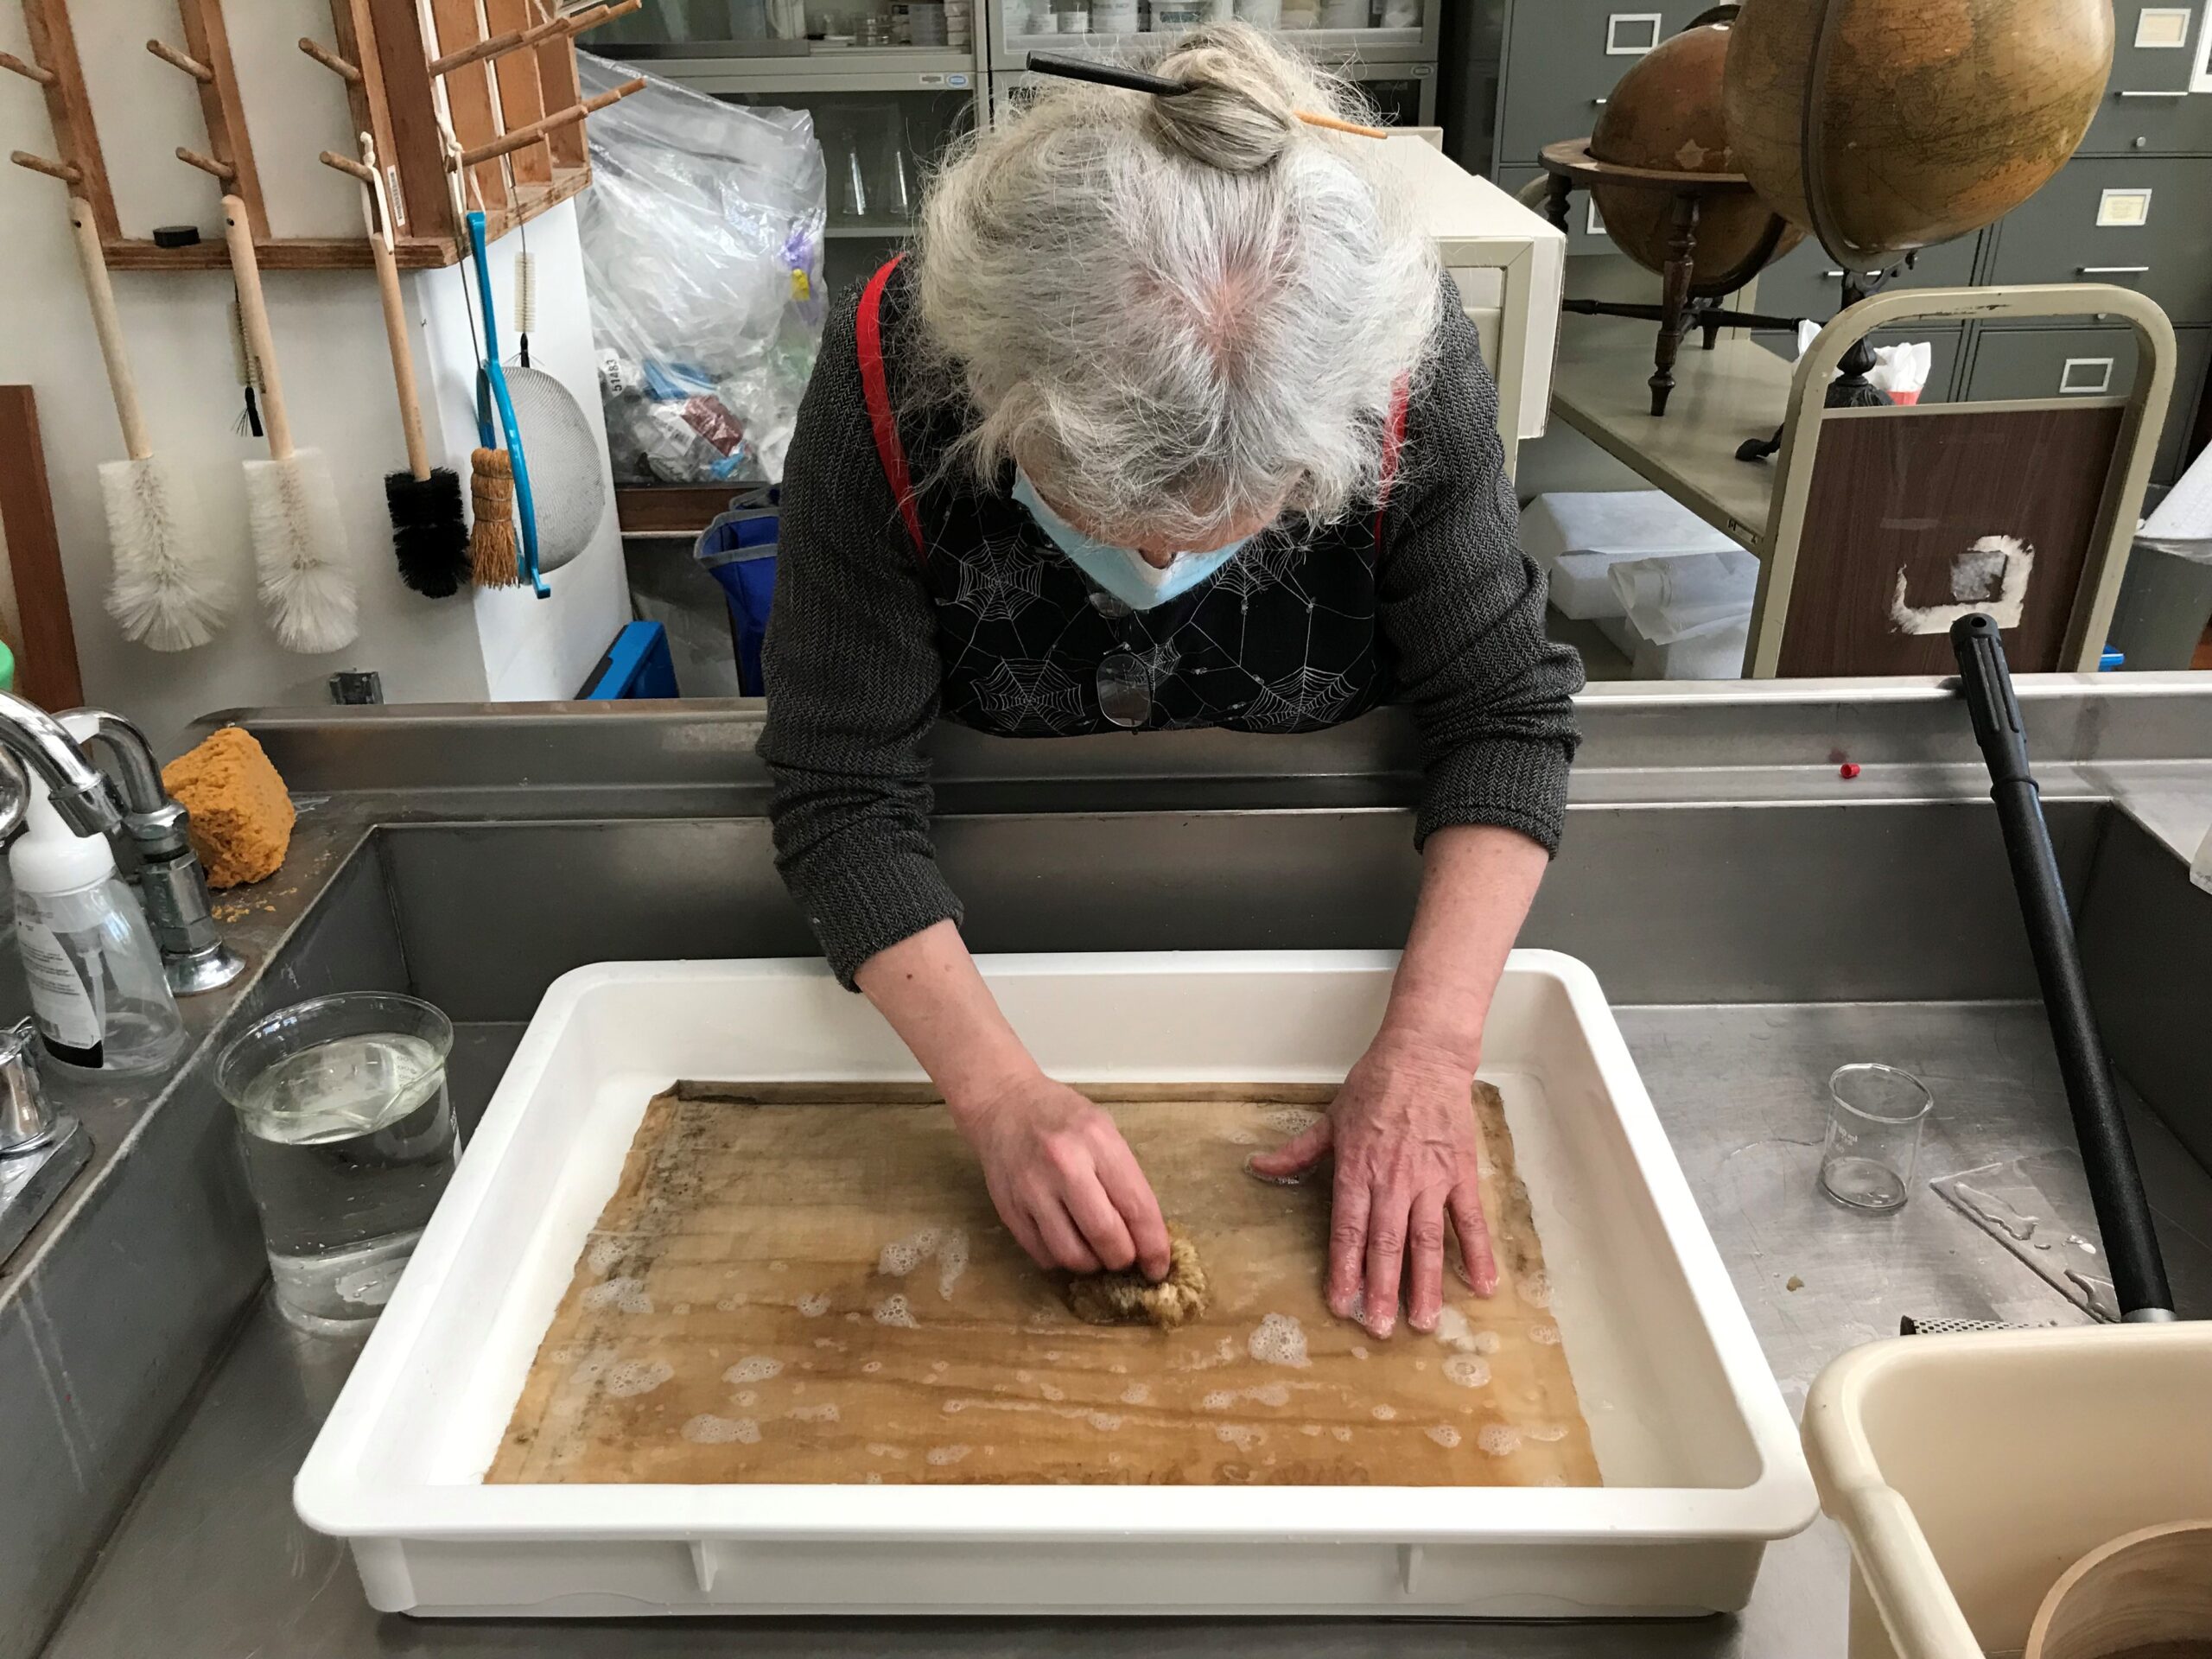
Figure 11. Textiles conservator, Colleen Wilson, blotting canvas with a sponge during first bath with detergents.
Figure 12. Verso of canvas 1.5 weeks after aqueous wash and after cyclododecane has fully disappeared.
Cleaning the Strainer
The wooden strainer was also vacuumed to remove surface dirt and dust. Some residual adhesive left on the outside edges of the strainer were re-moistened and removed with a Teflon spatula.
Reassembly
With all the individual pieces cleaned, the lined photograph was reattached to the canvas and then the canvas was re-stretched and adhered to the outside edges of the strainer. The Japanese tissue lining of the primary support provides support over areas of loss.
Figure 13. Recto of [Mr. & Mrs. Lum] (BC Archives, J-01350) after treatment
Figure 14. Verso of [Mr. & Mrs. Lum] (BC Archives, J-01350) after treatment
Re-Housing the Lum Portraits
While the main reason for diverting the Lum portraits to the conservation lab was to stabilize them for the move, there was also the issue of how to safely transport them. When they arrived in the lab, they were altogether in a paper folder, a housing system that was not offering sufficient protection in the context of a collection move.
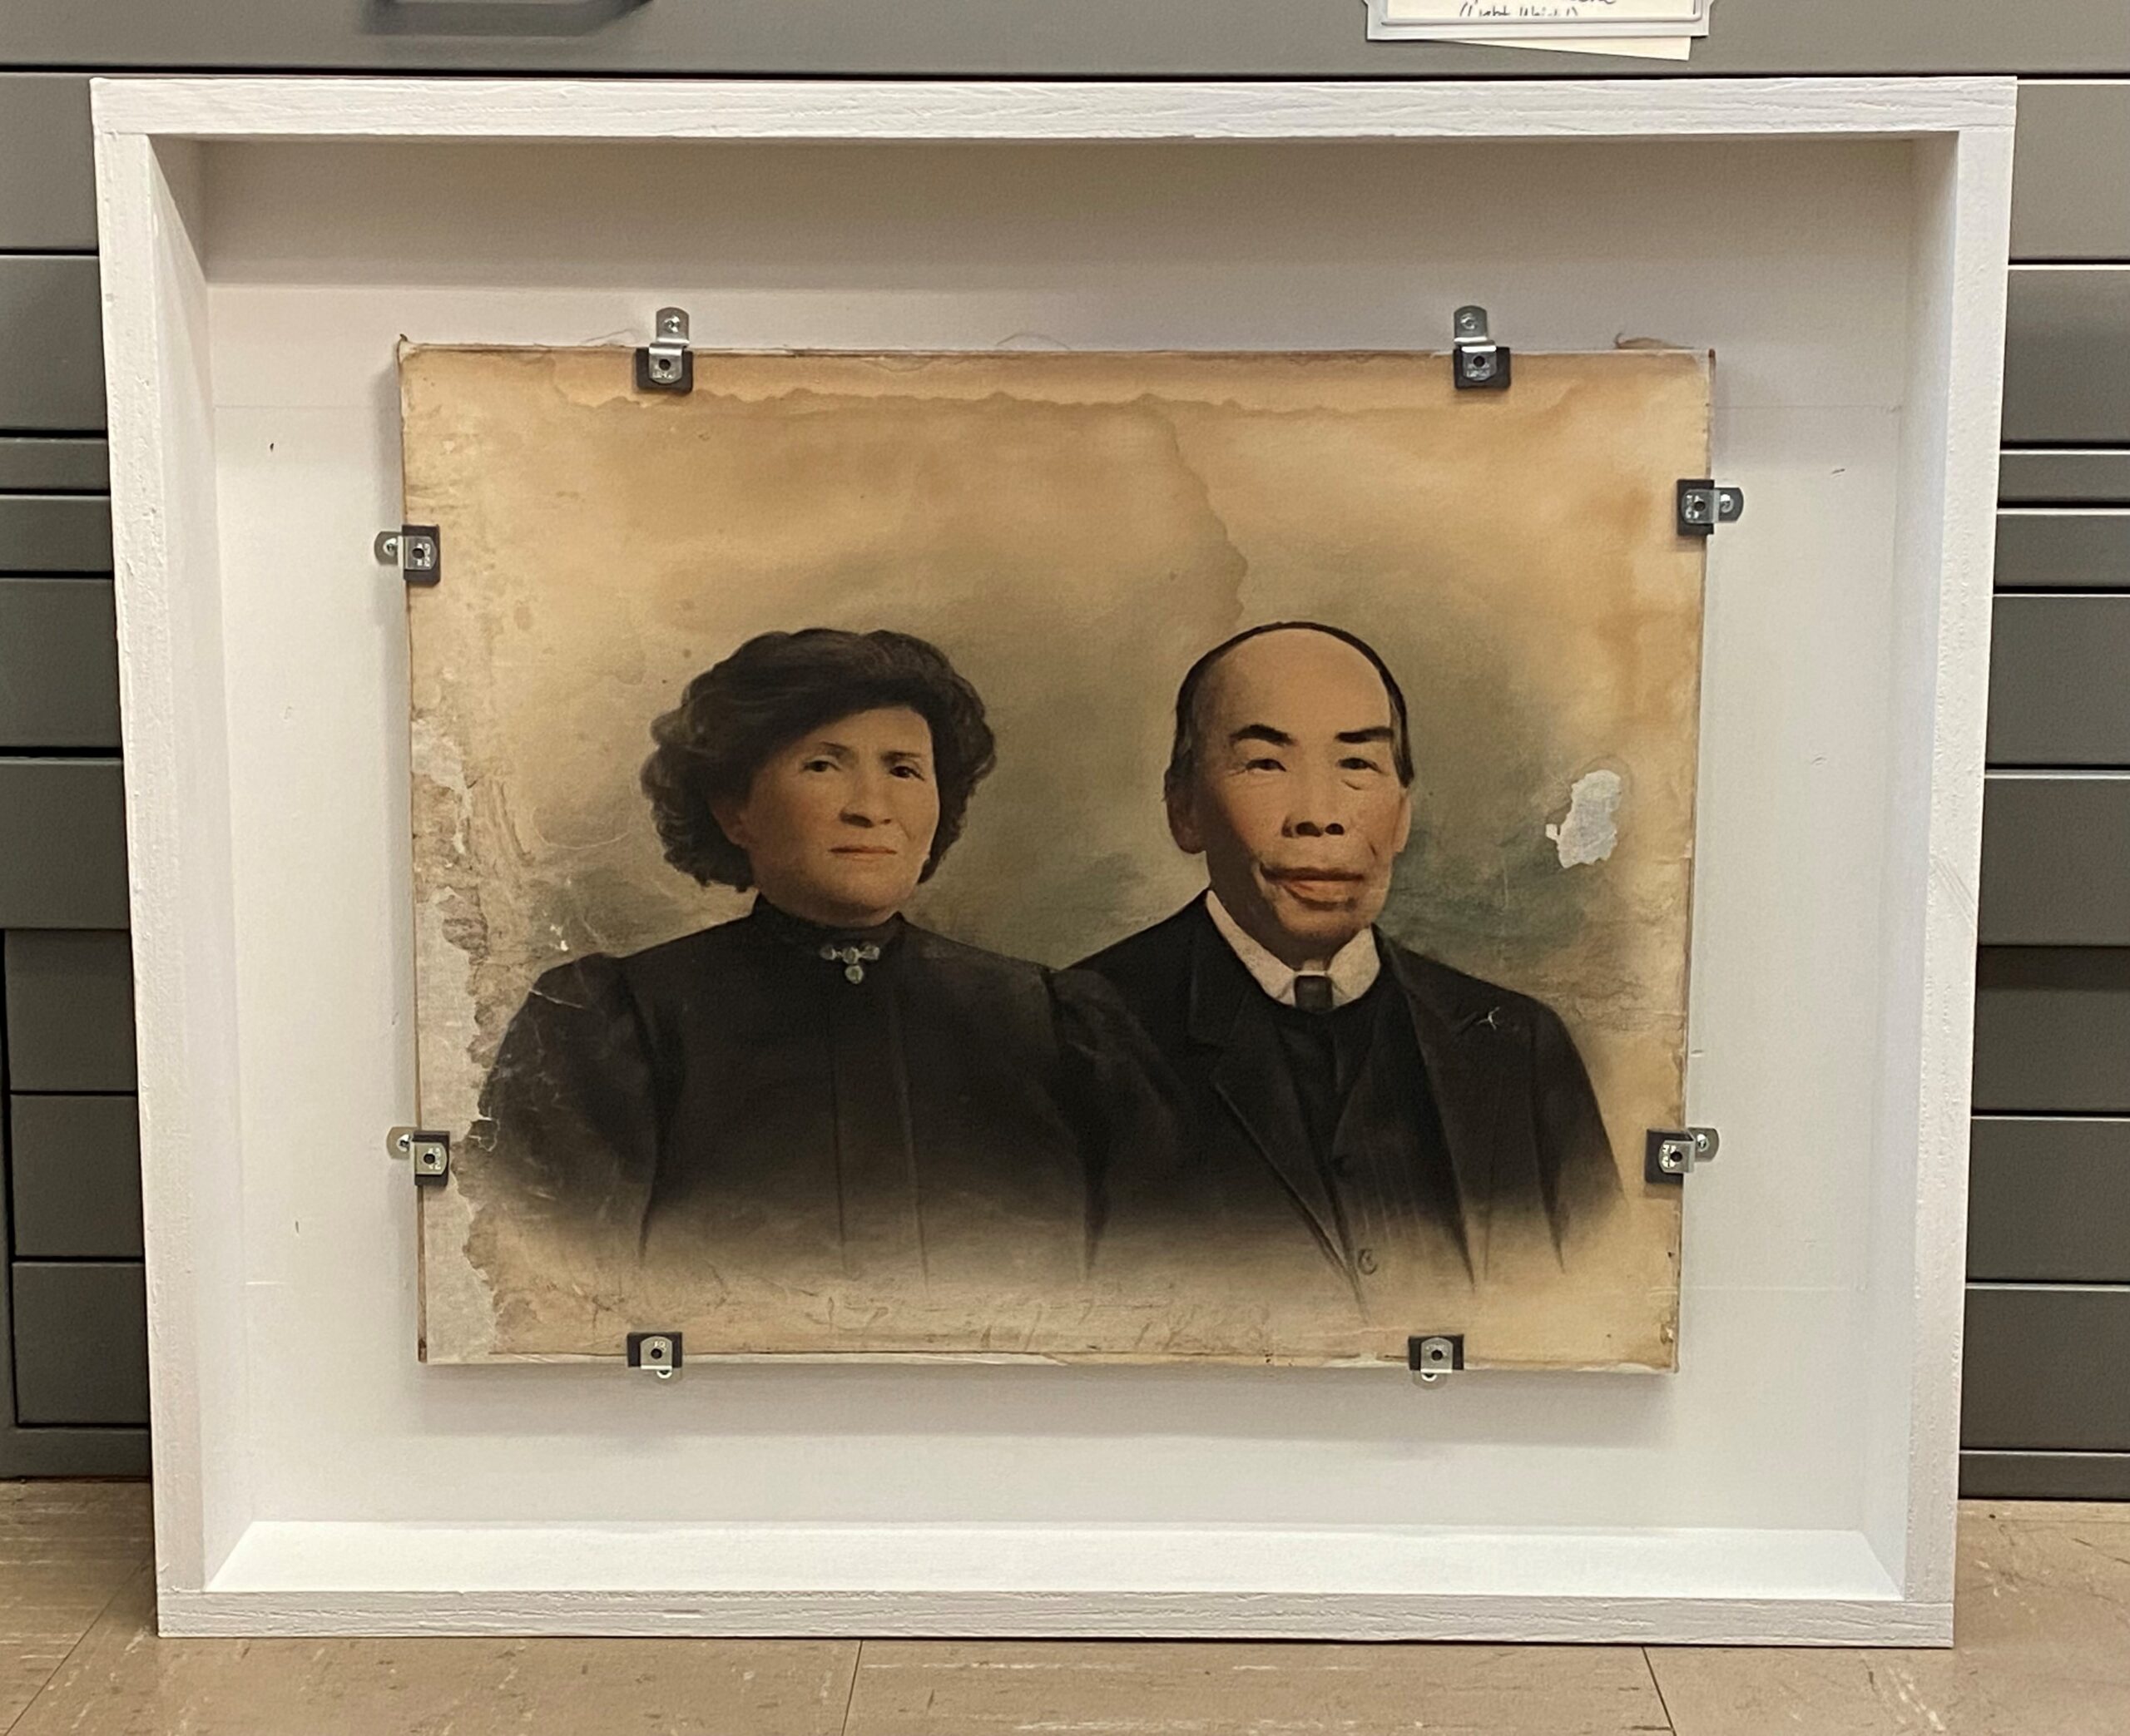
Once conserved, this portrait, as well as the other three portraits in the collection, were placed in HTS (handling-travel-storage) frames. These storage structures are based on models developed by the Canadian Conservation Institute and the National Gallery of Canada. These frames will provide protection to each work and can be easily re-used for other similarly-sized works if necessary.
Figure 15. [Mr. & Mrs. Lum] rehoused in an HTS frame.
Reilly, James M. (1986). Care and Identification of 19th-Century Photographic Prints. Rochester, NY: Eastman Kodak Co.
Whitman, Katharine (2005). “The Technology of Solar Enlargements”, Topics in Photographic Preservation, Vol. 11, pages 104-110. Washington DC: American Institute for Conservation of Historic & Artistic Works. History (culturalheritage.org)
A few months ago, a box of archival records that had been requested for access was transferred to the Royal BC Museum paper conservation lab. These documents were part of the Archibald Menzies fonds, a small collection of records and belongings related to Archibald Menzies (1754–1842), a Scottish surgeon and naturalist who accompanied Captain George Vancouver aboard the HMS Discovery in 1791–95.
The documents in this box were mostly parchment and had been folded several times in the past, then piled into a box for storage. Upon retrieving the box, the archivist realised that none of these documents were easy to open. The parchment was hard and inflexible, suggesting that any attempt to forcibly flatten out the records might lead to damage. When problems like this arise, these materials are diverted to our conservation team for assessment and remedy.
Figure 1. Folded documents from BC Archives collection PR-1261 before being treated and rehoused.
So, how can we convince parchment to relax, open up and share its hidden secrets? First, we need to understand where it’s coming from.
The Nature of Parchment
Parchment is made from animal skin—usually that of a calf, sheep or goat. The skins are removed from the animal, dehaired and defleshed, and then treated with a lime or other alkali solution. After liming, the skin is dried under tension, and in some cases, surface treatments are carried out to make it more suitable to receive inks and paints. Before the invention of paper, parchment was a common writing support in Europe and parts of the Middle East. It continued to be used as such for several centuries after papermaking became popular and widespread.
Parchment is very sensitive to moisture and heat. This means that when water is present, the parchment will expand and absorb moisture. When conditions become warm and dry, the parchment will shrink and release moisture. Over long stretches of time, these cycles of shrinking and expanding cause the parchment to deteriorate, becoming distorted and hard.
Relax and Unfold
The parchment documents in this collection were tightly folded, and attempts to open them were met with strong resistance. Forcing them open could have potentially led to cracks, breaks and losses in the document; however, leaving them as they were meant that no one could read them.
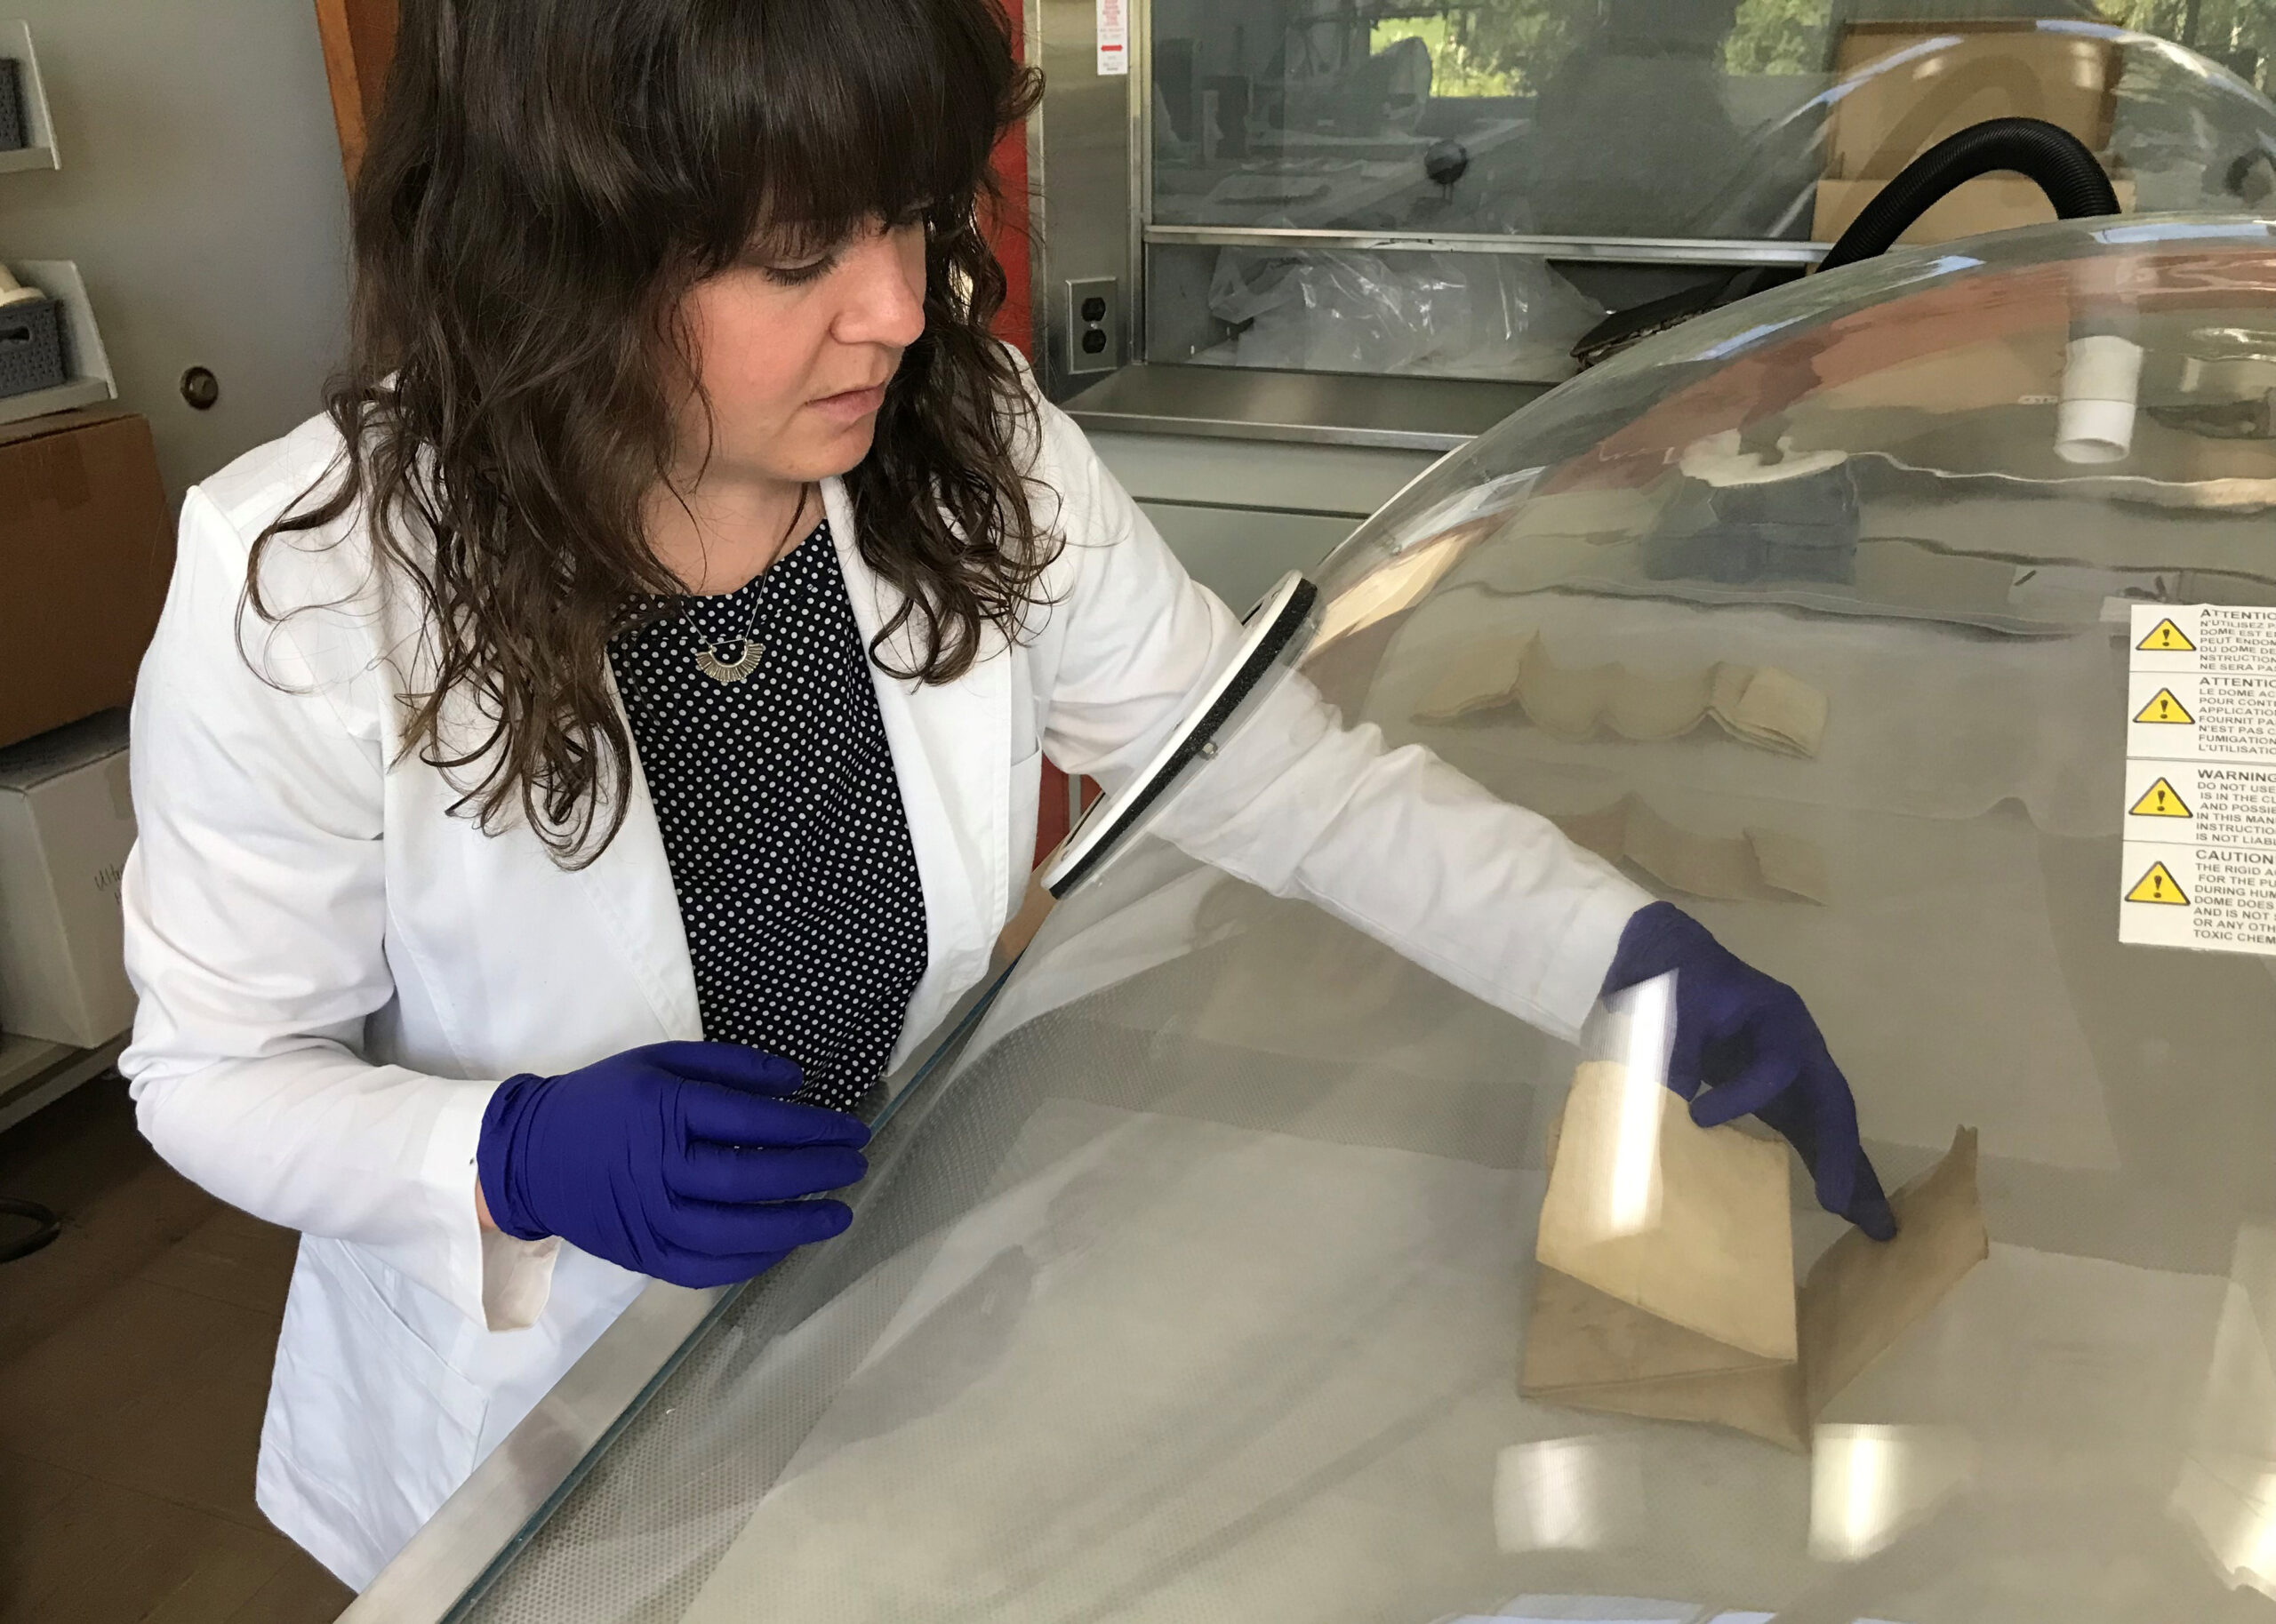
To open these documents without incurring damage and loss, we needed them to relax. This state of inner peace was achieved with the careful introduction of moisture. Since parchment is so sensitive to moisture, the use of moisture to treat deteriorated parchment might seem counterintuitive; however, in the case of this treatment, moisture is delivered in the form of water vapour (never liquid water), and it was delivered with control.
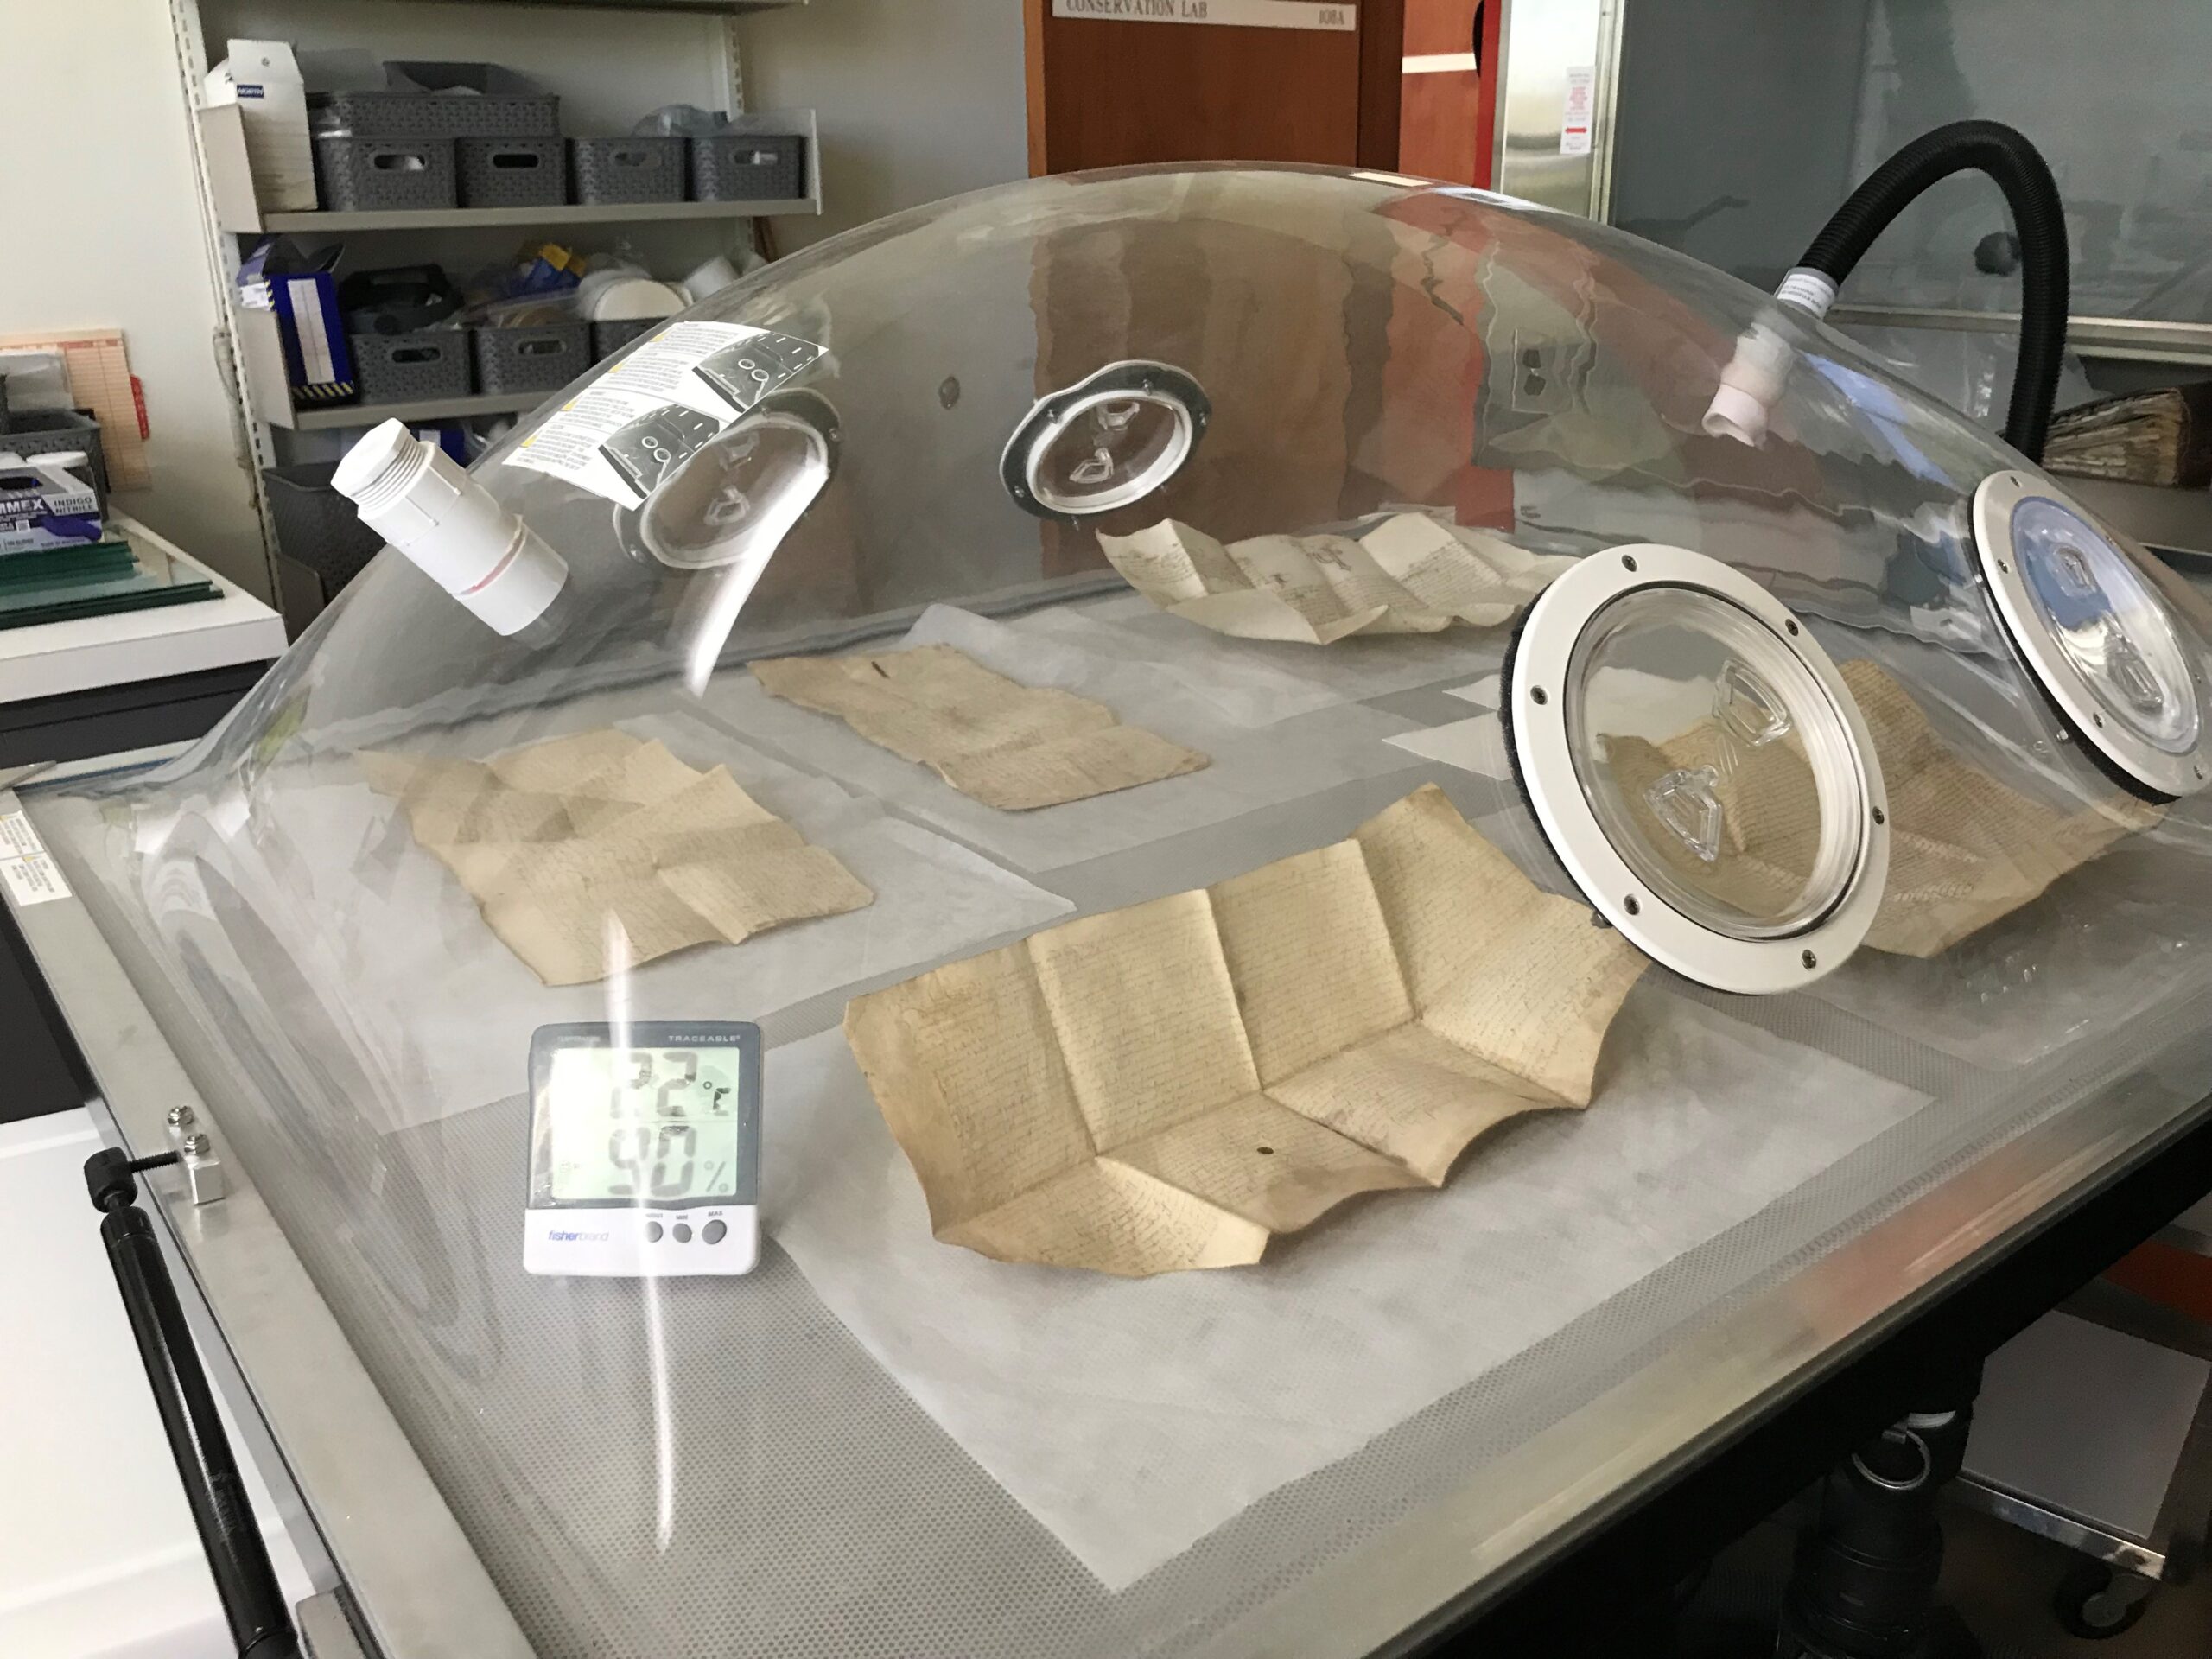
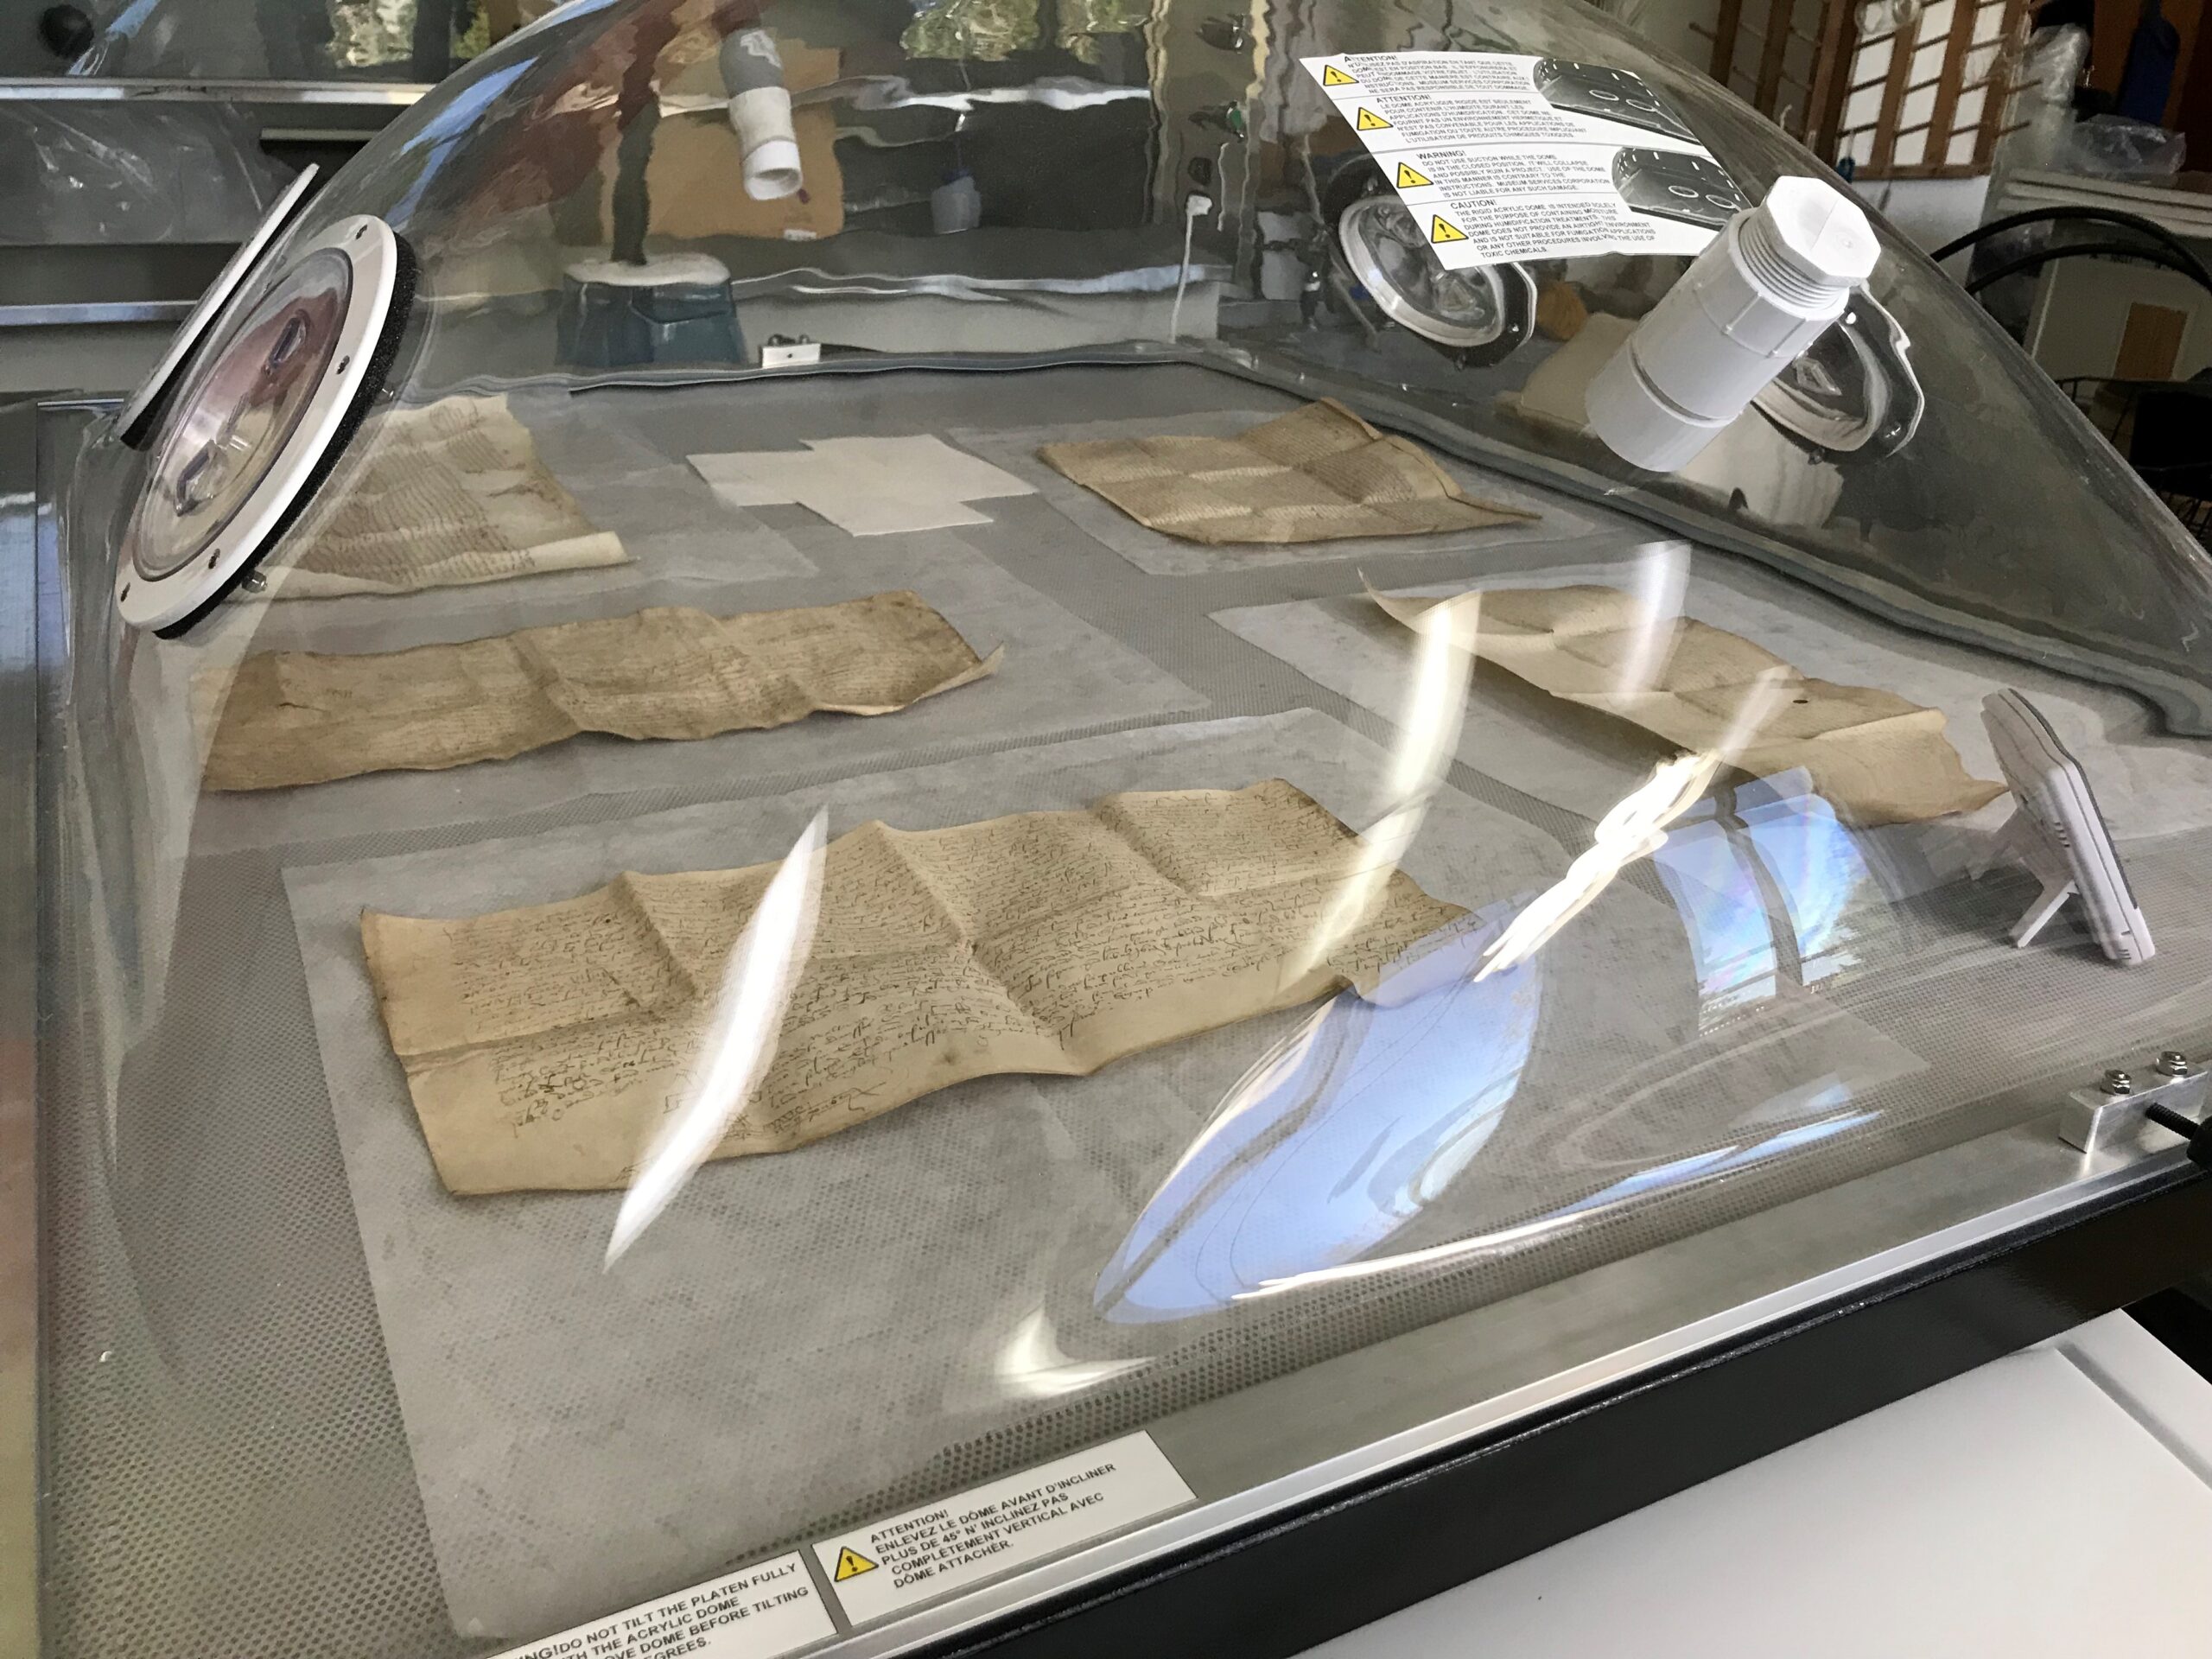
The tightly folded documents were placed in an environmental chamber where the relative humidity (RH) could be raised using an ultrasonic humidifier. The RH levels were monitored throughout this treatment using a hygrometer placed in the chamber. Slowly, over a period of approximately two hours, the documents were unfolded bit by bit, until they were relaxed enough to fall completely open.
Figure 2. Parchment documents in an environmental chamber with water vapour flowing in through the black tube connected to the side of the dome.
Figure 3. Paper conservator, Lauren Buttle, unfolding one of the parchment documents in the humidified chamber after about ~25 minutes.
Figure 4. Parchment documents in humidified chamber after one hour.
Figure 5. Parchment documents in humidified chamber after two hours.
Once the documents had fully revealed themselves, they were placed under very gentle pressure between felt pads to ensure they dried flat.
A New Home
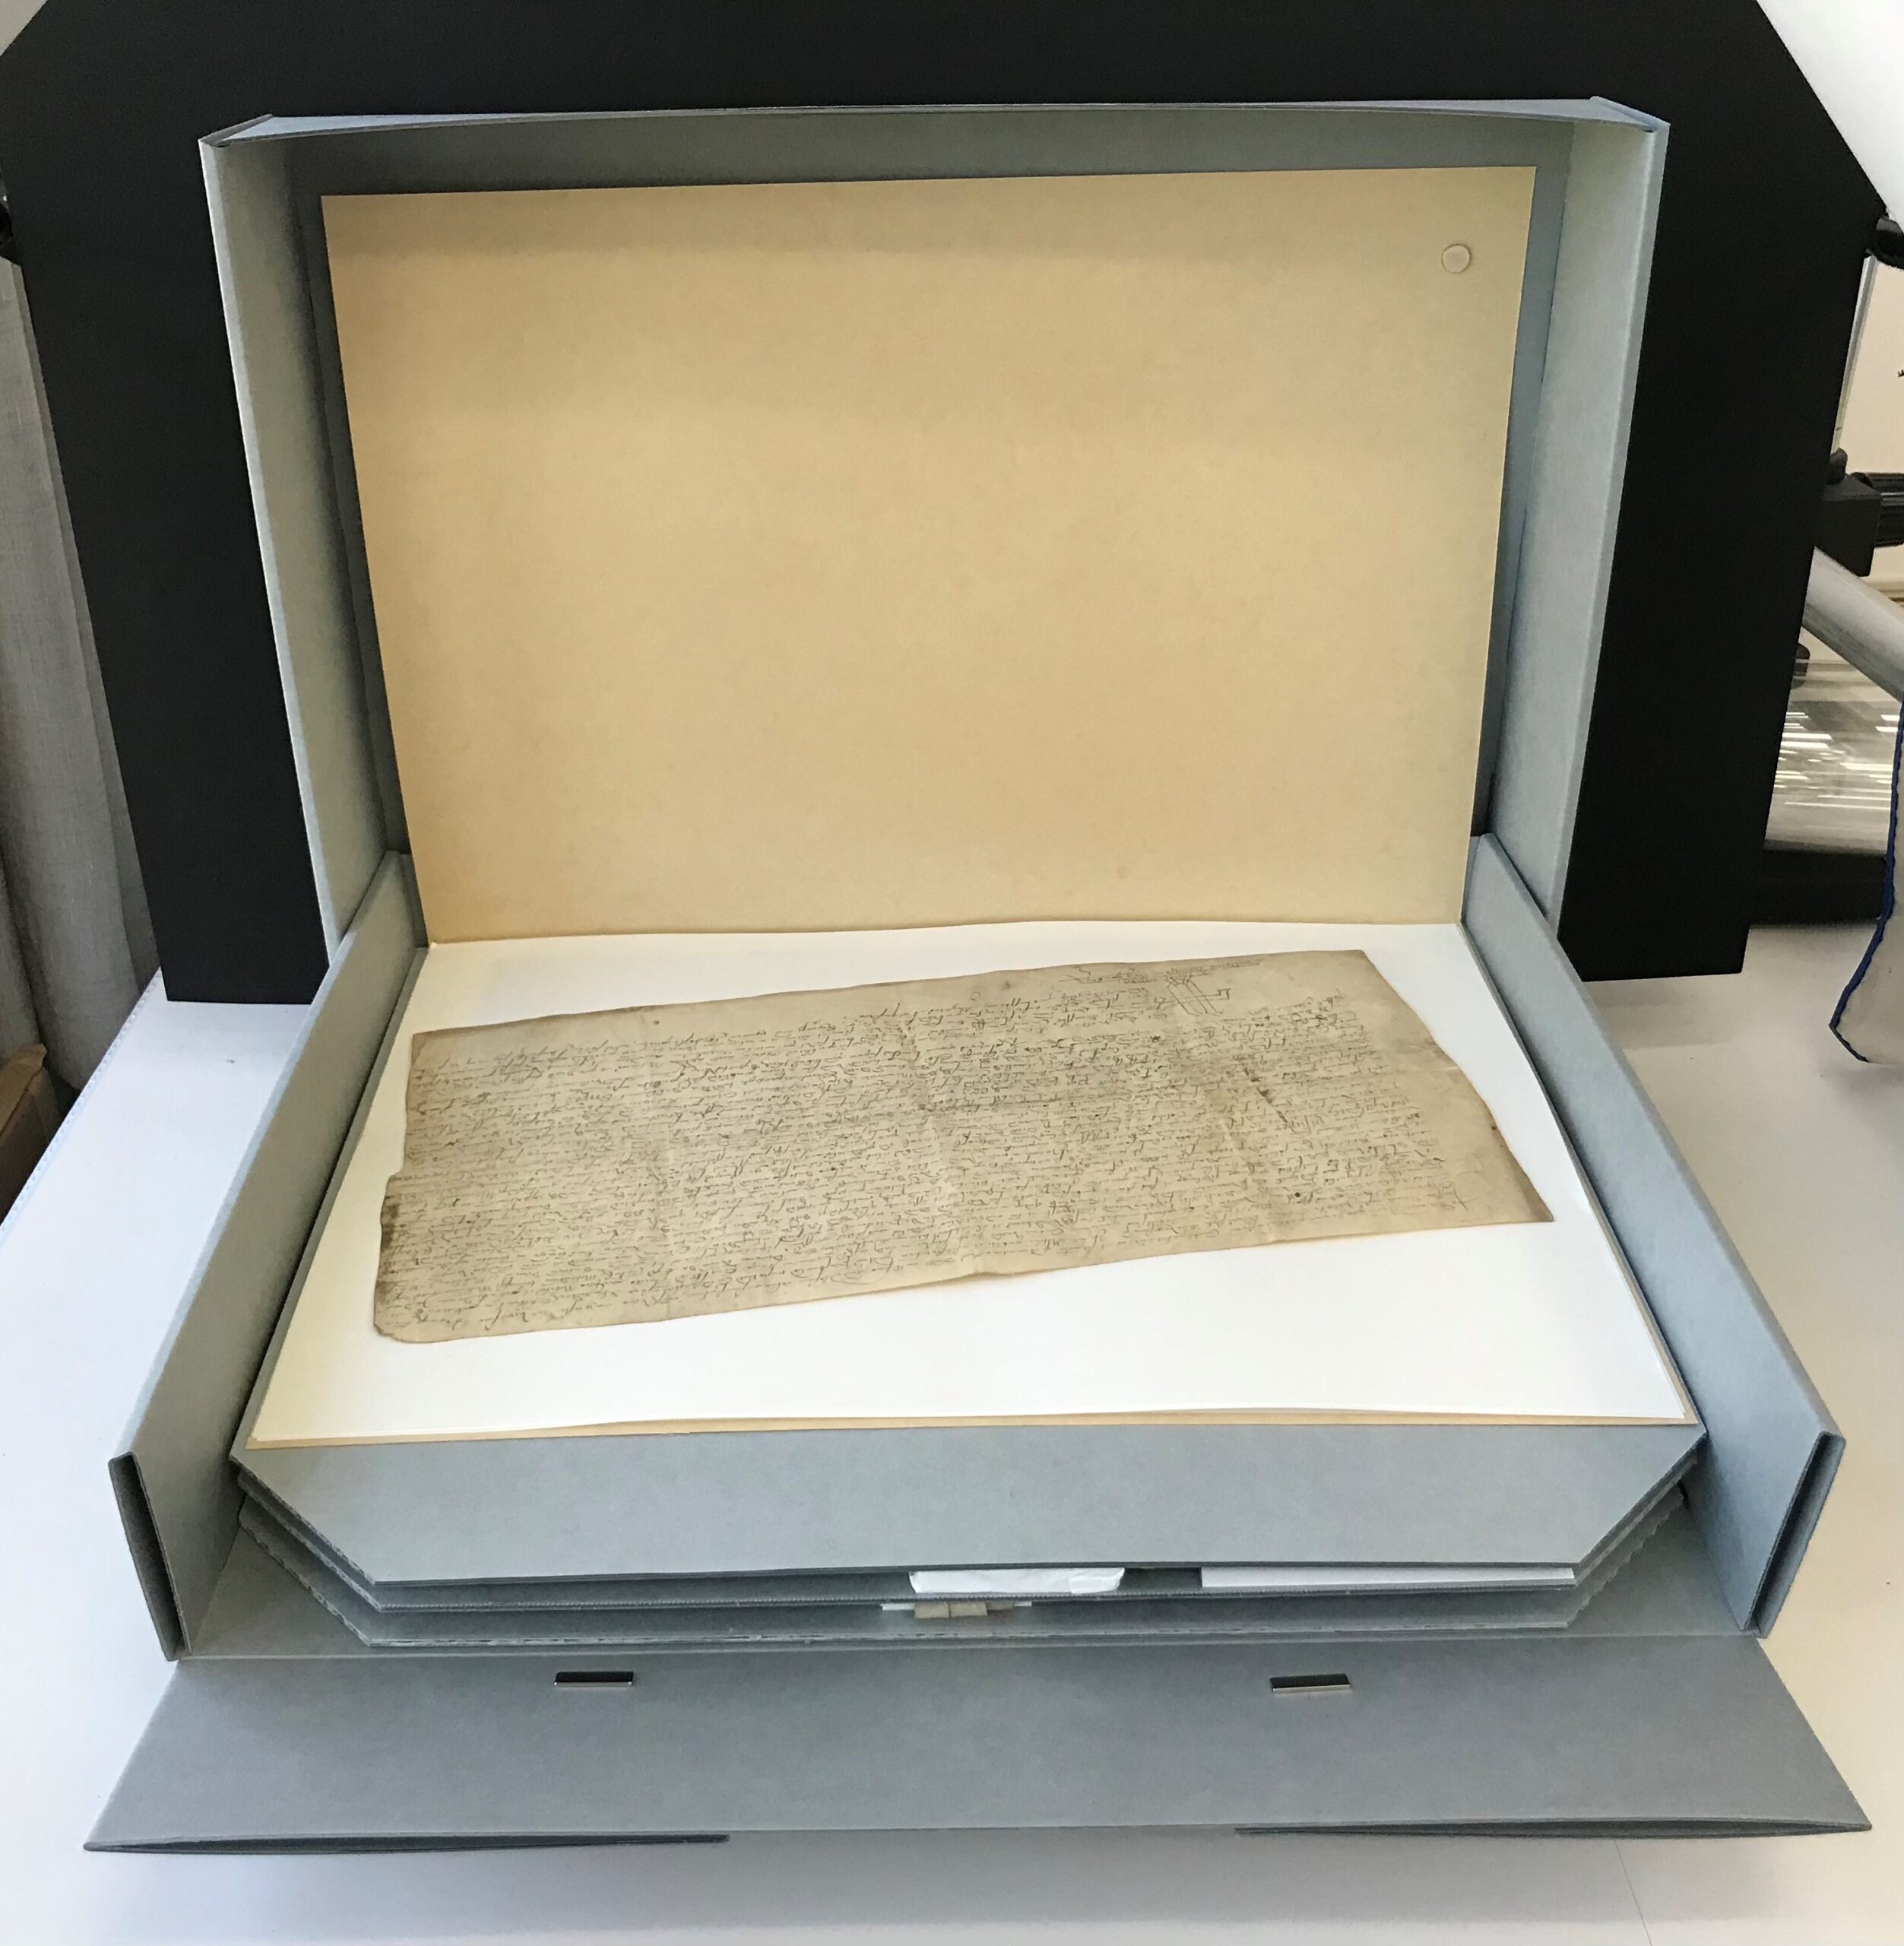
Now that these documents are open for viewing, they will be stored flat. They have been transferred to a flat storage box with custom padded trays for two of the documents, with seals and cords attached, ready for the next researcher.
Figure 6. Unfolded documents from BC Archives collection PR-1261 after being treated and rehoused.
Many plants, especially at high latitudes, have both widespread and highly discontinuous geographical distributions. To increase understanding of how such patterns originate, we examine genetic patterns in the arctic–alpine plant Sibbaldia procumbens . We evaluate the contributions of refugia and the role of long‐distance dispersal in shaping the current range of this species.
Location
Northern Hemisphere, especially North America.
Methods
We sampled Sibbaldia from 176 localities, including 168 for S. pro‐cumbens . We analysed sequence variation in three plastid DNA non‐coding regions (the atp I–atp H and trn L–trn F intergenic spacers and the trn L intron), performed Bayesian phylogenetic analyses and statistical parsimony analyses on the combined sequences, and analysed the geographical patterns of haplotype distribution and genetic diversity using data from all populations.
Results
Sibbaldia procumbens probably originated in the mountains of South and East Asia. We identified highly distinct clades in Europe and North America, which overlapped on oceanic islands of the North Atlantic indicating long‐distance dispersal capability. The North American clade included two lineages, one in California and the other widely distributed across the continent and North Atlantic. Haplotype diversity in the latter lineage was markedly higher to the south, suggesting mid–late Pleistocene southward displacement of North American populations with subsequent migration northwards into previously glaciated regions. In Europe, disjunct geographical regions generally harboured distinct haplotypes.
Main conclusions
Multiple Pleistocene refugia for S. procumbens occurred in both North America and Europe. North American refugia existed in California and in the southern Rocky Mountains, but in contrast with most widespread arctic–alpine species we found no evidence for a Beringian refugium. Cryptic refugia may have existed within the Cordilleran Ice Sheet. Episodes of range expansion and contraction and long‐distance dispersal have all contributed to the genetic structure and widespread but fragmented distribution of this species.
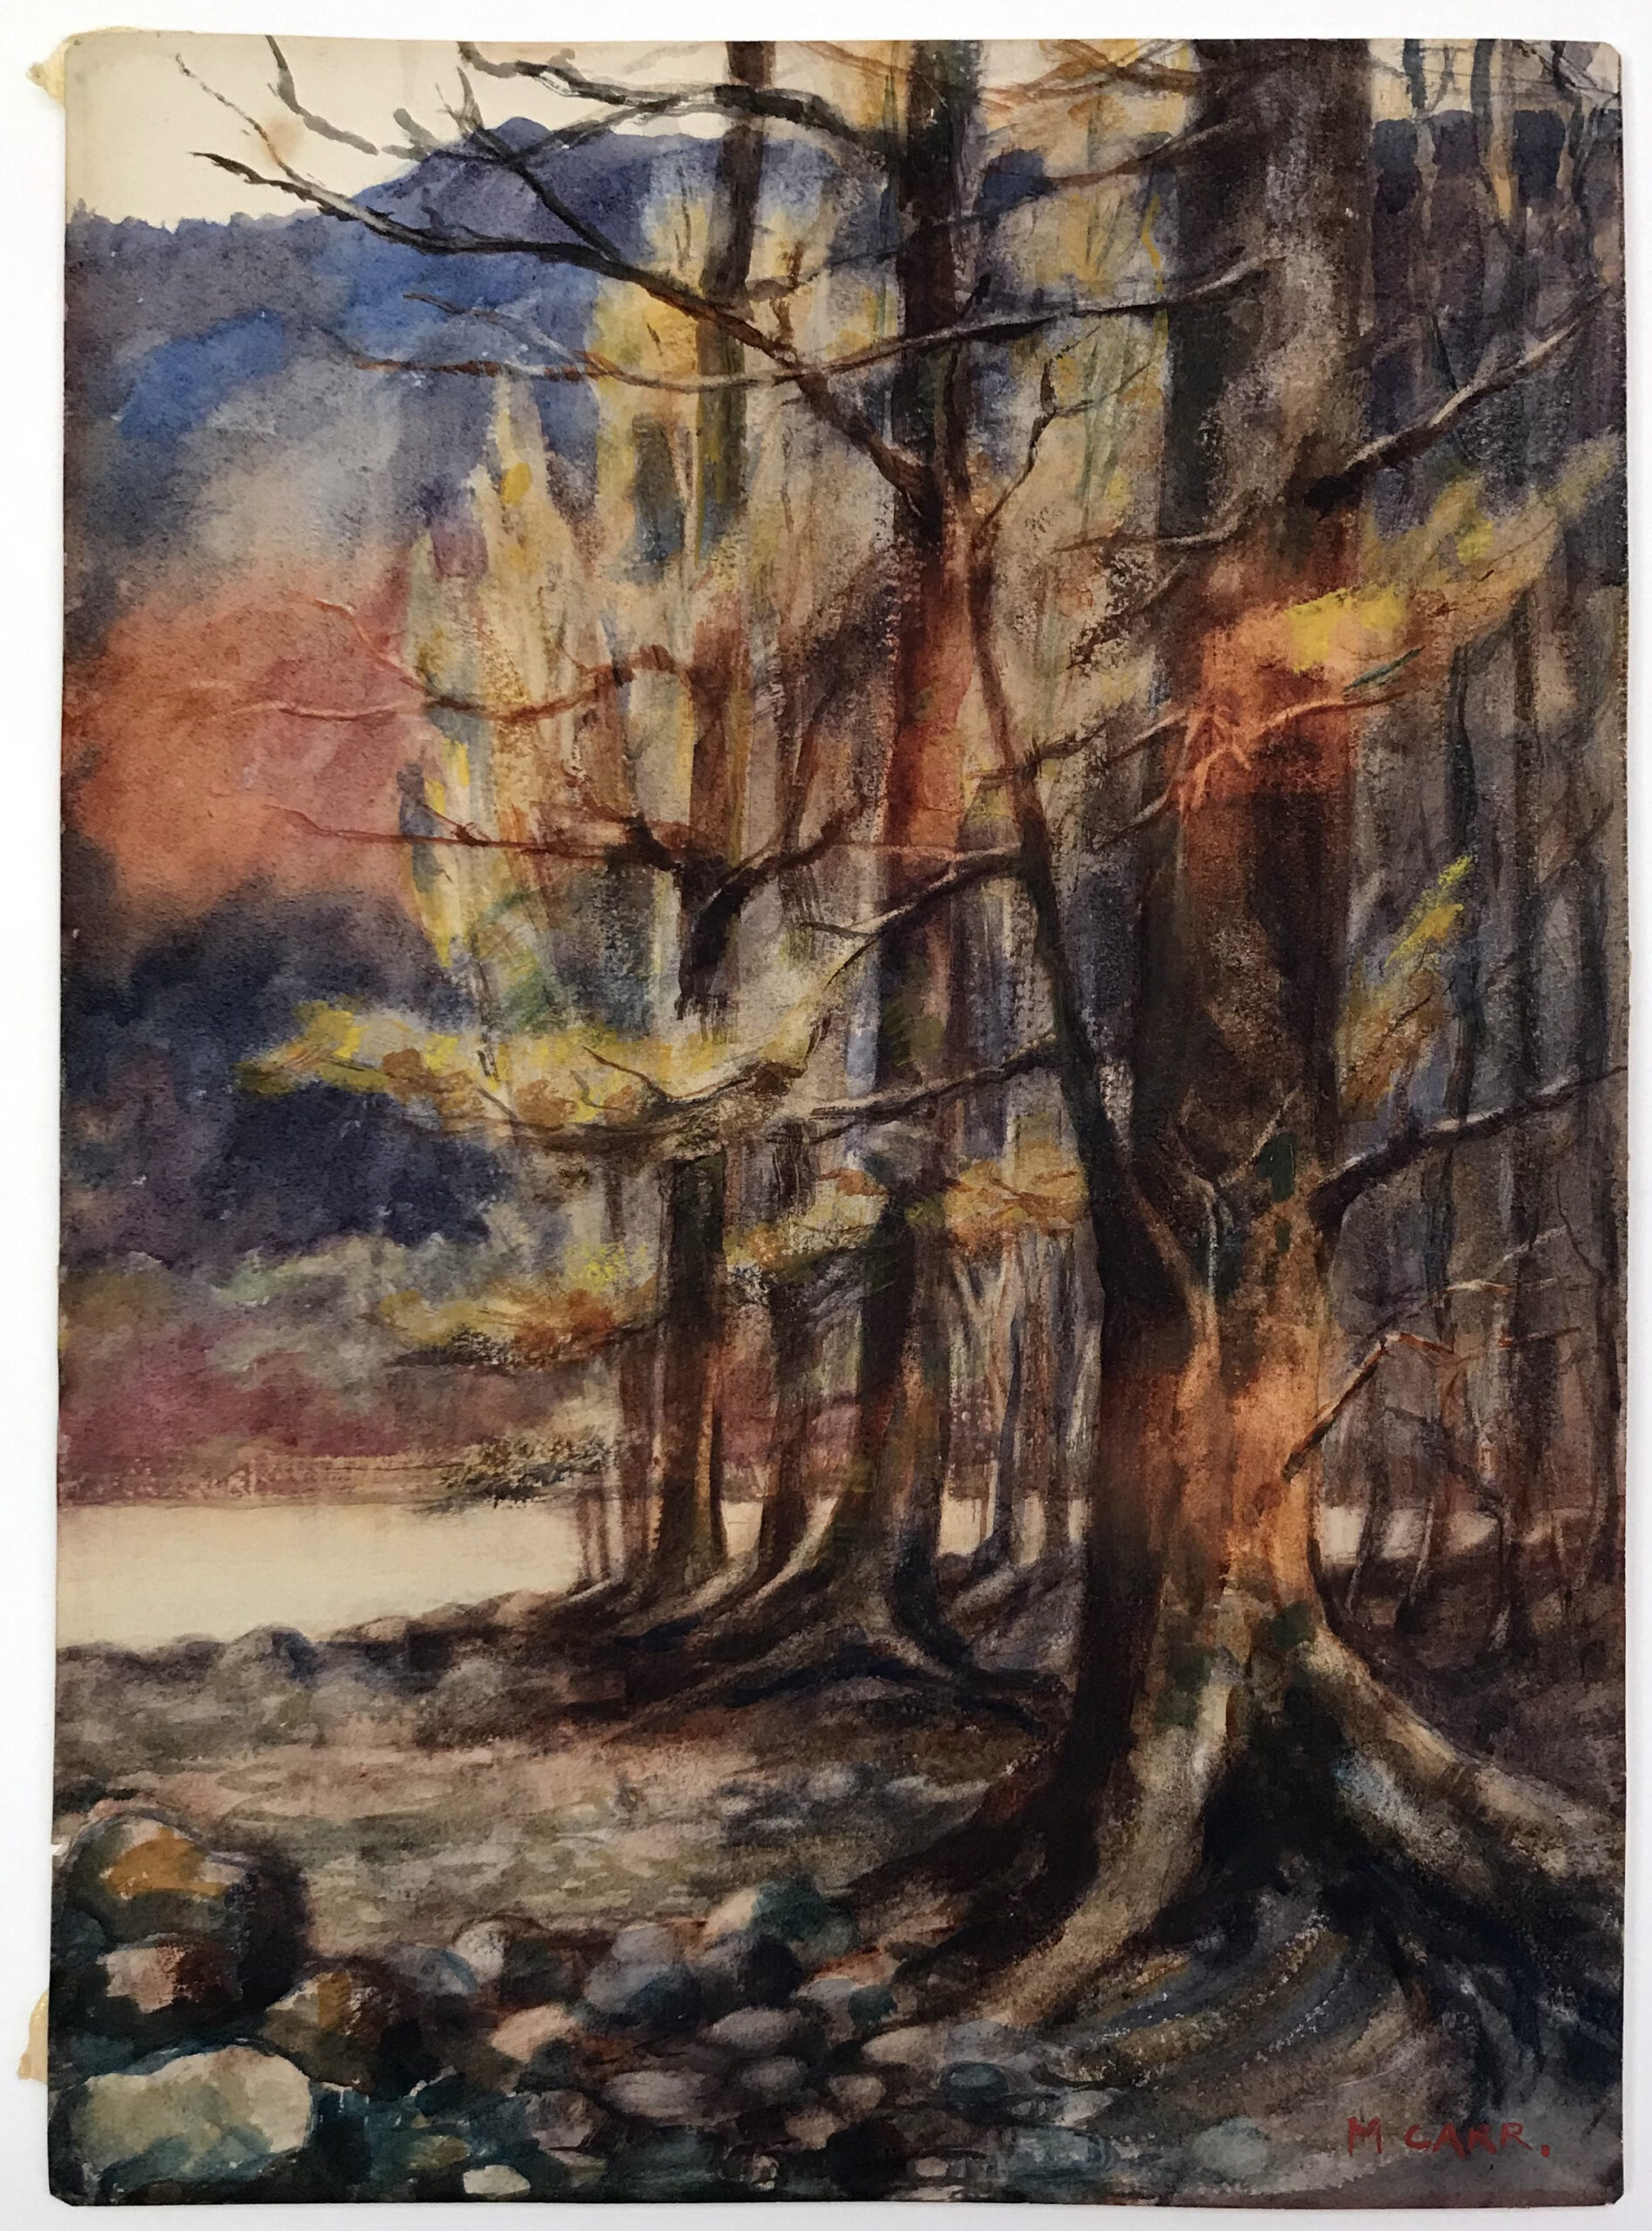
In 2017, the BC Archives acquired an Emily Carr watercolour of a woodland scene (PDP10276, Fig. 1). The work is an example of Carr’s early interest in the landscape of British Columbia. Recently, the work made its way back to the Paper Conservation Lab to receive the treatment that was recommended at the time of acquisition.
When this work arrived at the Royal BC Museum, a few condition issues were apparent. There was some evidence of fading, a small stain in the upper left corner and some microscopic cracking of the paint layer (Fig. 2), but these issues are irreversible and— now that the painting is entering a stable, museum storage environment—not particularly worrying. There was, however, one big (and unsightly) problem: the painting had been adhered to a low-quality, acidic cardboard support at some point in its history, and that support layer had been partially torn away (Fig. 3).
Figure 1. Front in reflected light (before treatment).
Figure 2. Micrograph of cracking in paint film over the artist’s signature (before treatment).
Figure 3. Back in reflected light (before treatment).
Why is this a big problem?
Mechanically:
A partial backing means that the painting is not supported evenly, which often leads to folds, creases and other types of damage if the work is not handled very carefully
Differential support can also lead to deformations in the paper because some areas of the sheet are constricted from movement (with environmental fluctuations) and some aren’t, leading to a build-up of internal stresses
The poor-quality cardboard was also very brittle and likely to crack or snap. If a snap in the cardboard were to happen, this would inevitably translate into bends, creases or even breaks in the painting as well.
Chemically:
Acidic components of the poor quality wood pulp cardboard (as well as acidic components that appear to have been absorbed from another source, visible as brown lines across the cardboard backing) will leach into the painting causing the paper to degrade and become brittle and discoloured. This could eventually affect the paint as well.
Treatment
The solution was clear: this partial backing had to be fully removed.
Removal of a backing usually happens in stages. The backing board attached to this painting was rigid and thick. Trying to remove something thick from something thinner all at once will usually result in tears, delamination and/or creasing in the thinner, more flexible object—in this case, the painting. To avoid this, the thick backing is removed in thin layers. The backing is reduced, layer by layer, until we reach the final layer, which is attached to the painting. This final layer is the one carrying the adhesive, which makes it the trickiest layer to remove and the layer that needs to be removed most delicately.
The initial layers were removed using a thin, slightly dull blade. Upon reaching the final layers, it was apparent that there were many areas, particularly towards the outer edges, that were not directly adhered to the back of the painting. These areas lifted up easily without the blade.
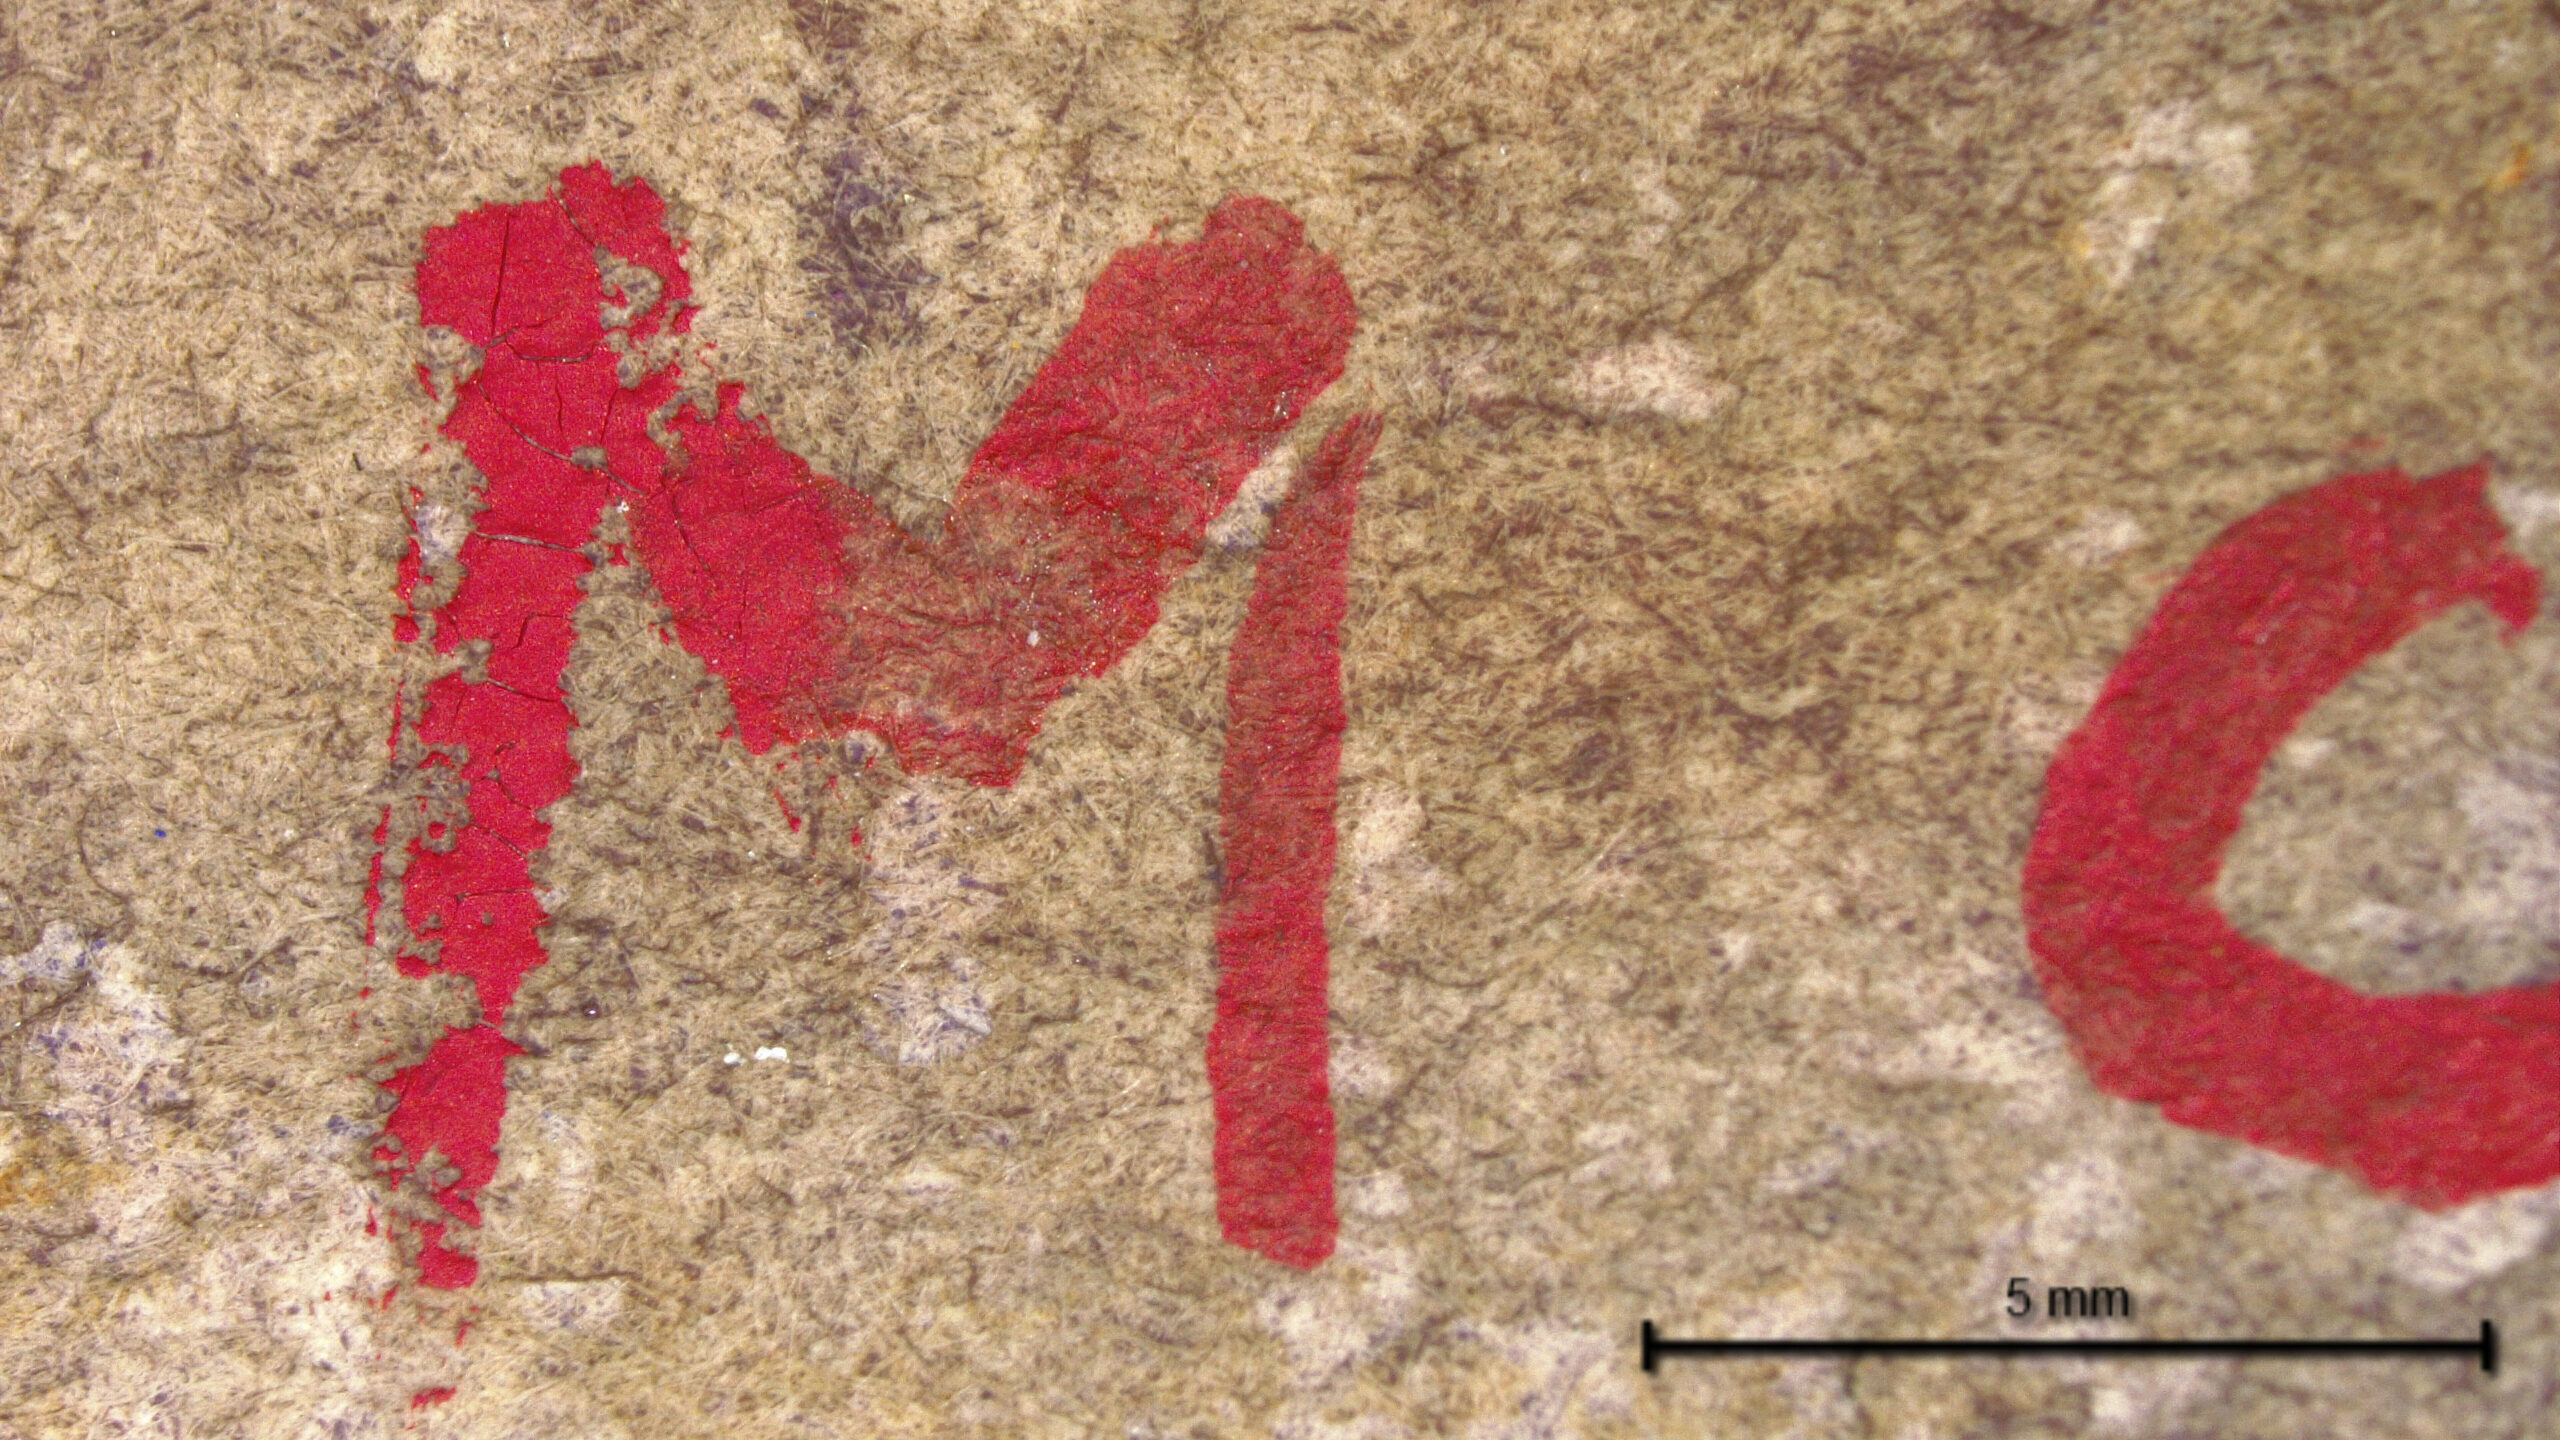
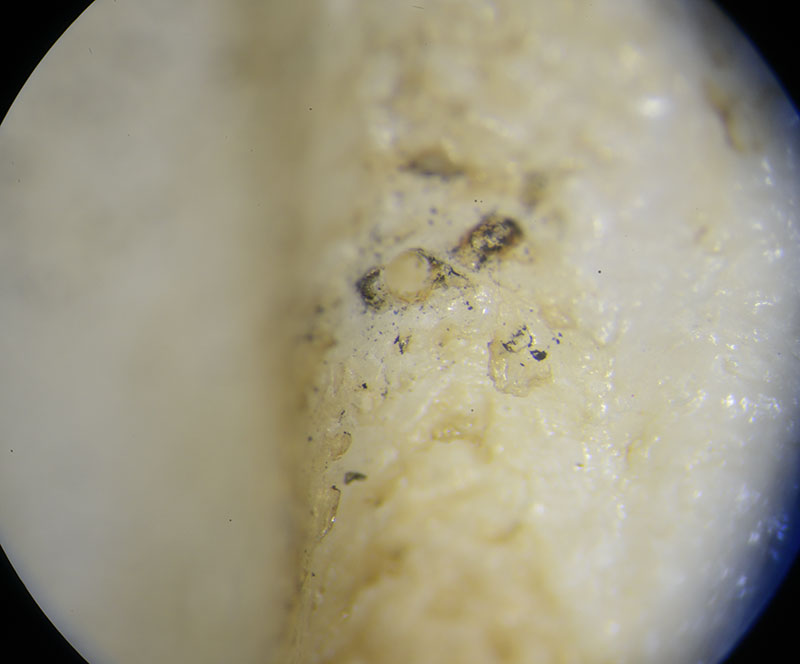
The remaining, adhered portion was tested with a small amount of distilled water under the microscope and fortunately, the adhesive was discovered to be water-soluble. To be sure that the application of water on the back would not solubilize the media on the front, the media on the front was tested under the microscope with small drops of water (Fig 4). Each different colour was tested in discrete areas. Fortunately, only one colour was partially affected by the water. Given the thickness of the paper and the sensitivity level of the paint, it seemed unlikely that the water used for the backing removal would cause damage, and therefore a small, controlled application of water, administered under the microscope, was used to remove the final layer of the backing.
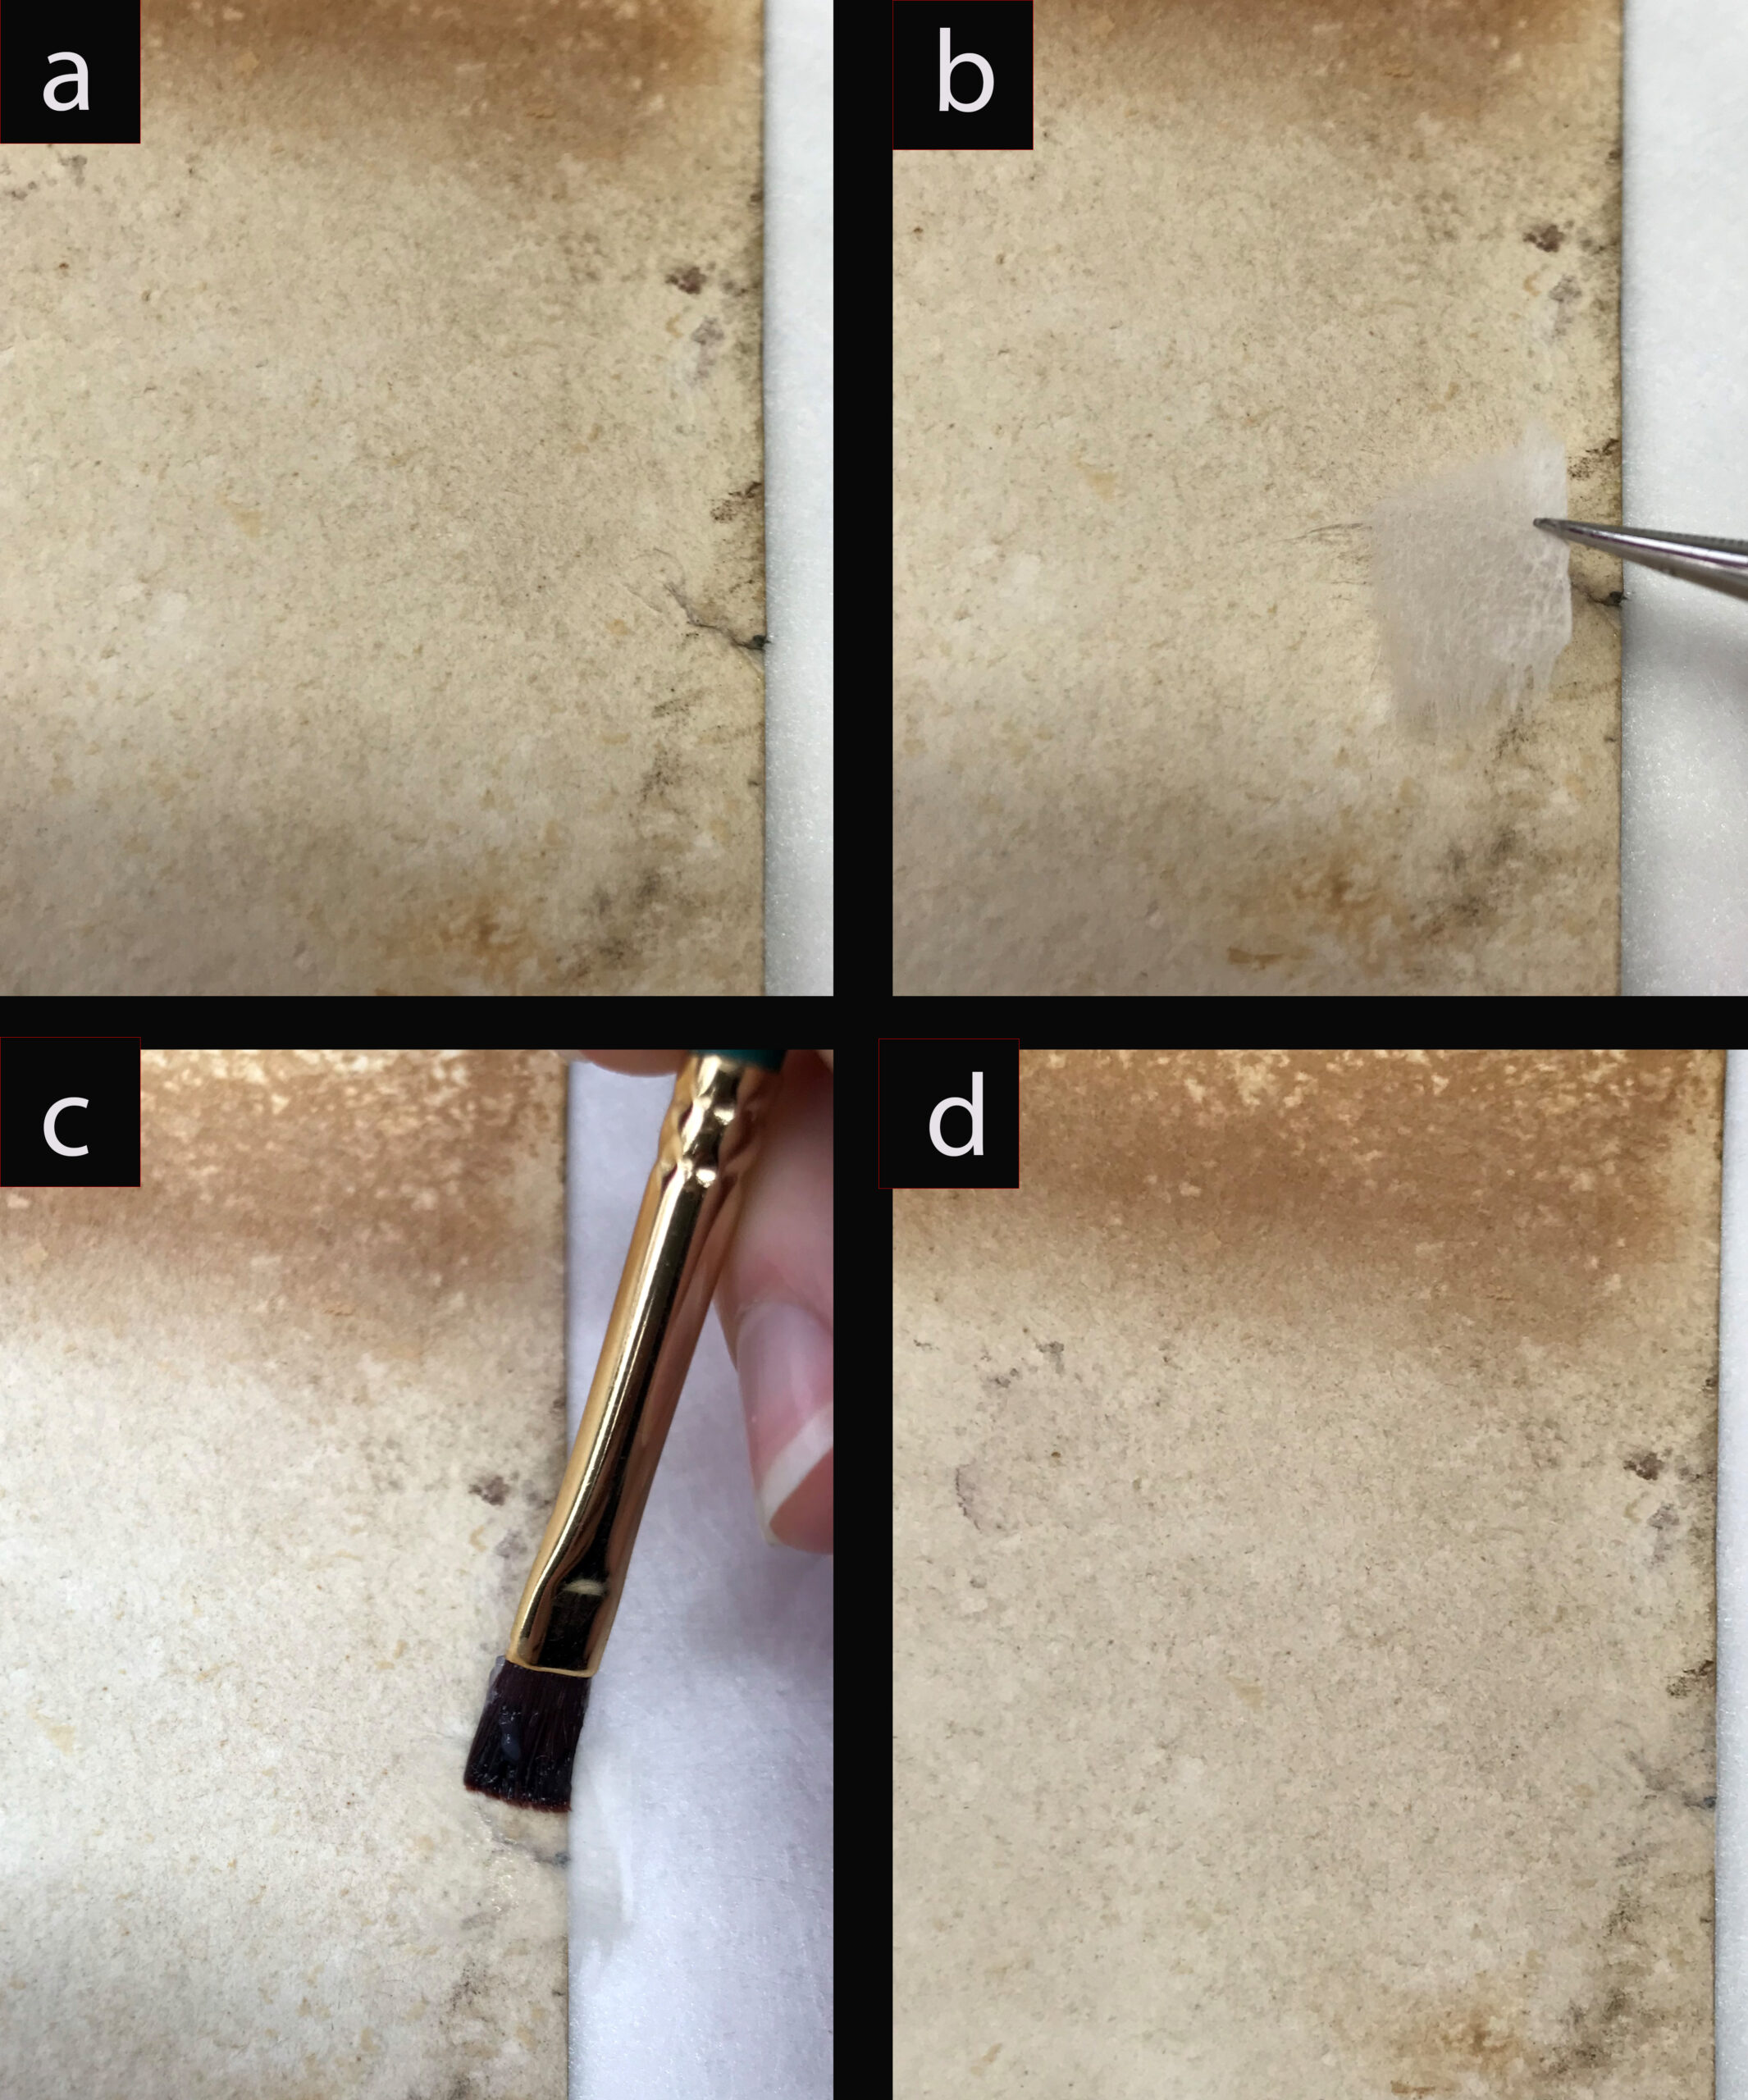
Following the backing removal, a small tear along the left side of the work became unsupported and therefore, unstable. To prevent this tear from growing bigger, it was repaired by pasting a thin piece of Japanese tissue over the tear on the back (Fig 5). The Japanese tissue is made of long natural fibres, which makes it very strong and supportive, despite how thin and translucent it appears after application.
Figure 4. Paper conservator Lauren Buttle carrying out solubility testing under the microscope. Paper triangles are used to identify areas tested. These areas are recorded in the condition report.
Figure 5. a) detail of the tear along the right side of the back in reflected light before repair; b) pasted out Japanese tissue being applied over tear with tweezers; c) a damp brush being used to smooth the repair tissue out over the tear; d) tear after repair.
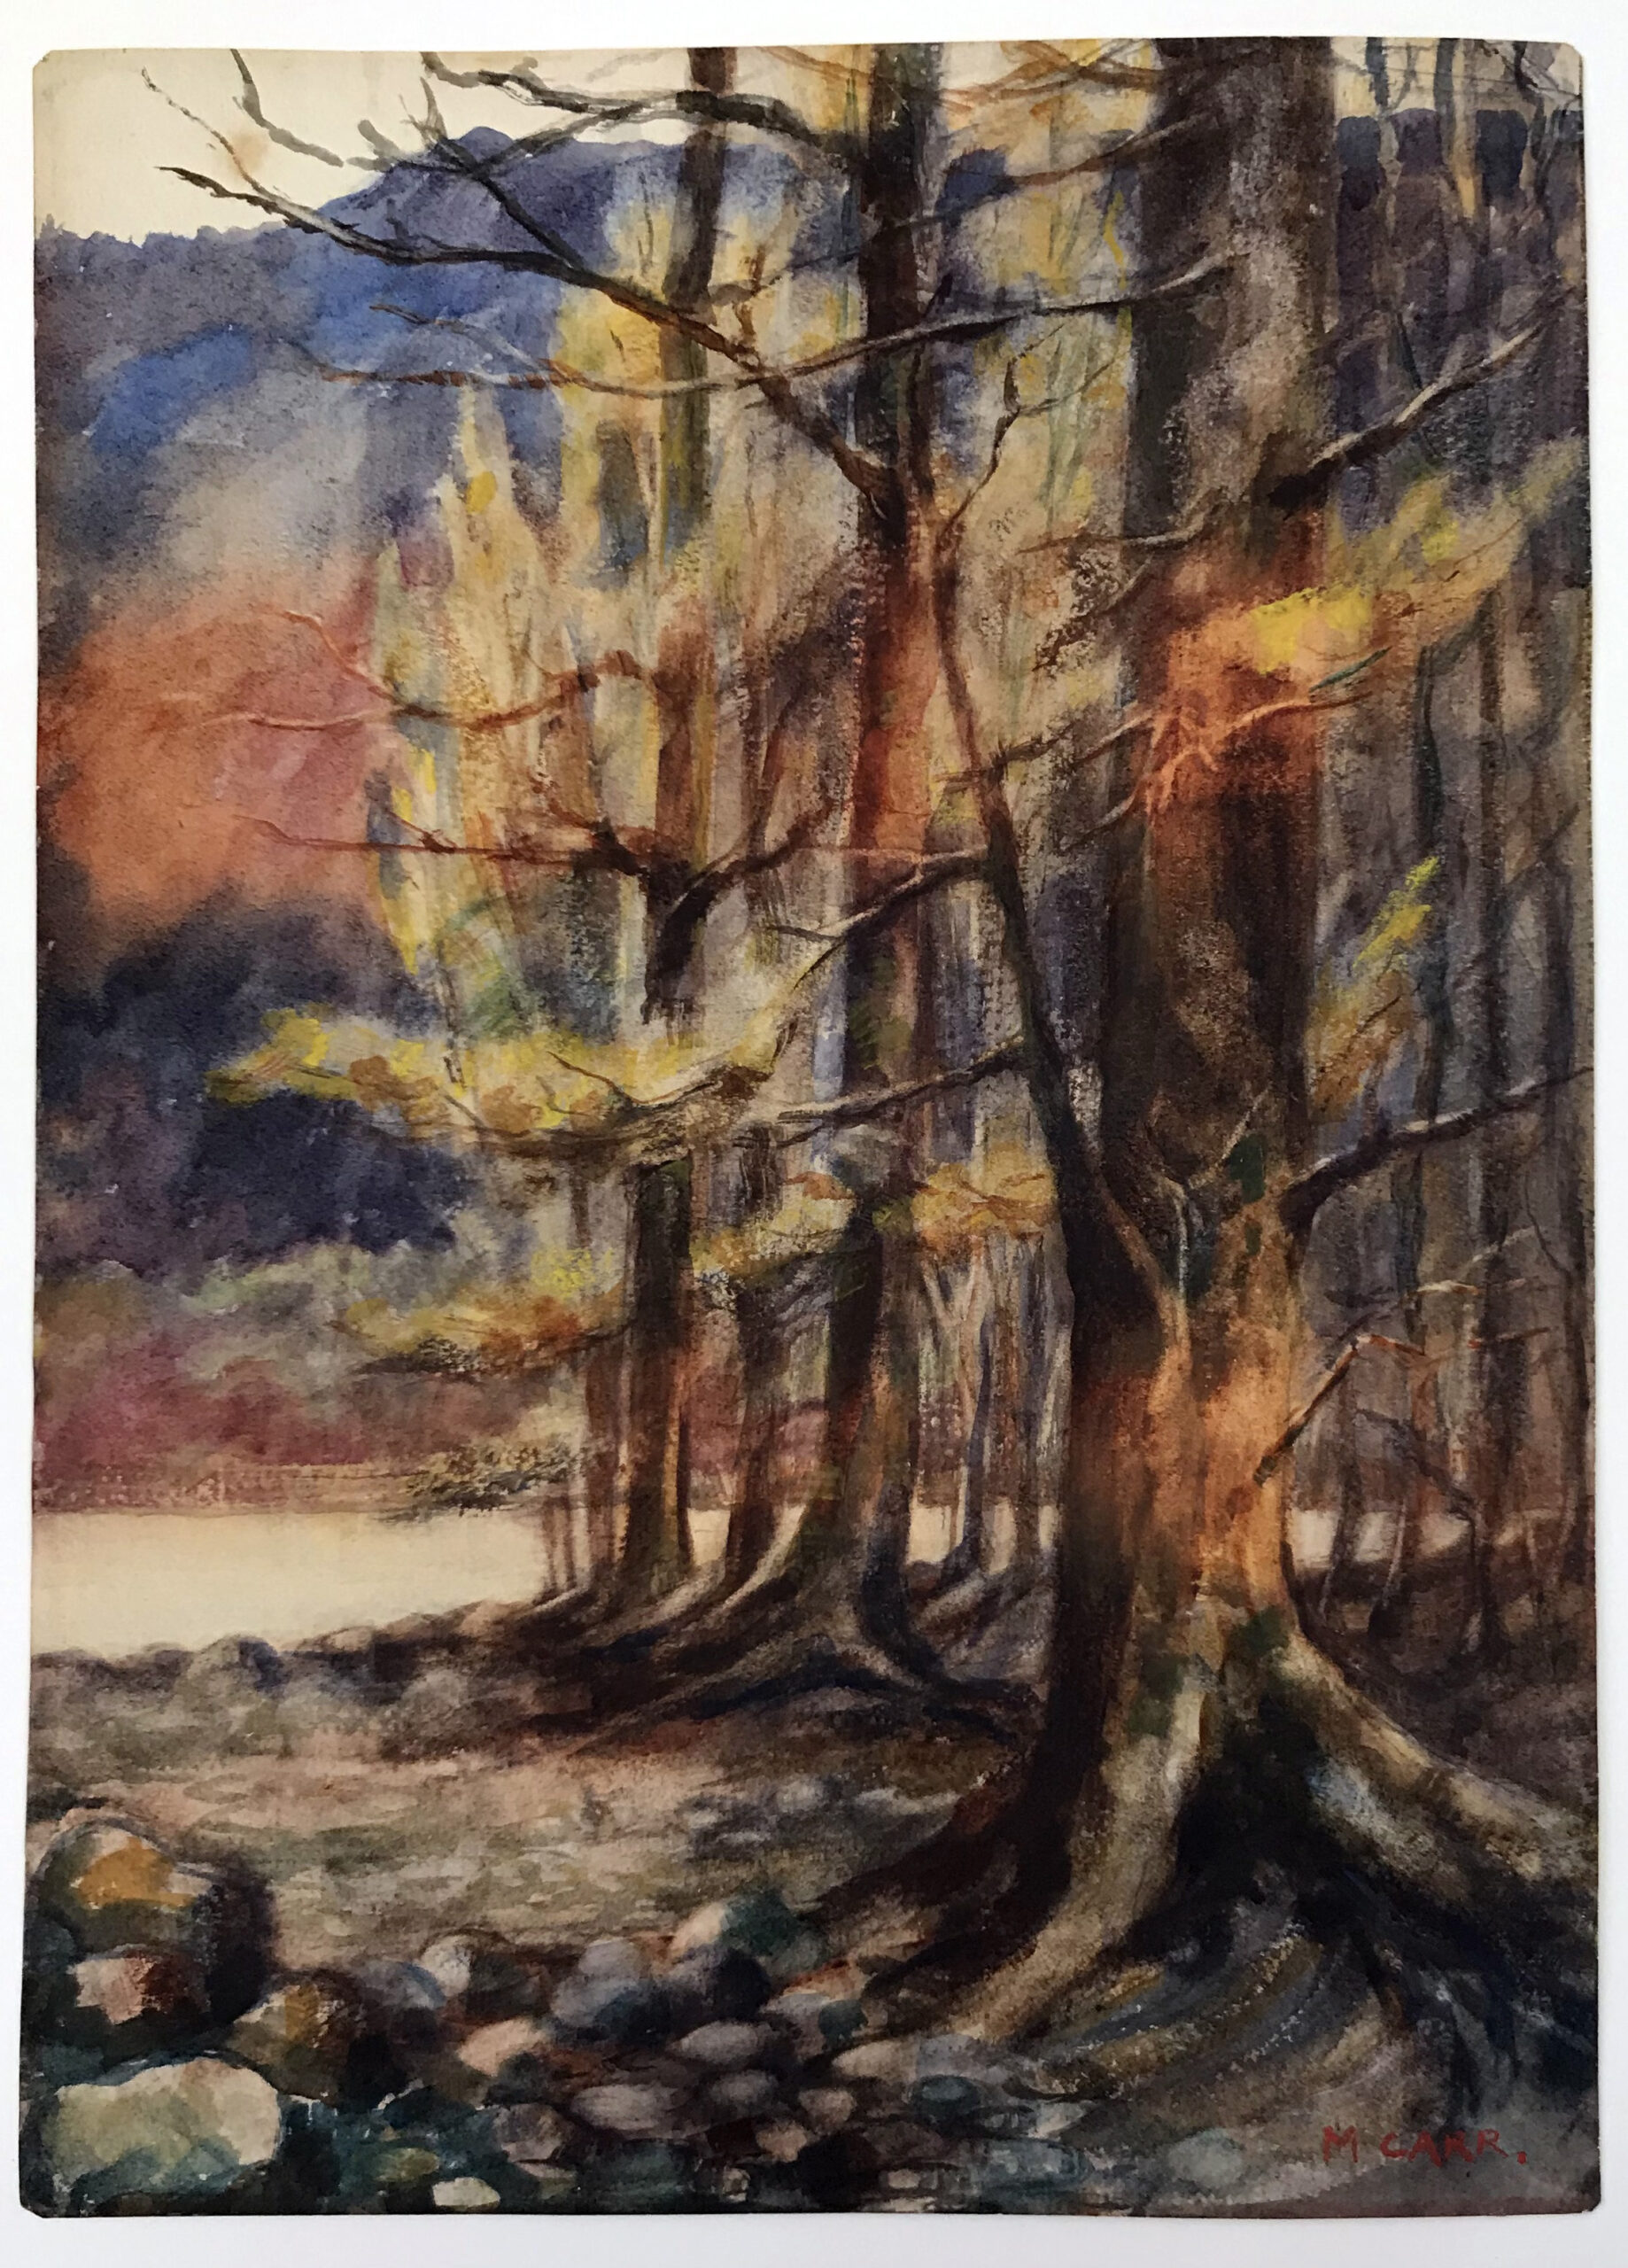
Now that the work is physically and chemically stable, it is ready to be mounted so that it can be made accessible for research and exhibit (Figs. 6 and 7). Once the work is matted and framed, the change from “before” to “after” won’t be detectable to most viewers, but this work is essential for the long-term stability of the painting. It is an invisible gift that this generation bequeaths to the next.
Figure 6. Front in reflected light (after treatment)
Figure 7. Back in reflected light (after treatment).
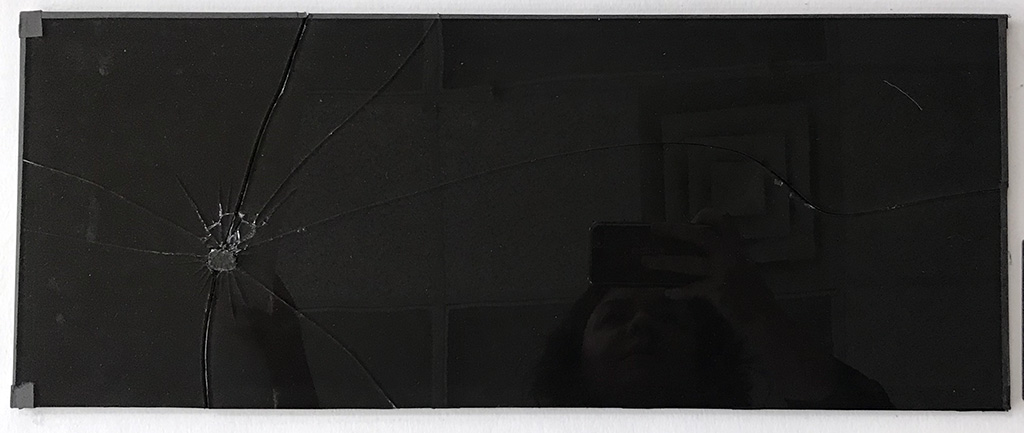
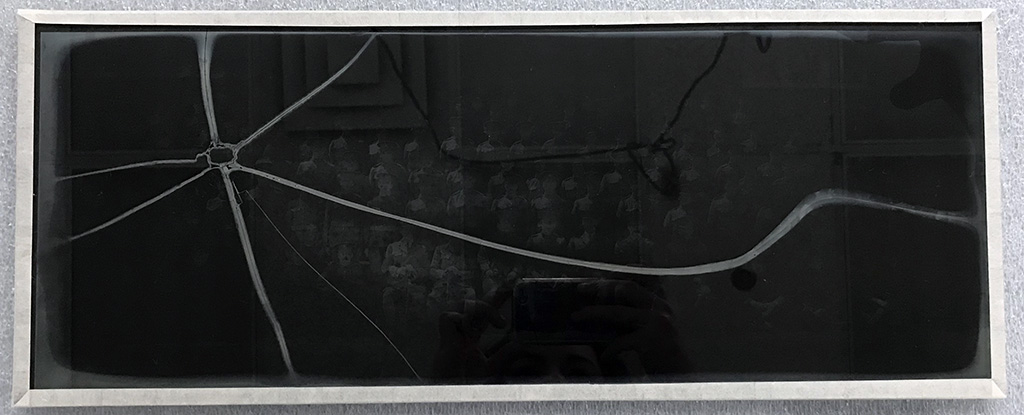
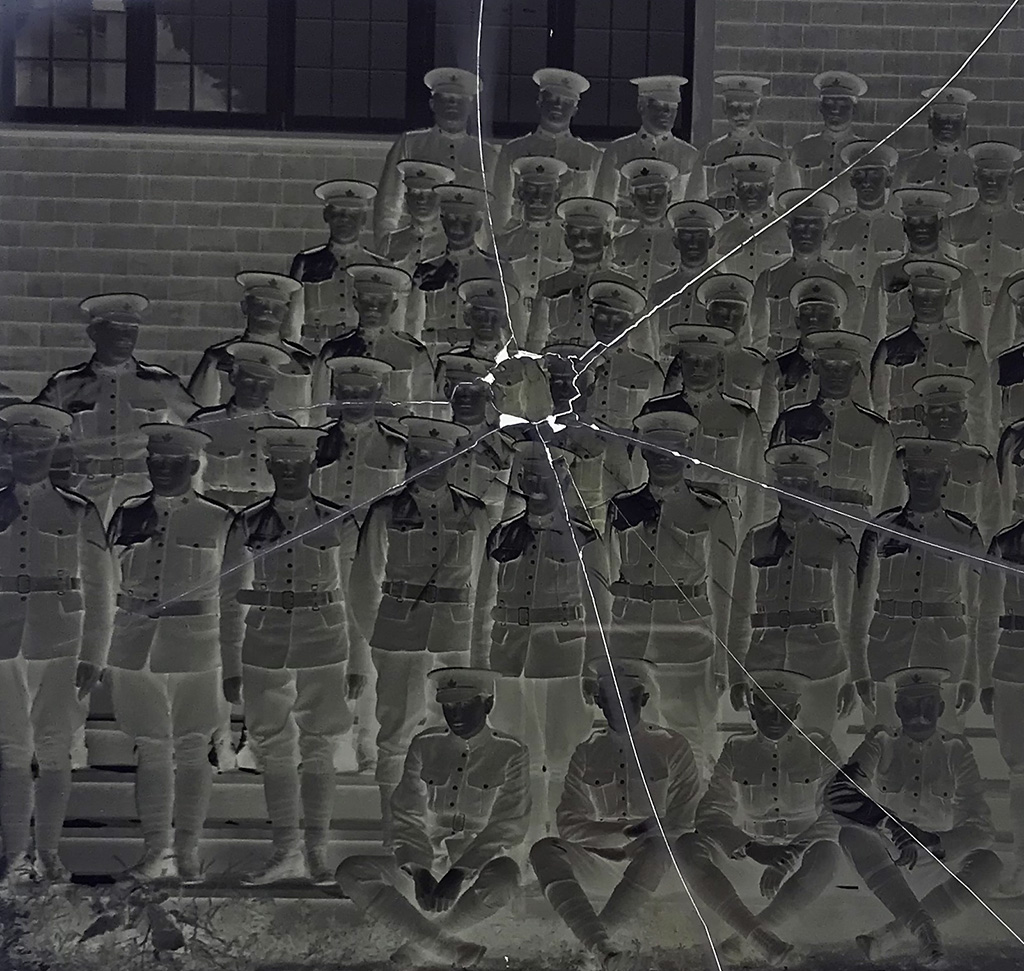
The BC Archives is currently finishing up a project to arrange, describe and digitize a collection of photographic holdings from Ernest Crocker, a notable nineteenth century photographer. Part of this effort has involved some conservation work to repair some of the elements of these collections that have not made it through the ravages of time in one piece. In this particular example, the image identified as J-02623, there were a great many pieces. The following is a description of how it was repaired.
Figure 1. Glass side of J-02623 (resting on another negative, J-02624) in reflected light before treatment.
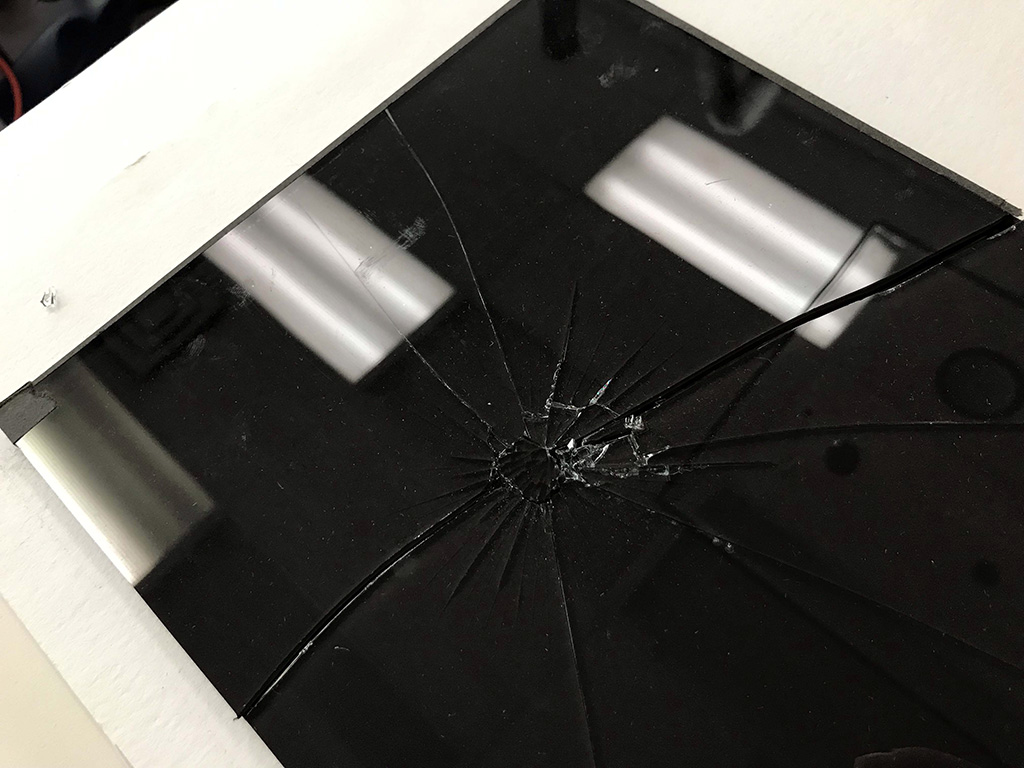
Figure 2. Detail of damage, glass side of J-02623 (resting on another negative, J-02624) in reflected light before treatment.
Background and terminology
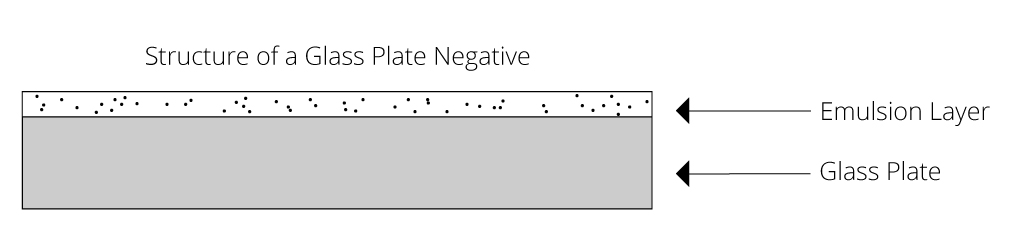
Glass plates were used as a support for photographic negatives early on in the history of photography and continued to be used well into the first half of the twentieth century. The negative is composed of two layers: the glass support and the photographic emulsion that holds the image (Fig 2). In the case of this example, the emulsion layer was made from gelatin.
Figure 3. Diagram of the physical structure of a glass-plate negative.
Condition issues
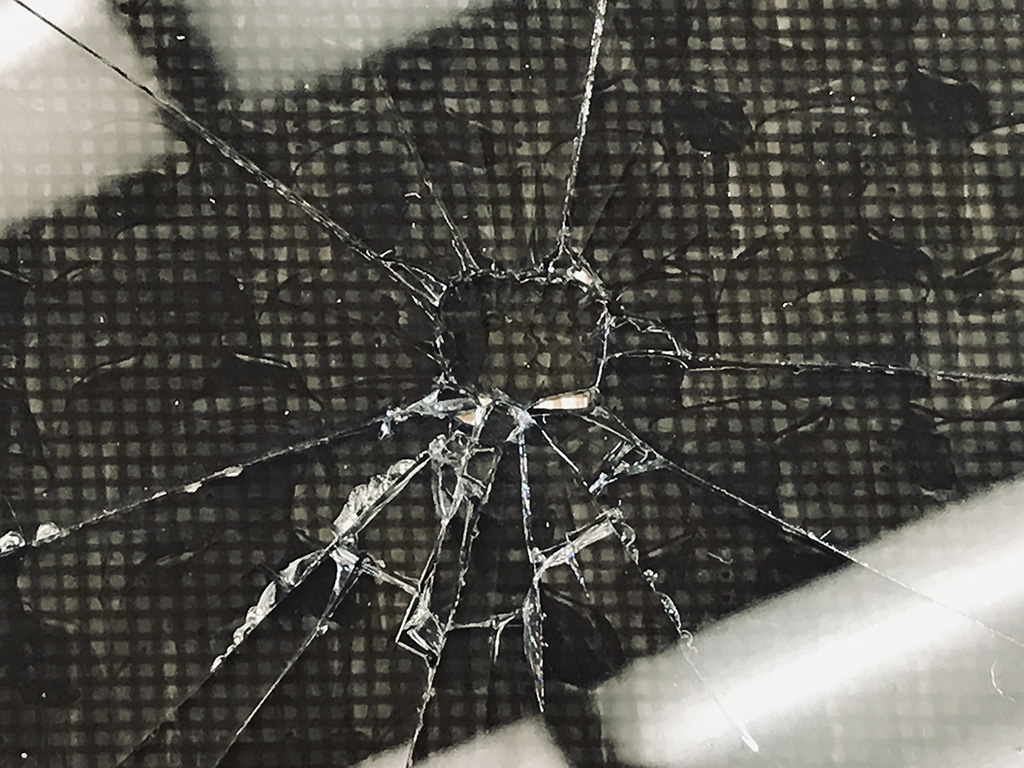
When J-02623 arrived in the conservation lab, it was in many pieces and was resting on a second, intact plate. The fractures radiated from a central point near the upper right corner, suggesting that the negative had been struck by something blunt at some point in its history. In some of the areas around the cracks, the glass had been reduced to dust, which meant that there would likely be small losses once the dust was cleared. Its fragmented and fragile condition meant that it could not be removed from the supporting negative underneath it, which meant that the archivist could not see or identify either image and absolutely couldn’t digitize them.
These condition issues posed a few interesting problems in terms of developing a conservation treatment:
1. Broken plate cannot be stabilized as it is
Cracks in glass plate negatives are not uncommon. In many instances, simple solutions such as custom storage enclosures or pressure mounts are sufficient for long-term stability. Pressure mounts—two new pieces of glass put on either side of the broken original and taped together—were used on several other broken plates within this collection. The benefit of this method is that the new glass provides the necessary support for the plate to be handled again and the treatment is completely reversible, allowing for reconsideration of treatment alternatives in the future if desired. In the case of J-02623, however, this would not be feasible—the negative was too fragmented and would not be adequately supported by a pressure mount alone.
2. Broken plate cannot be moved as one piece
Before methods for consolidation and long-term storage could be considered, the issue of simply removing the broken plate from the intact plate beneath it had to be addressed. As previously mentioned, areas around the cracks had disintegrated into dust. This meant that sliding the broken negative off of the supporting plate and onto a new piece of support glass would be impossible. Some of this sharp, glass dust was likely to be under the broken shards of the negative. If sliding was attempted, the glass dust would act as sandpaper, abrading the delicate emulsion on the underside of the broken negative, leading to partial losses of the image. It would also likely scratch the glass side of the other negative as well.
3. Reassembly after any disassembly would be very tricky
If the broken pieces couldn’t be slid onto a new support or work surface, they would have to be lifted. But this solution posed its own problems: how do you replace so many tiny pieces back in proper alignment once they’ve been disassembled?
4. How to stabilize for the long-term
Once a plan to remove and reassemble the broken plate is achieved, how do you stabilize it for gentle handling and digitization? If a pressure-mount system is not enough, the only other option is to adhere all of the shards back together; however, this is easier said than done. How do you apply adhesive to glass shards without it oozing out around the edges? What adhesive will provide a strong enough bond while also having good aging properties as well as being reversible/adjustable?
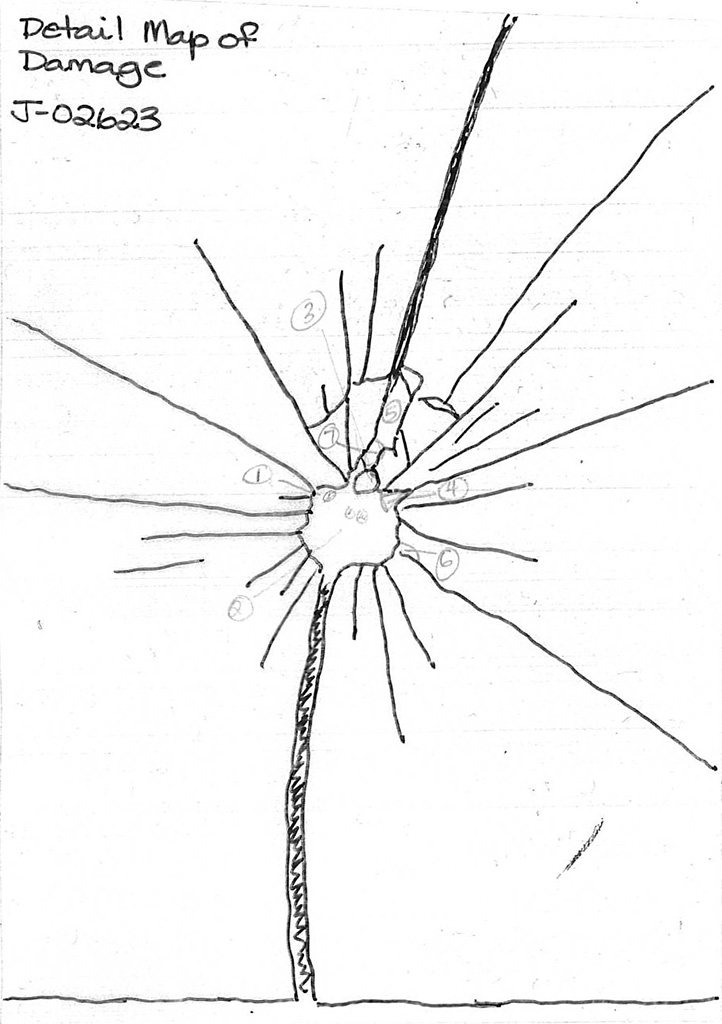
Figure 4. Detail of the damage (in greyscale) during treatment
Figure 5. Map of the damage
Treatment
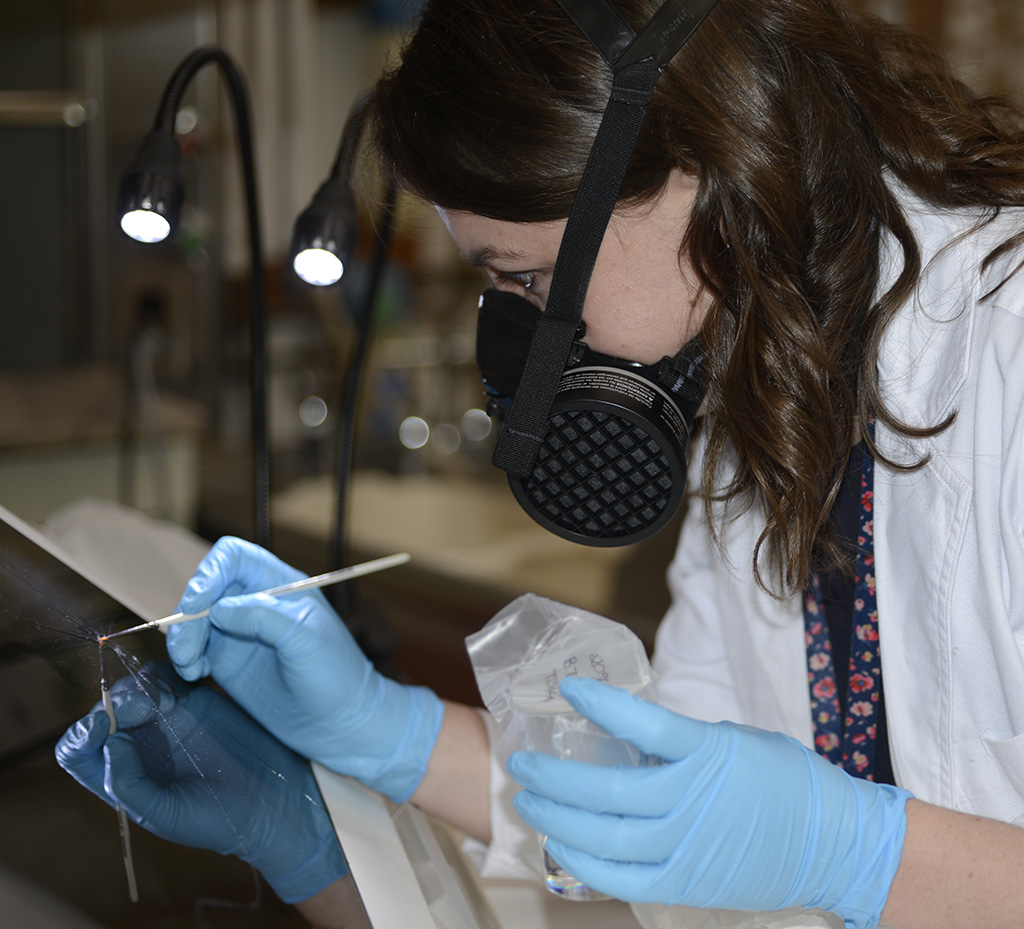
Figure 6. Paper conservator Lauren Buttle applying adhesive to glass side of J-02623 using Silpat® method. A respirator mask was required for this treatment because of the use of solvents.
A carefully considered treatment plan was required to answer so many questions.
To achieve the first task of moving the broken plate to a new working surface, the damage was first mapped (traced) onto a clear sheet of plastic with permanent marker and photocopied onto paper. This map was used as the basis for recording the location of each of the tiny shards that would have to be replaced afterwards. Tiny shards that were big enough to carry part of the emulsion were removed one-by-one, placed in a numbered bag and their shape and location was noted on the map (Figs. 4 and 5).
Before the shards were reassembled, the edges of each one were swabbed with acetone to clean away any dirt or oil that might impede adhesion. The shards were reassembled, emulsion-side down, on an inclined surface against a Silpat® mat (a reusable silicone-covered textile designed for baking). This mat provides a non-stick surface that is not completely flat. The texture in the textile provides a series of small bumps that raise the glass slightly off of the rest of the surface. The adhesive is delivered to the cracks on the glass side and capillary action draws the adhesive through the crack. Because there is no consistent contact with a flat surface on the emulsion side, the capillary action stops at the emulsion side, keeping the edges of the cracks on that side nice and neat. All of the pieces were assembled dry first. After all pieces were aligned, adhesive was administered.
After the adhesive in the cracks was dry, the glass-side surface was cleaned gently with solvents to remove any adhesive residue from the edge of the cracks.
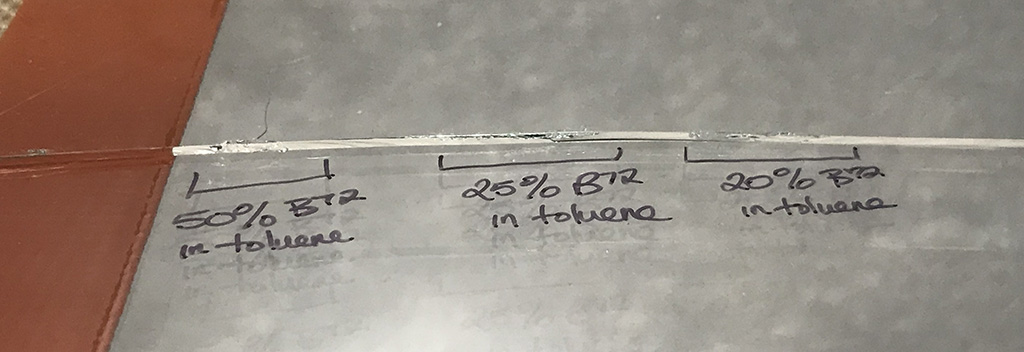
The adhesive used for this repair was Acryloid B-72, a non-proprietary acrylic adhesive with known aging properties and good long-term stability. Acryloid B-72 can be dissolved in many different organic solvents. In this case, toluene was used, because it has a relatively slower drying time, which allows more time for the solvated adhesive to flow into the cracks before drying. Various concentrations were tested until full penetration of a crack in a test piece of glass was achieved (Fig. 7).
Figure 7. Test glass with different concentrations of Acryloid B-72 in toluene applied to a crack. When light is shown over the crack, the areas where the adhesive has been drawn in begin to disappear.
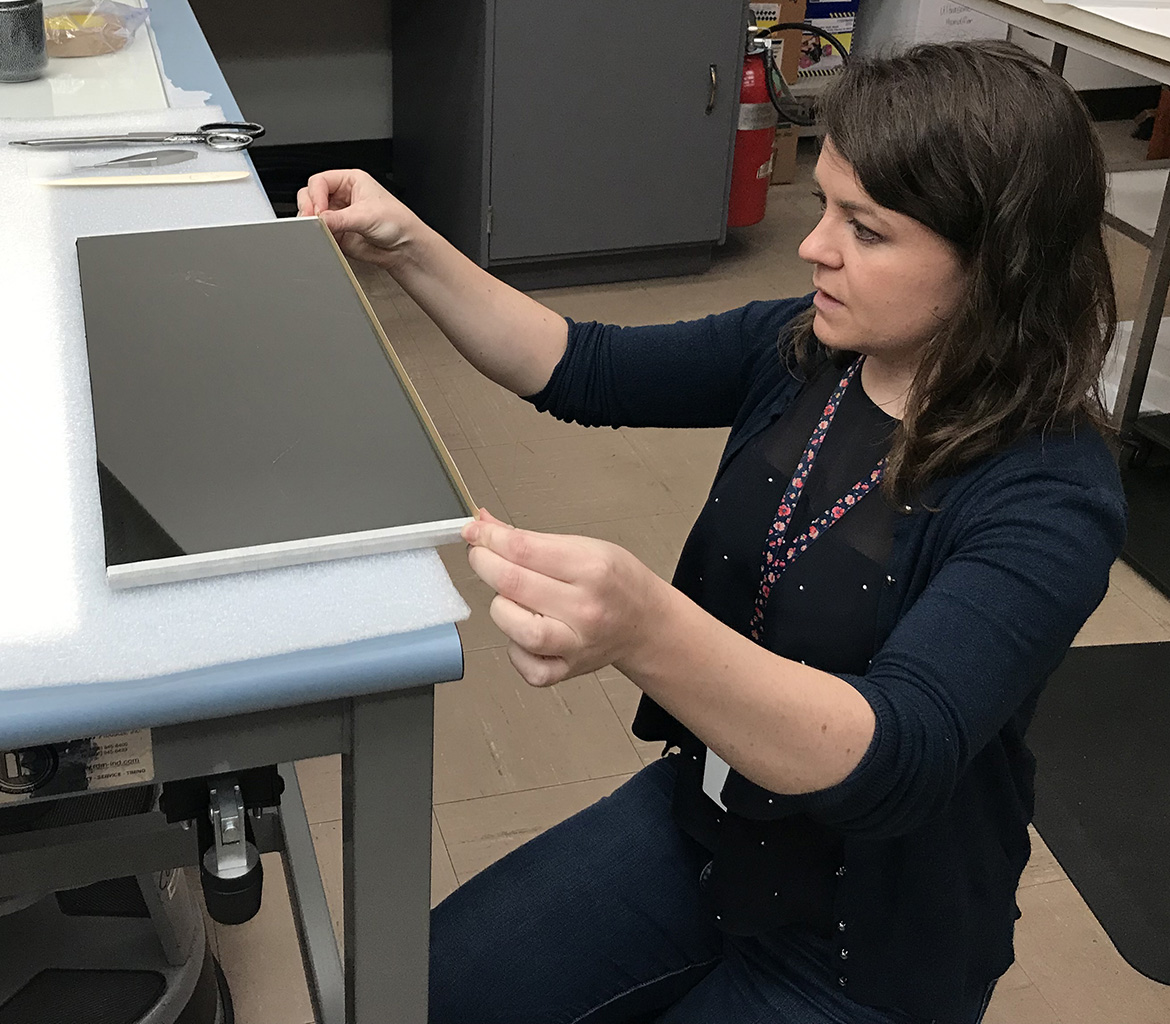
After all the pieces had been assembled and adhered in place, the plate could be lifted and handled gently. But due to the larger size of the plate and the amount of cracking, additional support would be needed for long-term care and access. Also, there were small losses in areas in the center of the cracking, which left jagged edges exposed. For these two reasons, it was decided that a pressuremount would be the best way to protect the plate and the patron.
Two new sheets of glass, cut to the same dimensions as the negative, were cleaned and placed on either side of the repaired plate. All four edges were taped to seal the package and allow for easy handling. The plate will be transferred to a member of our Preservation team for digitization with the rest of the collection.
Figure 8. Paper conservator Lauren Buttle taping up the edges of the pressure mount.
Figure 9. Emulsion-side of J-02623 in reflected light after treatment. The lines in the negative along the cracks that are visible in Figure 9 are the result of silver mirroring—a common form of irreversible deterioration of silver gelatin photographs.
Figure 10. Detail of the emulsion-side of J-02623 in transmitted light after treatment. Some losses were incurred from damage after treatment. Note that the silver mirroring visible in reflected light (Figure 9) is not visible in transmitted light.
For more information on this collection, see the Ernest Crocker Fonds (PR-1348) on the BC Archives website.
Acknowledgements
The techniques for repair discussed in this blog were based on the methods conveyed by Katherine Whitman, conservator of photographs for the Art Gallery of Ontario (AGO) at a workshop hosted by the AGO in October 2018. My attendance at that workshop was generously sponsored by the Koerner Conservation Initiatives Fund through the AGO and the Royal BC Museum. I am also grateful for the ongoing communications with Katherine Whitman in devising a treatment for this plate.
Thank you to Joel Blaicher, exhibits fabricator for the Royal BC Museum, for building the support that was used in this treatment. Thanks also to Rob Anderson, lighting and AV specialist for the Royal BC Museum, for his assistance in creating a time-lapse video of this treatment.
Tom Bown, Volunteer Archaeology Research Associate.
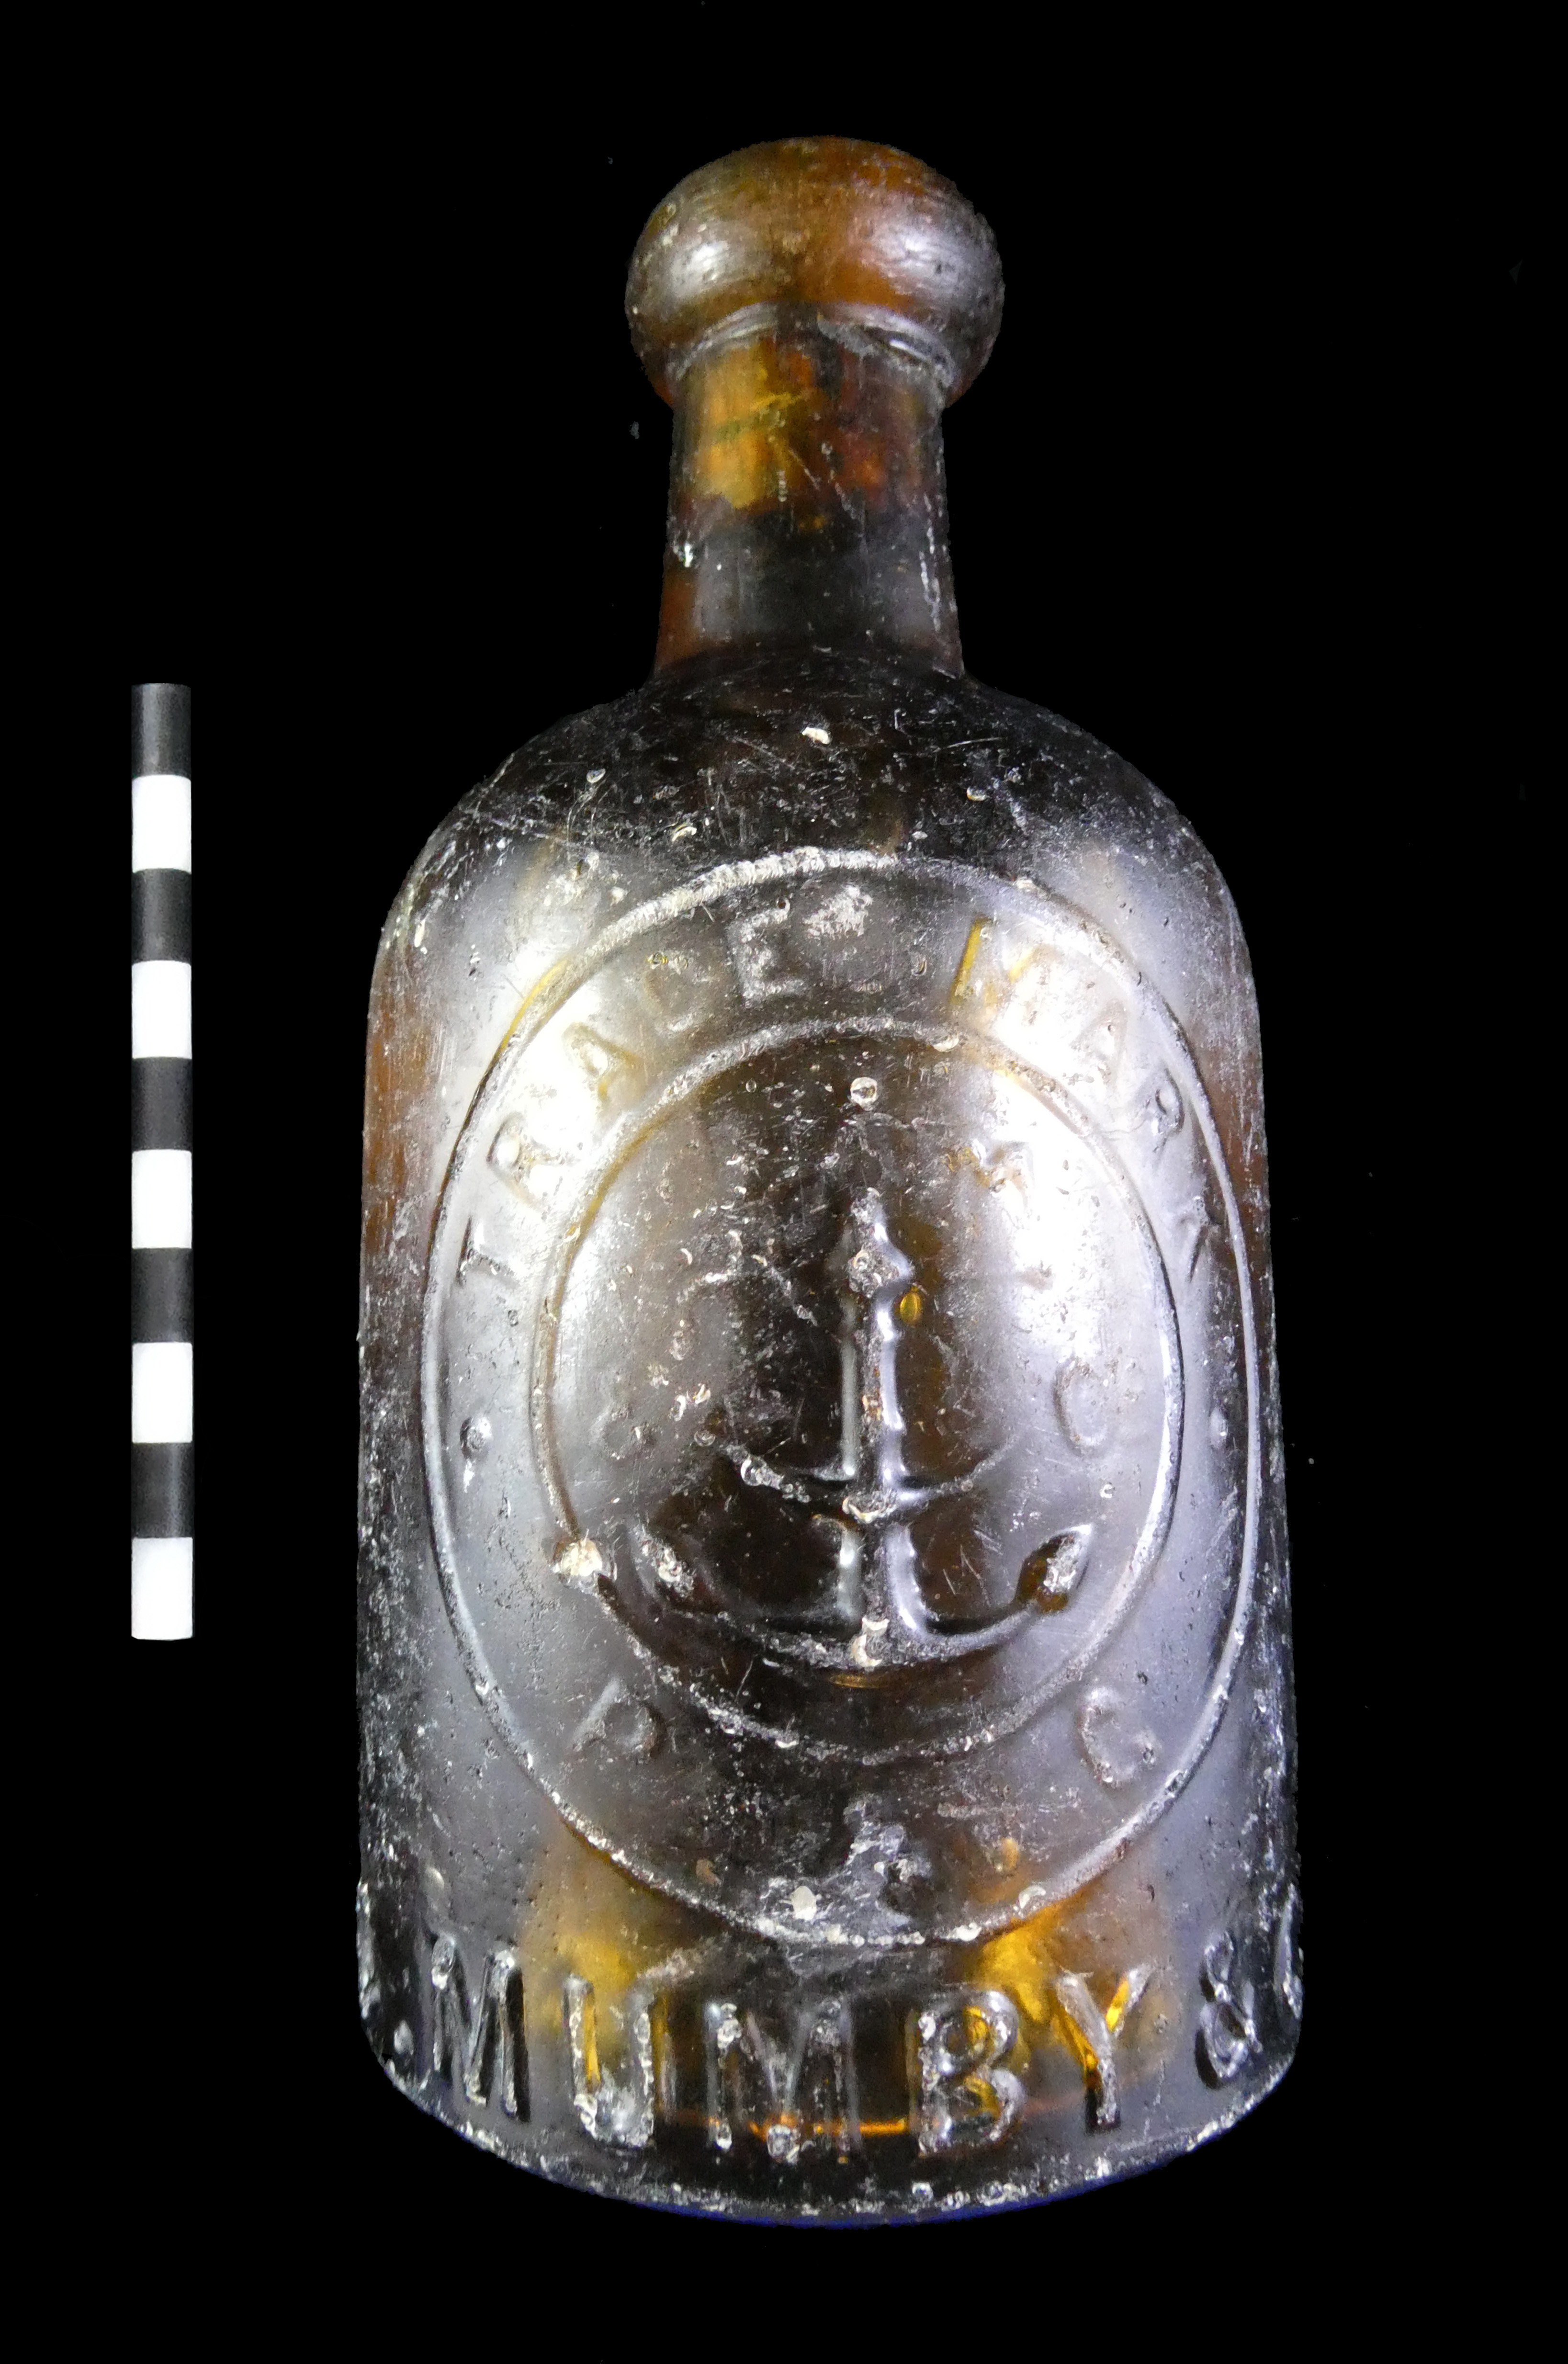
The first artifacts to arrive at the Royal British Columbia Museum from the Esquimalt Harbour Remediations dredging project (Esquimalt Harbour Remediation 2019) were a pair of pop or mineral water bottles from Charles Mumby, Portsmouth and Gosport.
This establishes a direct link between the Royal Navy Base in Portsmouth and Esquimalt.
As many of the Royal Navy ships would have been resupplied at Esquimalt, bottles and other artifacts from British Columbia companies will likely be found in Portsmouth.
Fig. 1 C. Mumby glass bottle from Esquimalt Harbour, DcRu-1278:125
(photo by author)
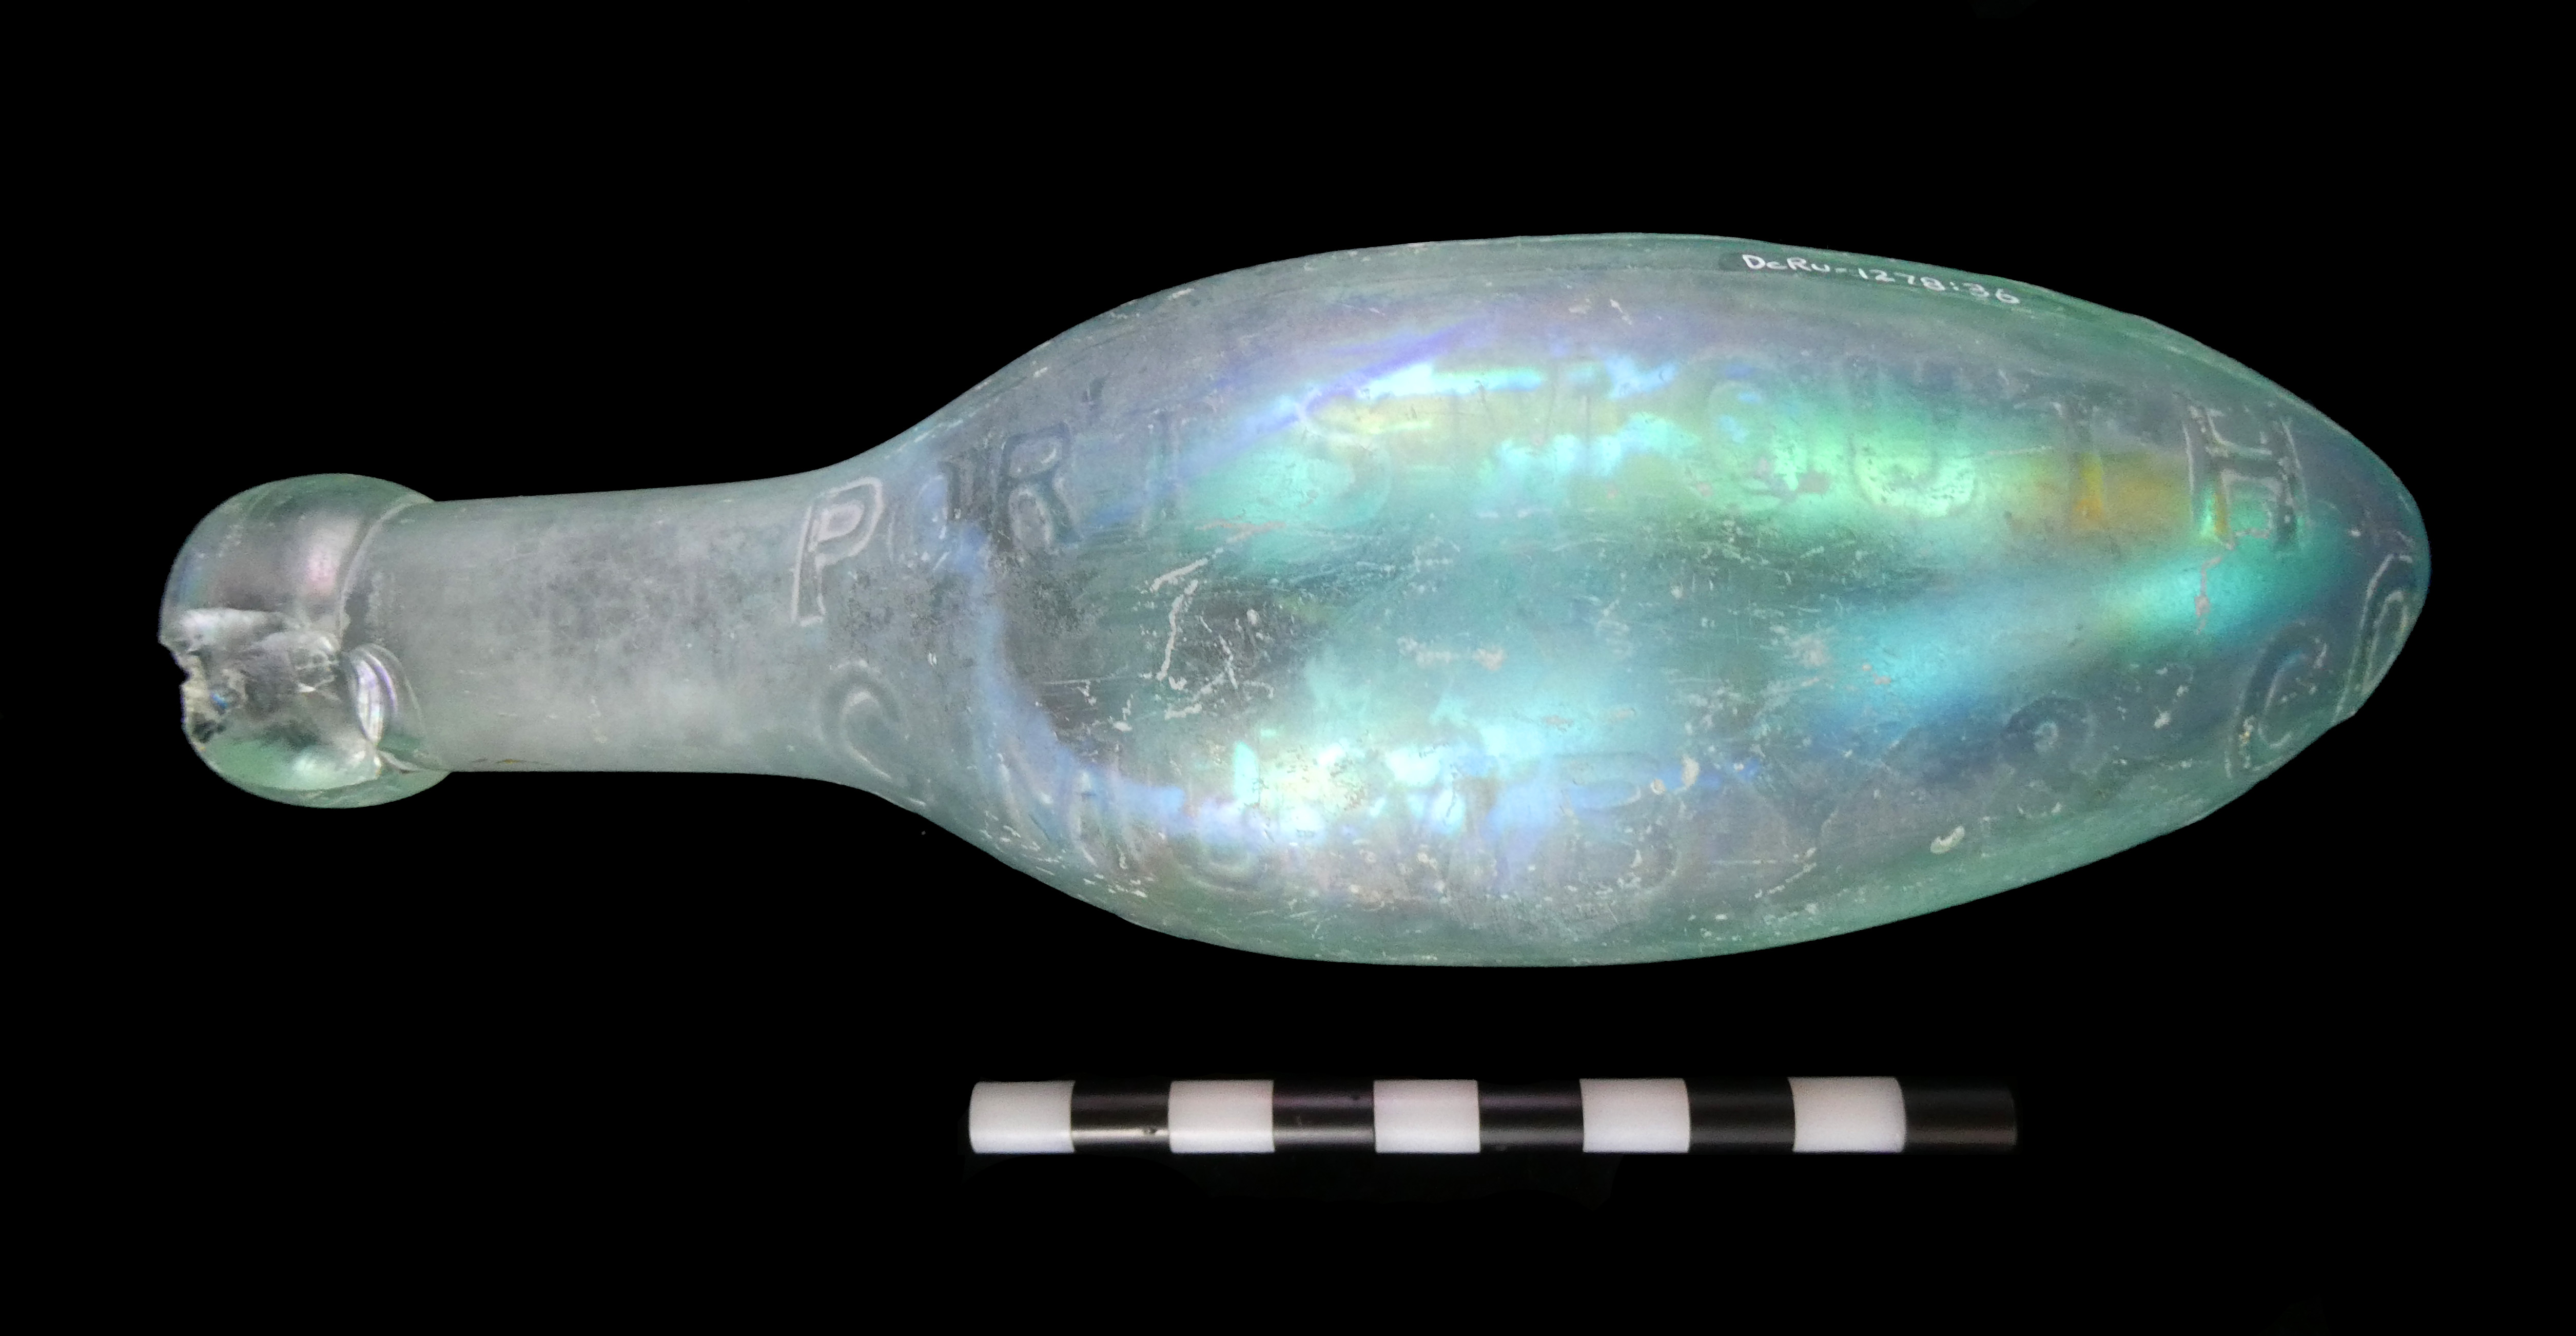
The first of these two bottles, is a short squat, amber coloured, cylindrical, bottle with a hand finished blob top. It is 15.5 cm. in height and 7.7 cm in diameter. Remarkably the cork is still in the neck and the bottle might still have the original contents. The front is embossed C. MUMBY & Co with a double circle embossed TRADE MARK P & G and a fouled anchor in the center. A bottle such as this would likely date between 1884 and 1910. Hannon and Hannon (1976) state the term trade mark on Mumby’s bottles post dates 1884.
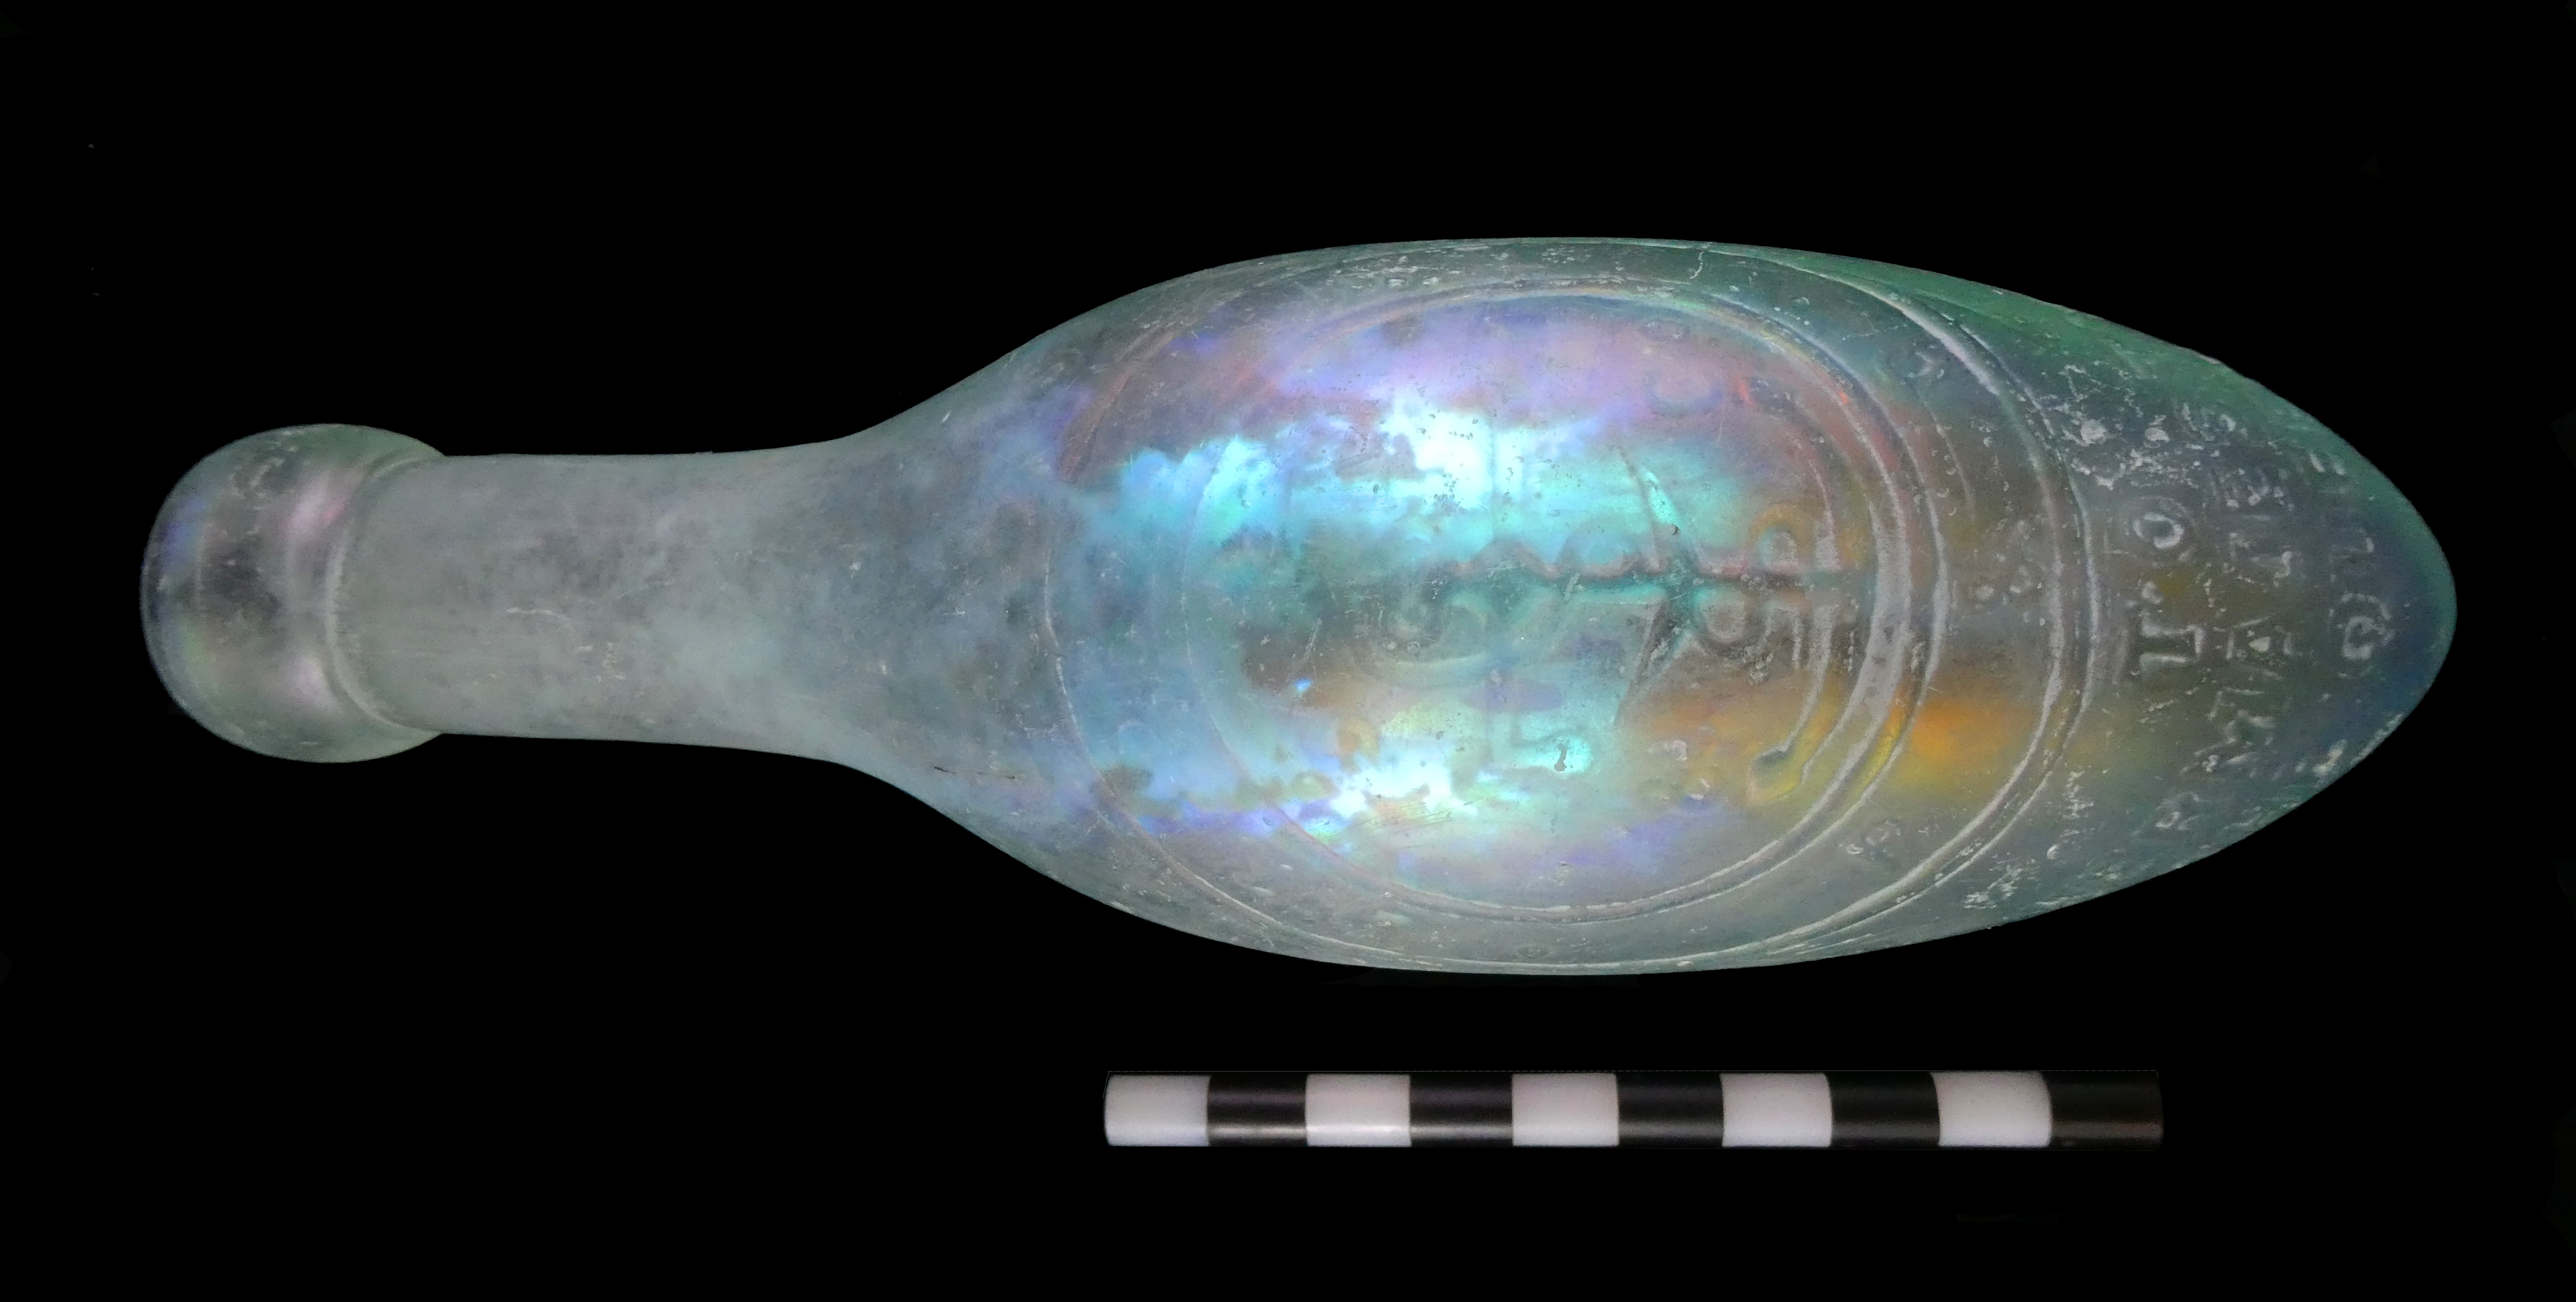
Fig 2a C. Mumby “torpedo” bottle from Esquimalt Harbour DcRu-1278:36 (front). Photo by author
Fig 2b C. Mumby bottle from Esquimalt Harbour (reverse side). Photo by author
The second, is a “torpedo” shaped bottle also known as a Hamilt on style named after the inventor. In aqua coloured glass, it has a hand finished blob top. It is 19.0 cm in length and 6.1 cm at its widest diameter. On the front it has a double circle with TRADE MARK at the top and P&G at the bottom with the fouled anchor in the center the same as the one in figure 1. Above the circle only the last two letters are legible as ER the phrase was likely SODA WATER MAKERS and below the circle TO HER MAGESTY THE QUEEN. On one side it’s embossed C MUMBY & Co PORTSMOUTH AND GOSPORT on the opposite side. This bottle likely dates between 1884 and passing of Queen Victoria in 1901.
The torpedo style bottle was initially designed to withhold the pressure of the carbonation as well as keeping it from standing up right allowing the cork to dry and the carbonation to escape. They were used extensively in the mid 19th century and a few companies kept the design until the start of the 20th century. In British Columbia, there are no known bottlers that ordered torpedo style bottles embossed with company names.
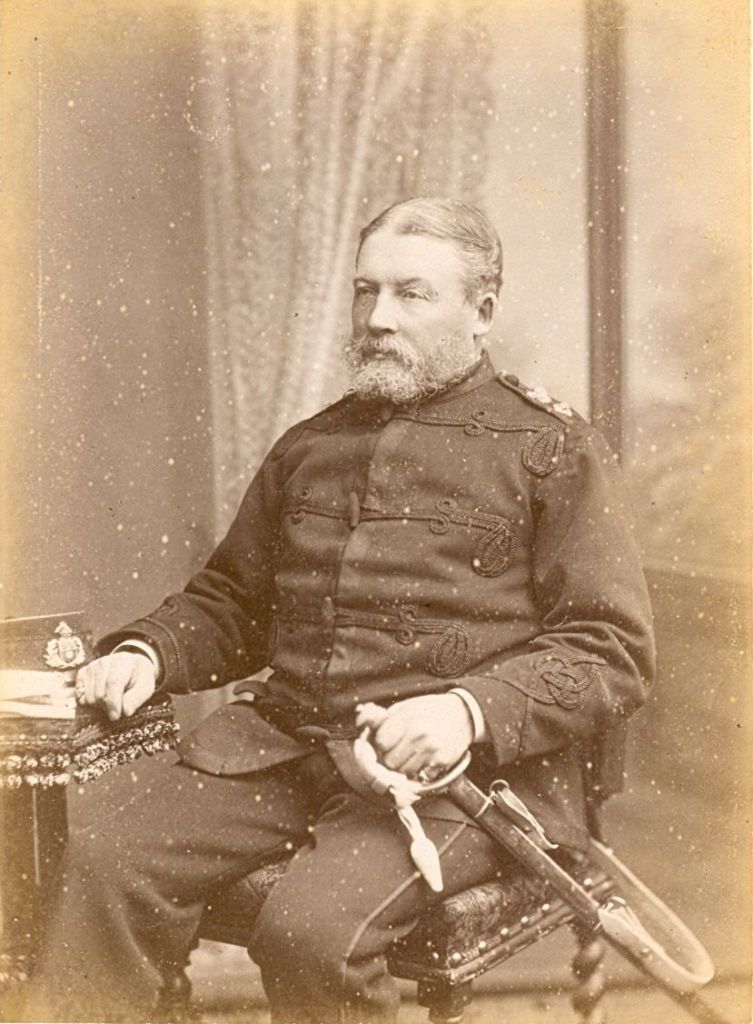
Fig. 3 Colonel Charles Mumby. Photo with permission of David Moore, Historic Gosport
Starting on the mid-19th century, both the Royal Navy and British Army were recognizing alcohol as a serious problem. Lloyd and Coulter (1963:96) state: “Heavy drinking especially on shore, diminished towards the end of the century when tea and coffee were fast supplanting grog…” Increased levels of technology required higher levels of training that had little tolerance for drunkenness. In addition, the temperance moment was having an influence. As a result, many of the Royal Navy Clubs and regimental canteens were supplying their own soft drink bottles with club names and regimental crests (Bown 2015). A second advantage of these products was the carbonation which acted as a preservative keeping the contents for long sea voyages.
It would appear Charles Mumby saw an opportunity and was close at hand to supply the Royal Navy with a good supply of non-alcoholic beverages. Even his choice of logo with the fouled anchor was likely designed to appeal to the Navy.
Like many prominent businessmen in the Victoria era, Mumby was an officer in the local militia. This may have given him the necessary status and connections to supply the Royal Navy. The following was provided by David Moore at Historic Gosport (2019):
“Charles Mumby set up business in Gosport in 1849 as a chemist and manufacturer of mineral waters. His shop was at 47/48 High Street. His supply of water was a large bore hole in the yard at the back of the shop, which had rear access from North Street. At 345 feet he hit natural water in the chalk subsoil. He installed machinery to increase the production of natural ice. He produced famous soda water, ginger beer and lemonade, selling across the south of England. He supplied the Army and the Navy, receiving a Royal Warrant from Queen Victoria. The manufacture of mineral waters continued at his original premises in the High Street, and an office was opened up at Portsmouth, first at 71 St George’s Square, then, from the late 1870s, at 34 The Hard. Charles Mumby was a Poor Law Guardian, a magistrate, a County Councillor for Hampshire, and sat on innumerable public and social committees. Charles retired in 1885 leaving the business to his son Everitt.” It was floated as a company in 1898.”
WikiTree (2019) also states Mumby and Company was awarded a Royal Warrant to supply King Edward VII and the company continued to supply the Royal Navy until about 1970.
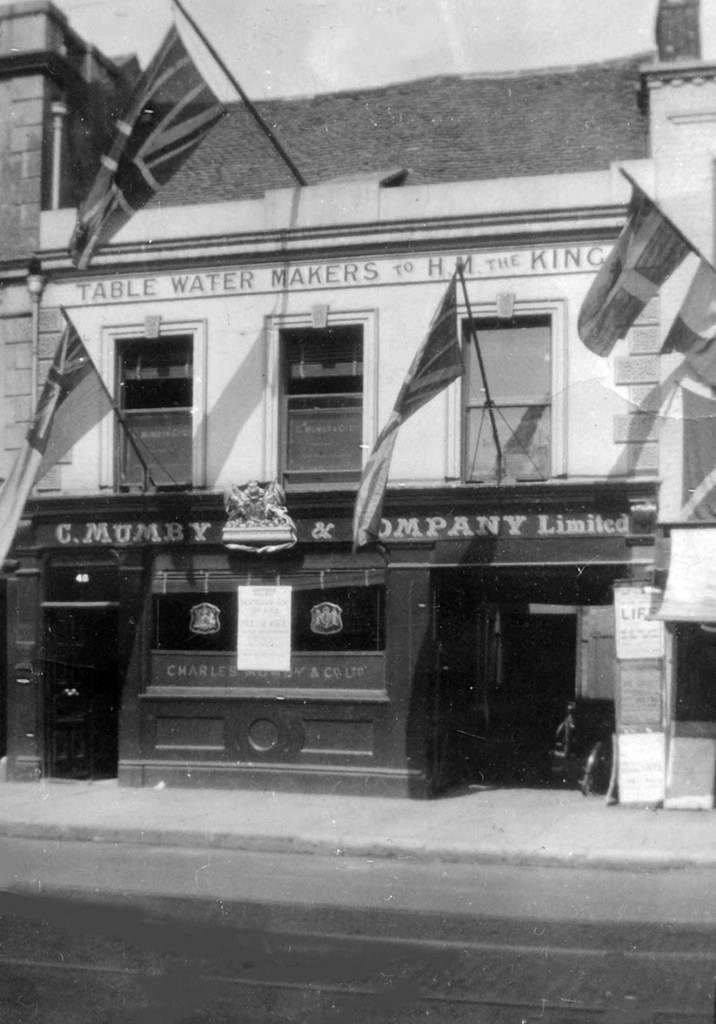
Fig. 4 A Photo of Mumby’s Shop, Photo with permission of David Moore, Historic Gosport
Located at 47/48 High Street sometime after the reign of Queen Victoria as the banner states TABLE WATER MAKERS TO HM THE KING. His business in Gosport was conveniently located within a kilometer of the Royal Navy base at Portsmouth across the harbour.
References
Bown, T. and C. Addams, 2015. Glass and Pottery of the Royal Navy and British Military: Historic and Archaeological Finds form the 18th, 19th and 20th Century. First Choice Books Victoria B.C.
Hannon T., and Hannon A., 1976. Bottles Found in St Thomas, Virgin Island Waters. Journal of the Virgin Islands Archaeology Society, Volume. 3, 1976, pp. 29-46.
Jade Savage¹, Art Borkent³, Fenja Brodo¹¹, Jeffey M. Cumming², Gregory Curler⁴, Douglas C. Currie⁵, Jeremy R. deWaard⁶, Joel F. Gibson³, Martin Hauser⁷, Louis Laplante⁸, Owen Lonsdale², Stephen A. Marshall⁹, James E. O’Hara², Bradley J. Sinclair¹⁰, Jeffey H. Skevington²
1 Bishop’s University, Sherbrooke, Quebec, Canada 2 Agriculture and Agri-Food Canada, Canadian National Collection of Insects, Arachnids and Nematodes, Ottawa, Ontario, Canada 3 Royal British Columbia Museum, Victoria, British Columbia, Canada 4 Mississippi Entomological Museum, Mississippi State University, Starksville, Mississippi, USA 5 Royal Ontario Museum, Toronto, Ontario, Canada 6 Centre for Biodiversity Genomics, University of Guelph, Guelph, Ontario, Canada 7 California Department of Food and Agriculture, Sacramento, California, USA 8 Unaffiated, Montreal, Quebec, Canada 9 University of Guelph, Guelph, Ontario, Canada 10 Canadian Food Inspection Agency, Ottawa, Ontario, Canada 11 Canadian Museum of Nature, Ottawa, Ontario, Canada
Abstract
The Canadian Diptera fauna is updated. Numbers of species currently known from Canada, total Bar-code Index Numbers (BINs), and estimated numbers of undescribed or unrecorded species are provided for each family. An overview of recent changes in the systematics and Canadian faunistics of major groups is provided as well as some general information on biology and life history. A total of 116 families and 9620 described species of Canadian Diptera are reported, representing more than a 36% increase in species numbers since the last comparable assessment by JF McAlpine et al. (1979). Almost 30,000 BINs have so far been obtained from flies in Canada. Estimates of additional number of species remaining to be documented in the country range from 5200 to 20,400.
Keywords
biodiversity assessment, Biota of Canada, Diptera, flies, systematics
1 Royal British Columbia Museum, 675 Belleville St., Victoria, British Columbia, V8W 9W2, Canada 2 School of Environmental Sciences, 50 Stone Rd. East, University of Guelph, Guelph, Ontario, N1G 2W1, Canada
Abstract
In the last 40 years, the number of species in the orthopteroid orders has increased by ~10% from that known in 1979. The largest order, the Orthoptera, has increased from 205 to 235 species known in Canada. The number of Blattodea has increased from 14 to 18 species, while Dermaptera has increased from 5 to 6 species. The number of species of Mantodea (3) and Phasmida (1) known in Canada have remained unchanged. Most new species records reported in Canada since 1979 have resulted from new collections along the periphery of the range of more widespread species. Some species reported since 1979 are recent introductions to Canada, including species restricted to homes or other heated buildings. The taxonomy of these orders has also changed, with only the Dermaptera having maintained its order definition since the 1979 treatment. Additional orthopteroid species are likely to occur in Canada, particularly in the orders Orthoptera and Blattodea. DNA bar-codes are available for more than 60% of the species known to occur in Canada
1 Department of Entomology, Natural History Section, Royal British Columbia Museum, 675 Belleville Street, Victoria, British Columbia, V8W 9W2, Canada 2 Centre for Biodiversity Genomics, University of Guelph, 579 Gordon Street, Guelph, Ontario, N1G 2W1, Canada
Abstract
In 1979 nearly 1400 spider species in 32 families either had been recorded (1249) or were believed to occur (~140) in Canada. Twenty years later, although significant progress had been made in survey efforts in some regions, Canada’s spider inventory had only increased by approximately 7% to roughly 1500 species known or expected to occur. Th family count had increased to 38 but only two additions were truly novel (fie family additions and one family deletion were the result of advances in family-level systematics). The first comprehensive taxonomic checklist of Canadian spider species was published in 2010 documenting the regional distributions of 1376 species representing 42 families (three novel since 1999). From 2010 through 2017 new national records steadily accumulated resulting in the current (2018) Canadian inventory of 1477 species classified in 45 families (one novel since 2010). Although there has been close to a 20% increase in the number of spider species recorded in Canada since 1979, much greater increases have occurred in some of the regional species checklists, indicating increasing knowledge of the regional distribution of species previously recorded elsewhere in Canada. For example the regional checklists for Newfoundland, British Columbia, and Prince Edward Island have increased by 69%, 339%, and 520%, respectively. The national and regional increases reflect significant advances in the fist two decades of the 21 st Century in spider faunistics research in previously under-sampled habitats and regions and the development of molecular techniques and consequent bar-coding of spiders. Of the 1477 species recorded in Canada, 92% have been successfully DNA bar-coded resulting in 1623 unique Bar-code Index Numbers (BINs). At least 25 of the BINs are associated with relatively easily distinguished but undescribed morpho-species. Th majority, however, appear to indicate the existence of many cryptic species within Canada’s known spider fauna. Thse data, coupled with the fact that novel Canadian or even Nearctic spider species records (including of undescribed species) continue to accumulate annually (especially in habitat-diverse regions such as British Columbia), suggest that Canada’s tally of spider species may approach or even exceed 1800.
Keywords
Araneae, BINs, biodiversity assessment, Biota of Canada, checklist, classification, DNA barcoding, faunistics, spiders
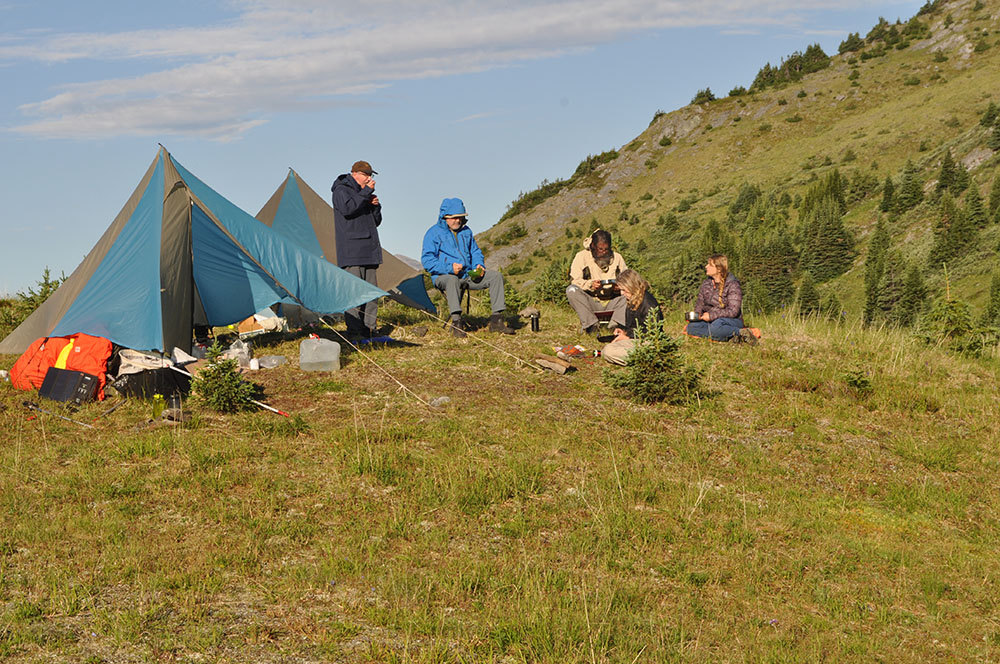
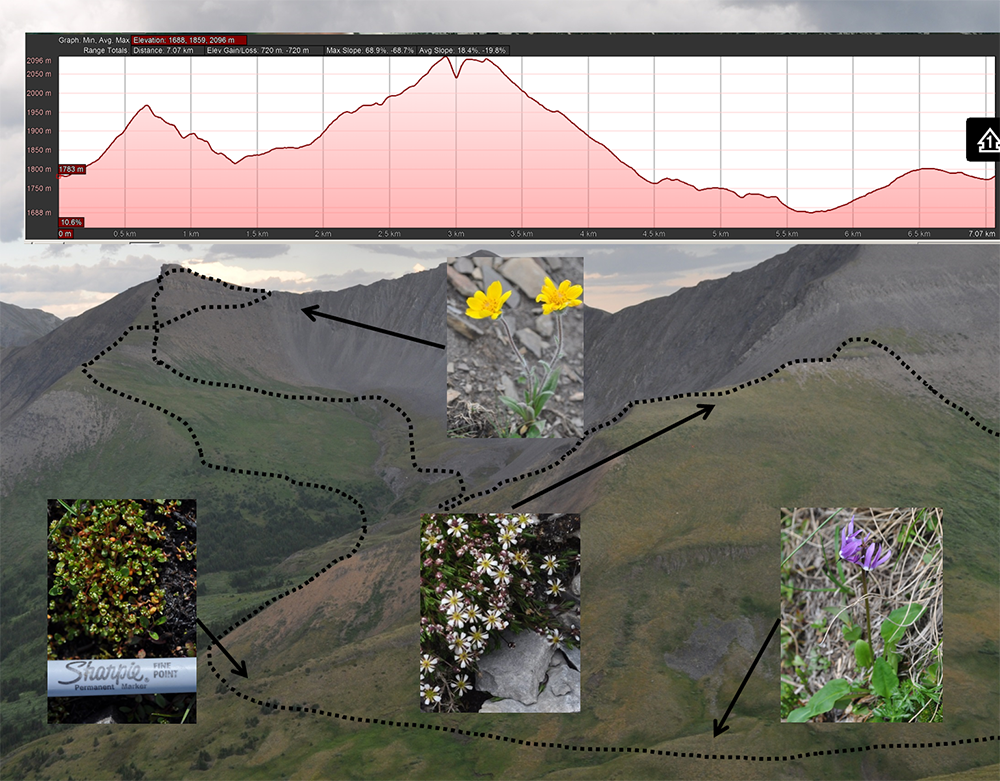
This year’s fieldwork was our 17th in the alpine of the northern B.C. We made collections from six mountains. The area is so vast and remote and access is difficult, thus few if any biological inventories have been undertaken in many large areas. Many peaks and lakes have no names; in fact there are no names on entire mountain massifs. I feel like we are to some degree just ‘scratching the surface’ of what is out there.
We again worked together with the insect and spider experts at the museum. And we followed our typical approach of setting up camp for 2-3 days and collecting specimens of every species we encounter, being intentional to reach as many different habitats as possible.
Field camp at Laurier Pass. Note the diversity of habitats ranging from alpine wetlands, to a relative dry, windswept ridge.
One shelter is used for cooking, one for processing specimens.
Typical day of hiking (dotted line) and collecting, striving to reach as many habitats as possible. Upper part of figure documents elevation changes during the day. Three of the four plants in this illustration were encountered only once, highlighting the importance of having several botanists in the field and covering as much ground as possible.
At one mountain, Mt. Whitford, we were joined by two staff and a contract photographer of the Yellowstone to Yukon Conservation Initiative https://y2y.net/about-us and their guest freelance journalist who produces pieces for both CBC and NPR. At a second mountain, south of Tumbler Ridge, we were joined by two staff members of the Tumbler Ridge Geopark, http://tumblerridgegeopark.ca/. What is a Geopark? According to their website “A UNESCO Global Geopark is an area recognized as having internationally significant geological heritage.” These groups are all interested in knowing as much as possible about the biota of these areas and we will share everything we learn with them.
As we have in the past, we contacted the local indigenous groups and informed them of our work and will provide them species lists when the identifications are complete.
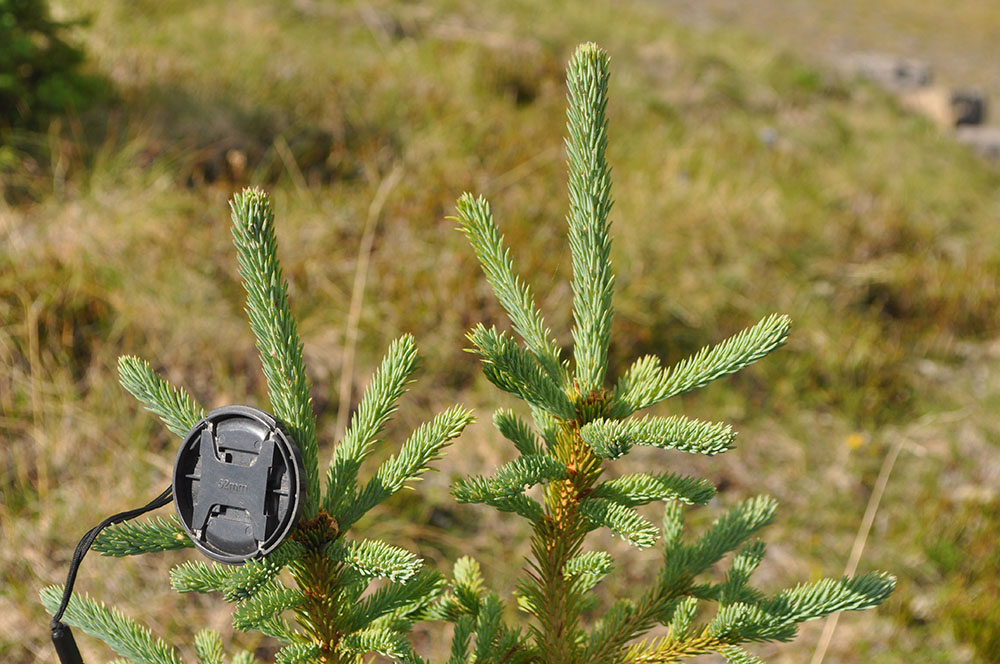
We are often asked if we notice any of the effects of climate change during our fieldwork. Treeline is controlled by temperature, not elevation and is highest at the equator – where temperatures are warmer at higher elevations – and becomes lower and lower further north and south. One likely consequence of a warming planet is that forests will advance into the alpine, reducing the available habitat for tundra plants that generally require open, i.e. non-shaded habitats.
Young trees in alpine meadows at 1750 m north of Laurier Pass, Graham-Laurier Provincial Park. Note the dark skies of a storm about to dump
For a number of years I’ve noticed small trees in the alpine and of course wonder if their appearance is related to climate change as a consequence of global warming. I’ve also noticed the absence of dead trees. The absence of dead trees may mean that tree populations in the alpine are relatively young, compared to lower elevation forests where trees have been growing and dying for thousands of years.
Young trees on a ridge at nearly 2000 m north of Laurier Pass, Graham-Laurier Provincial Park.
Current years’ growth – the portion of the stem beside the lens cap – of young trees at 2000 m, north of Laurier Pass, Graham-Laurier Provincial Park.
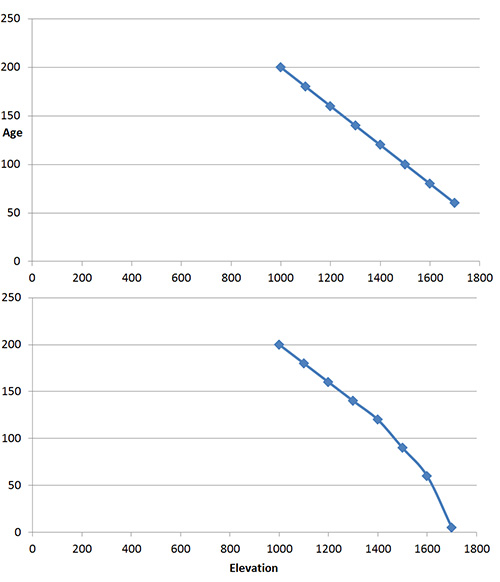
Two hypothetical graphs of tree age versus elevation curves. The upper one portrays trees that become gradually younger with elevation gain, much as one might expect if treeline was moving higher gradually. The hypothetical curve on the lower graph describes a more abrupt change, i.e. what one might expect if tree line had been stable for a relatively long period of time, slowly moving to higher elevations, then suddenly and relatively recently, young trees became established higher than before.
But a further question is this: have the young trees in the alpine arrived relatively suddenly and recently because of recent rapid increase in global temperatures, or are they gradually moving upwards due to a long term warming trend that has been taking place ever since the end of the Pleistocene, ca. 13,000 years ago? Dating trees by their growth rings could provide the answer by measuring the ages of trees along an elevation gradient from well below tree-line into the alpine. I suspect this kind of research is underway.
Every year we seem to encounter botanical surprises, either range extensions or species that we haven’t seen before. I like these kinds of discoveries because distribution patterns tell us something about the history of the landscape and when those distribution patterns are found to be different from what was previously known, the background story might change.
One notable collection this year was Dodecatheon frigidum (northern shootingstar) that we collected in northern Graham Laurier Provincial Park, about 200 km south of where it has been collected previously near the Alaska Highway. We’ve visited 8 mountains in the intervening area and have not encountered this species. What does this occurrence mean? Have we merely overlooked it in other areas or is it in fact not present for this 200 km distance?
Another interesting find was Claytonia lanceolata (western spring beauty) which I saw in the alpine for the first time. Previously I had encountered it at lower elevations in Botanie Valley north of Lytton. Indigenous people in the southern interior of BC eat the tubers either fresh or cooked. Perhaps indigenous people in the Tumbler Ridge area also eat the tubers. I haven’t had a chance to ask local people or to investigate the literature.
Dodecatheon frigidum (northern shootingstar) relativly abundant in Graham – Laurier Provincial Park.
Claytonia lanceolata (western spring beauty) south of Tumbler Ridge.
The Royal British Columbia Museum (RBCM), Canada, houses a collection of almost 7 million artifacts, archival records, and natural history specimens. Three comprehensive collection risk assessments over the past decade have resulted in improvements to the physical environments of the collections as well as new policies and procedures to reduce risk. However, there remain ongoing risks that can only be mitigated through major facility renewal. The last collection risk assessment, completed in 2016, was revisited to review the data and build a defensible case for funding to replace the RBCM’s on-site collection storage facilities. Changes to overall collections risk is a complex function of collection development and use trends, evolving risk factors both internal and external to the museum, a growing understanding of the relationship between risks and preservation, in addition to reduction due to risk mitigation projects and building systems aging and wearing out. A defensible method for illustrating the facilities-related risks over time involves estimating the expected loss of individual collection items or loss in value of a group of items that may occur if a major facility upgrade or redevelopment is not realized in the near future. Risk assessment data for representative collection units were reviewed to differentiate risk due to permanent facility characteristics versus more active controls, operations budget controlled risk versus capital budget controlled risk, and collection management-controlled risk versus facility management-controlled risk. This enabled the risk model to isolate risks that could only be mitigated through major facility upgrades. Change in collection value was expressed as Object Equivalents Lost (OEL) and its compliment Object Equivalents Remaining (OER). Projections into the future indicating the effect of varying facility renewal dates could then be clearly shown. Losses, when presented as numbers of items expected to be lost from the collection, become emotionally salient to persons in senior management and governance roles.
Heidi N. Gartner, Cathryn Clarke Murray, Melissa A. Frey, Jocelyn C. Nelson, Kristen J. Larson, Gregory M. Ruiz and Thomas W. Therriault
Abstract
Marine fouling communities on artificial structures are invasion hotspots for non-indigenous species (NIS). Yet, little is known about NIS infouling communities of British Columbia (BC), Canada. To determine NIS identity and richness in BC fouling communities, we deployed settlement plates at 108 sites along the coast of BC between 2006 and 2012. Of the 295 invertebrate taxa identified to species, 20 were NIS while an additional 14 were cryptogenic, including several global invaders. This study documents the range expansion of tunicates Botrylloides violaceus Oka, 1927 and Botryllus schlosseri (Pallas, 1766), including the first known records on Haida Gwaii. NIS were detected within each of the six distinct geographic regions with the southern, more populated regions of BC (Straits of Georgia and Juan De Fuca) having the highest NIS richness and frequency of occurrence compared to the less populated northern regions. This study provides a contemporary baseline of invertebrate NIS identity and richness in fouling communities that will allow comparisons through time and a means to focus research and prioritize management efforts.
Key words: non-native species, introduced species, invasion, Northeast Pacific, West Coast, North America, biofouling
The introduction of potentially invasive species remains a global threat to biodiversity and ecosystem services. The spatial distribution of introduced species can provide insight into present and historical vectors of invasion. Here, we aim to investigate the influence of environmental, demographic and vector variables on the spatial distribution of non-indigenous species (NIS) in coastal marine ecosystems.
Location
Coastal British Columbia, Canada.
Methods
We used subtidal settlement plates to sample NIS richness at 81 sites. Spatial patterns for seventeen environmental, population, and vector variables were created using a Geographic Information System (GIS). We used multiple regression with model selection and spatial autocorrelation to define a statistical model that best explained the spatial distribution of NIS.
Results
Four variables, salinity, human population density, port arrivals and marina propulsiveness (probability of boater travel from home marina), best explained the observed spatial distribution of subtidal NIS. Aquaculture, an original global introduction pathway, did not significantly explain the contemporary distribution of NIS. Results suggest that recreational boating is the most probable pathway of fouling NIS spread in this region, driving their current distribution. Spatial autocorrelation was significant for environmental, demographic, and aquaculture variables. However, marina propulsiveness and attractiveness were not autocorrelated, suggesting that boater behaviour varies on a finer scale.
Main conclusions
A simple model using a combination of vector, demographic, and environmental characteristics can explain 43.6% of the variation in the spatial distribution of NIS. Our study provides further evidence that recreational boating is a significant pathway for the contemporary spread of NIS in marine environments. With projected increases in human population, we expect a continued rise in introduction rates and spread in this region and elsewhere in the world.
Here, we report the first records of the non-native amphipod Caprella mutica along the coast of British Columbia, Canada. Between 2006 and 2009, we surveyed marine fouling communities across 81 subtidal sites, and sampled hulls and sea-chests from 18 domestically operated commercial vessels. Caprella mutica was present at 33% of the sites and on 22% of the vessels, sometimes at remarkably high densities (>10,000 individuals m-2). Our findings confirm an extensive distribution of C. mutica along the coast of the northeast Pacific, and offer additional evidence in support of hull fouling as an important vector for secondary spread. Key words: caprellid, introduced, northeast Pacific, biofouling, sea-chest, vector, museum records
Marine fouling communities on artificial structures are invasion hotspots for non-indigenous species (NIS). Yet, little is known about NIS in fouling communities of British Columbia (BC), Canada. To determine NIS identity and richness in BC fouling communities, we deployed settlement plates at 108 sites along the coast of BC between 2006 and 2012. Of the 295 invertebrate taxa identified to species, 20 were NIS while an additional 14 were cryptogenic, including several global invaders. This study documents the range expansion of tunicates Botrylloides violaceus Oka, 1927 and Botryllus schlosseri (Pallas, 1766), including the first known records on Haida Gwaii. NIS were detected within each of the six distinct geographic regions with the southern, more populated regions of BC (Straits of Georgia and Juan De Fuca) having the highest NIS richness and frequency of occurrence compared to the less populated northern regions. This study provides a contemporary baseline of invertebrate NIS identity and richness in fouling communities that will allow comparisons through time and a means to focus research and prioritize management efforts. Key words: non-native species, introduced species, invasion, Northeast Pacific, West Coast, North America, biofouling
Originally published in What’s inSight Magazine, Winter 2013. Subscribe to What’s inSight by becoming a member here.
Close-up of the damaged and spine of a Dally album, suffering badly from red rot.
Digitization is the big buzz word in archives and museums these days. We can digitize documents, images, sounds, even whole objects and we can share them on the internet, in our galleries, in on-and off-site educational programs and in our reference room. The Royal BC Museum even has a 3D digital printer that uses high-tech laser scans to produce replicas of almost anything.
But is a digital facsimile really an exact replica of the original? Digital copies are created using a finite number of data points. These points represent samples of the surface of the original object. The more data points, the higher the resolution of the digital copy. It is impossible to gather every possible data point, so what you have is actually an approximation of the original, not an exact copy. There are many other reasons why a digital replica is not identical to the original: the colour might be a little different depending upon the calibration of the equipment; the texture can be slightly smoother or rougher, due to the method by which the software fills in missing information; the sound may be a little fuzzier or missing certain registers due to equipment limitations; even whole parts of the original might not be reproduced, by choice or by accident. These copying deficiencies are why it is so important to retain and preserve the original.
This is where the relationship between digitization and conservation comes in. Museums and archives do not seek to replace the original (except in very Conserving Collections in a Digital Age rare circumstances when the original object faces imminent demise), but rather to make copies as accurately as possible, even though they are incomplete.
Preservation copies of original materials may be made to save what is left of a rapidly deteriorating object. An example is magnetic sound recordings, which have a short lifespan. Many videotapes have an expected life of 30 years, less if they have not been stored and used in ideal conditions. Digital copies of videotapes and sound recordings may be the only surviving record in the near future. As you may have read in the previous editions of this magazine, cool storage can prolong the life of magnetic media, but because it cannot be frozen, the deterioration is only delayed, not halted. Adding to this problem is the obsolescence of formats and playback equipment. Who remembers reel-to-reel tape recorders, eight-track music players or vitaphones? Even if the recordings survive, what use will they be if the machines required to play them no longer exist? For these reasons, digitization may represent the only means of saving large segments of our media culture.
Digitally reconstructed animation of a Chinese Freemasons’ lantern as it may once have looked.
The conservator’s role is to facilitate digitization, to help make the collections more accessible. In rare cases an archival record or museum object is not appropriate for digitization. An item may be so large and/or heavy that it cannot be scanned or photographed safely with existing equipment. In the case of books, the text may extend into the gutter of the spine, so that the only way of exposing the information is to remove the binding – something rarely done, especially if it means damaging a historic book. If an item requires significant conservation work, digitization may not proceed until there is sufficient project time and funding to do the work.
Conservation is often the first stop in a digitization project. Before an original record is digitized, a conservator will inspect and assess it to decide if it can go straight to the imaging studio or if it needs some minor repairs or preparation first or requires stabilization treatment before digitization can take place. Simple preparatory work might include surface cleaning to prevent the spread of dirt to other parts of the object during handling or to make details of the surface clearer. Occasionally a complex conservation treatment may be necessary before digitization. Broken bindings should be repaired and leather with red rot requires consolidation. Loose and torn pages must be secured, areas affected by mould should be cleaned and may require repair. Powdery or flaking pigments need consolidation. Rolled documents and textiles may require humidification for flattening before digitization and custom supports are usually a must for three dimensional objects. The conservator may suggest specific support and handling techniques be used during the digitization process. A collection manager or preservation specialist may be required to assist or, in extreme cases, conservators may do all the handling themselves.
Conservation and digitization are related in other ways too. For example, digital facsimiles can be used to analyze and even enhance the original for research and presentation purposes. Conservators have used laser scanning and reflectance transformation imaging to examine and measure minute details of objects, including clues to manufacturing methods and changes due to use and deterioration. As discussed above, 3D printers can also be used to reproduce objects so that they can be shared with more people and in vastly different locations and for different purposes, without compromising the original – an effective preservation strategy.
The Chinese Freemasons’ lantern arrived at the museum and archives in such dilapidated condition that even heroic conservation treatment methods could not restore it to its former glory but could only stabilize what was left. Further restoration would have been based on guesswork, and therefore not appropriate. Fortunately, a digital representation of the lantern as it may have once looked when the moving parts rotated, the coloured lights were illuminated, and the paints and textiles were vibrant, presents the viewer with an amazing likeness of something that no longer exists. Digital imaging has also been used to replicate the unsalvageable decorative plastic film on the lantern, replicating the original pattern on a new, more stable Mylar material. The Chinese Freemasons’ lantern does not sit well on a flat surface, but rather is supported and secured with lead weights. In the future the Royal BC Museum hopes to use laser scanning and printing to build precisely fitting supports to cradle fragile objects on exhibit or to pack them gently inside a shipping crate.
Clearly, conservation and digitization are intrinsically linked in the world of museums and archives. The next challenge facing us is just how we are going to conserve all the digital information we are creating.
Generations of people have grown up at the Royal BC Museum. This includes the babies that come in strollers with their parents, the multitudes of youth that visit with their school groups, college students who find summer employment as camp leaders, tourists, parents and grandparents. Museums attract them all. Museums also attract insects. Vast collections of furs, feathers and textiles – on exhibit and in storage – provide a tempting food source for young larvae.
The adult insects arrive on the clothes of staff and visitors, through cracks in the walls and under door sweeps. Occasionally, these opportunistic interlopers find their way to collections, where they settle down to raise their families. Their needs are basic; a quiet place in the dark that is free of predators, a nice stable climate and an ample source of food. A bear skin rug, woolen uniform, or a cozy moccasin is move-in ready.
After they take possession of their lovely new home, the eggs are laid and not long after, the larvae hatch. The larvae create their very own receiving blanket, a sort of cocoon made of extruded silken material mixed with fibres stolen from the artifact around them. Larvae are hungry little beasts and waste no time beginning to feed … on their own home of all things! This is where the story gets scary. Those furs, feathers and textiles can be digested at lightning speed, leaving nothing behind but frass, or tiny fecal pellets. The damage is done, and often it is devastating.
I arrived at the Royal BC Museum in May, just as Mammoths! Giants of the Ice Age was opening. As I walked among the mammoth ivory, I considered the importance of ivory identification. Elephant ivory is regulated due to the threat of poaching. (For more information, check out the United Nations Convention on International Trade in Endangered Species of Wild Fauna and Flora, also known as CITES). I recalled flow charts, diagnostic tables, and diagrams, but could I identify ivory in practice?
Although most of our work is stabilization, Conservation has a small store of supplies for restoration, including ivory piano key veneers. I compared these with a souvenir piece of mammoth ivory to see if I could differentiate between elephant and mammoth. The mammoth ivory displayed very clear Schreger lines, crisscrossing patterns visible in cross section, which are only present in proboscidean ivory. I thought I would finally be able to use Schreger lines to distinguish between elephant and mammoth. Elephant Schreger lines cross at an angle greater than 115°. Mammoth Schreger lines cross at an angle less than 90°. More information on how to measure Schreger lines can be found in CITES’ Identification Guide for Ivory and Ivory Substitutes found here.
Schreger lines in mammoth ivory
I took five angle measurements from the mammoth ivory and determined a Schreger angle of 92°. This favoured mammoth, as expected, but is technically in a gray zone. Schreger lines are not always conclusive and often not visible on art objects.
There are many ivory substitutes including other animal products and plastics. I found an unidentified piece of “ivory.” It had a different texture and heft and “felt” like plastic to me. I tested my hypothesis using a variety of methods, starting non-destructively.
Ivory has a wide range of fluorescence including bluish white while plastic ivory substitutes fluoresce dull blue. Everything fluoresced bluish, but I couldn’t confidently characterize the colour beyond that. I moved to a static test that I found in Eva Halat’s Contemporary Scrimshaw. I rubbed the ivory samples and unidentified “ivory” with wool and touched them to small polyester fragments. According to Halat, artificial materials retain more static charge than ivory. The unidentified piece picked up and held the fragments … as did the mammoth ivory. Confused, I tried again. Upon closer inspection, I realized the mammoth ivory was coated. The very glossy surface had brush strokes. This may also explain why fluorescence was inconclusive.
I moved to the destructive “hot pin” test in which a red-hot metal pin is held against the sample; this test is NOT for museum objects! The pin produced small dark burn marks on the veneers. In contrast, the pin sank into the mystery sample, melting the surface. This was dramatic confirmation that the sample was plastic.
This testing could not have been performed on museum collections, but it gave me some hands-on experience for the next time I am presented with “ivory.”
Result of the hot pin test on ivory piano key veneers under magnification. The pin created shallow, charred-looking indentations in the surface.
The result of the hot pin test on the mystery sample under magnification. The pin melted a deep recess in the surface with blackened edges.
Lisa Imamura
Conservation Intern
Queen’s University Master of Art Conservation Program 2016